用Ethers.js构建一个简单的DApp


如果你已经在以太坊上开发过DApp,那你在前端JavaScript中可能用过 web3.js。Ethers.js可算是一个轻量级的web3.js,本文将介绍如何使用Ether.js构建一个简单的DApp。
与Web3.js相比,Ethers.js有很多优点,如Ethers.js提供的状态和密钥管理就非常的好用。 Web3的设计场景是DApp应该连接到一个本地节点, 由这个节点负责保存密钥、签名交易并与以太坊区块链交互。现实并不是这样的,绝大多数用户不会在本地运行一个geth节点。Metamask在浏览器应用中有效地模拟了这种节点环境,因此绝大多数web3应用需要使用Metamask 来保存密钥、签名交易并完成与以太坊的交互。 Ethers.js采取了不同的设计思路,它提供给开发者更大的灵活性。Ethers.js 将“节点”拆分为两个不同的角色: * 钱包:负责密钥保存和交易签名 * 提供器:负责以太坊网络的匿名连接、状态检查和交易发送 ## 编译、部署智能合约 本文中我们要与一个ERC20智能合约交互,需要在机器里先安装 nodejs和npm。 ### 创建项目文件夹 首先创建一个文件夹ethers-template,然后在这个文件夹里再创建另一个 contracts文件夹: ``` ~$ mkdir -p ethers-template/contracts ``` ### 初始化npm配置 然后进入ethers-template目录初始化npm配置: ``` ~$ cd ethers-template ~/ethers-template$ npm init -y ``` ### 创建项目配置文件 接下来创建一个config.json文件保存你的项目配置: ``` { "private_key": "24C4FE6063E62710EAD956611B71825B778B041B18ED53118CE5DA5F02E494BA", "network": "kovan", "ERC20": "0x0DEd9F7D82a24099F09AF7831CaB61B31Df10487", "name": "Kanchan Coin", "symbol": "SNK", "total_supply": "1000000000000000000000000", "decimals": 18 } ``` 说明如下: * private_key:账户私钥,将使用这个私钥对应的账户在指定网络上部署智能合约。 * network:要接入的以太坊网络,ethers.js支持以下网络: * homestead:主网 * rinkeby * ropsten * kovan * goerli * ERC20:声明要交互的已部署合约,可选 * name/symbol/decimals:ERC20合约的参数 ### 安装ethers.js 现在可以安装ethers.js了: ``` ~/ethers-template$ npm install --save ethers ``` ### 安装编译合约需要的npm包 为了编译合约,我们还需要安装solc和fs-extra: ``` ~/ethers-template$ npm install fs-extra@8.1.0 solc@0.5.11 --save ``` ### 创建ERC20合约代码 在contracts目录下创建文件erc20.sol: ``` ~/ethers-template$ touch contracts/erc20.sol ``` 并按如下修改: ``` pragma solidity ^0.5.0; contract ERC20 { using SafeMath for uint256; event Approval(address indexed tokenOwner, address indexed spender, uint tokens); event Transfer(address indexed from, address indexed to, uint tokens); mapping(address => uint256) balances; mapping(address => mapping (address => uint256)) allowed; string public symbol; uint8 public decimals; string public name; uint256 private _totalSupply; constructor(uint8 _decimals, string memory _symbol, string memory _name, uint256 _total_supply) public{ decimals = _decimals; symbol = _symbol; name = _name; _totalSupply = _total_supply; balances[msg.sender] = _totalSupply; } function totalSupply() public view returns (uint256) { return _totalSupply; } function balanceOf(address tokenOwner) public view returns (uint) { return balances[tokenOwner]; } function transfer(address receiver, uint numTokens) public returns (bool) { require(numTokens <= balances[msg.sender]); balances[msg.sender] = balances[msg.sender].sub(numTokens); balances[receiver] = balances[receiver].add(numTokens); emit Transfer(msg.sender, receiver, numTokens); return true; } function approve(address delegate, uint numTokens) public returns (bool) { allowed[msg.sender][delegate] = numTokens; emit Approval(msg.sender, delegate, numTokens); return true; } function allowance(address owner, address delegate) public view returns (uint) { return allowed[owner][delegate]; } function transferFrom(address owner, address buyer, uint numTokens) public returns (bool) { require(numTokens <= balances[owner]); require(numTokens <= allowed[owner][msg.sender]); balances[owner] = balances[owner].sub(numTokens); allowed[owner][msg.sender] = allowed[owner][msg.sender].sub(numTokens); balances[buyer] = balances[buyer].add(numTokens); emit Transfer(owner, buyer, numTokens); return true; } } library SafeMath { function sub(uint256 a, uint256 b) internal pure returns (uint256) { assert(b <= a); return a - b; } function add(uint256 a, uint256 b) internal pure returns (uint256) { uint256 c = a + b; assert(c >= a); return c; } } ``` ### 编写合约编译脚本 下面的代码使用solc编译合约文件,将其保存为compile.js: ``` const path = require('path'); const fs = require('fs-extra'); const solc = require('solc'); const config = require('./config.json'); const sourceFolderPath = path.resolve(__dirname, 'contracts'); const buildFolderPath = path.resolve(__dirname, 'build'); const getContractSource = contractFileName => { const contractPath = path.resolve(__dirname, 'contracts', contractFileName); const source = fs.readFileSync(contractPath, 'utf8'); return source; }; let sources = {}; fs.readdirSync(sourceFolderPath).forEach(contractFileName => { sources = { ...sources, [contractFileName]: { content: getContractSource(contractFileName) } } }); const input = { language: 'Solidity', sources, settings: { outputSelection: { '*': { '*': [ '*' ] } } } } console.log('\nCompiling contracts...'); const output = JSON.parse(solc.compile(JSON.stringify(input))); console.log('Done'); let shouldBuild = true; if (output.errors) { console.error(output.errors); // throw '\nError in compilation please check the contract\n'; for(error of output.errors) { if(error.severity === 'error') { shouldBuild = false; throw 'Error found'; break; } } } if(shouldBuild) { console.log('\nBuilding please wait...'); fs.removeSync(buildFolderPath); fs.ensureDirSync(buildFolderPath); for (let contractFile in output.contracts) { for(let key in output.contracts[contractFile]) { fs.outputJsonSync( path.resolve(buildFolderPath, `${key}.json`), { abi: output.contracts[contractFile][key]["abi"], bytecode: output.contracts[contractFile][key]["evm"]["bytecode"]["object"] }, { spaces:2, EOL: "\n" } ); } } console.log('Build finished successfully!\n'); } else { console.log('\nBuild failed\n'); } ``` 上面的代码将读入并编译contracts目录中的所有合约文件, 然后将编译得到的abi和字节码保存为json文件。 ### 编译合约 现在使用compile.js来编译erc20.sol合约: ``` ~/ethers-template$ node compile.js ``` 编译结束后,我们得到如下的目录结构; ``` +ethers-template +compile.js +contracts -erc20.sol +build -ERC.json -Context.json -IERC20.sjon -SafeMath.json -package.json ``` ### 编写合约部署脚本 创建文件deploy.js: ``` ~/ethers-template$ touch deploy.js ``` 然后按如下修改: ``` const startTimestamp = Date.now(); const ethers = require('ethers'); const config = require('./config.json'); const fs = require('fs-extra'); const provider = ethers.getDefaultProvider(config["network"]); const wallet = new ethers.Wallet(config["private_key"], provider); console.log(`Loaded wallet ${wallet.address}`); let compiled = require(`./build/${process.argv[2]}.json`); (async() => { console.log(`\nDeploying ${process.argv[2]} in ${config["network"]}...`); let contract = new ethers.ContractFactory( compiled.abi, compiled.bytecode, wallet ); let instance = await contract.deploy(config["decimals"], config["symbol"], config["name"], config["total_supply"]); console.log(`deployed at ${instance.address}`) config[`${process.argv[2]}`] = instance.address console.log("Waiting for the contract to get mined...") await instance.deployed() console.log("Contract deployed") fs.outputJsonSync( 'config.json', config, { spaces:2, EOL: "\n" } ); })(); ``` **注意:** * 上面代码中的默认网络是kovan测试网 * 在这个测试网中,你的账号需要一些以太币来支付部署交易的手续费 * 将使用config.json中的private_key来部署合约 ### 部署合约 运行deploy.js脚本时,需要在命令行传入要部署的合约名称ERC20: ``` ~/ethers-template$ node deploy.js ERC20 ``` 输出结果: ``` Loaded wallet 0xC8e1F3B9a0CdFceF9fFd2343B943989A22517b26 Deploying ERC20 in kovan... deployed at 0x77Bb3546f5ee356E4026BaA96b7DDf22141bd77B Waiting for the contract to get mined... Contract deployed ``` 在与合约交互时需要合约部署地址,上面的代码会自动将合约部署 地址保存到config.json文件中。 ## 与智能合约交互 在本文中,我们使用ES6来编写合约交互代码,然后使用webpack 和babel将ES6代码转换为ES5代码。 ### 安装ES6构建工具 首先安装这些依赖项: ``` ~/ethers-template$ npm i webpack webpack-cli @babel/core \ @babel/plugin-proposal-object-rest-spread \ @babel/preset-env babel-loader \ babel-polyfill -D ``` ### 编写前端脚本 创建一个文件app.js: ``` ~/ethers-template$ touch app.js ``` 然后按照如下修改: ``` const ethers = require('ethers'); const config = require('./config.json'); // Import the json file from build to get the abi const erc_json = require('./build/ERC20.json'); //import the json of the contract which you want to interact // You can use any standard network name // - "homestead" // - "rinkeby" // - "ropsten" // - "kovan" // - "goerli" const provider = ethers.getDefaultProvider(config['network']); // Make a wallet instance using private key and provider const wallet = new ethers.Wallet(config['private_key'] , provider); const address = config["ERC20"]; const abi = erc_json.abi; erc20 = new ethers.Contract( address , abi , wallet ); document.getElementById("send").onsubmit = async function(e) { e.preventDefault(); let address = document.getElementById("address").value; document.getElementById("status").innerText = "Waiting for transaction to get published..."; let tx = await erc20.functions.transfer(address, "1000000000000000000"); let tx_hash = tx.hash; let node = document.createElement("LI"); let link = document.createElement("A"); link.target = "_blank"; link.href = `https://${config["network"]}.etherscan.io/tx/` + tx_hash; let textnode = document.createTextNode(tx_hash); link.appendChild(textnode); node.appendChild(link); document.getElementById("transactions").appendChild(node); document.getElementById("status").innerText = "Waiting for transaction to be mined..."; await tx.wait(); document.getElementById("status").innerText = "Transaction confirmed"; return false; }; ``` 首先需要指定要使用的网络/提供器: ``` const provider = ethers.getDefaultProvider(config['network']); ``` 为了与合约交互,需要2个东西: * 合约部署地址 * 合约ABI接口 在上面app.js中,我们从配置文件引入了合约地址,从合约编译结果目录中 引入了合约ABI: ``` //import the json of the contract which you want to interact const erc_json = require('./build/ERC20.json'); const config = require('./config.json'); const address = config["ERC20"]; const abi = erc_json.abi; ``` ### 创建钱包实例 为了创建合约实例,我们需要先创建一个钱包实例,这样不管什么时候调用 setter方法,都需要一个私钥来签名交易。在ethers.js中,你只需要 创建钱包,所有的setter方法就会由这个钱包签名。 ``` const wallet = new ethers.Wallet(config['private_key'] , provider); ``` 你也可以使用keystore和助记词来创建一个钱包。如果你希望用这个钱包与 智能合约交互,你还需要传入提供器。如果你只是想用私钥签名消息,那么 就不需要提供器了。 ``` erc20 = new ethers.Contract( address , abi , wallet ); ``` 上面的代码创建了一个合约实例,然后你就可以像这样调用合约函数: ``` erc20.functions.function_name_in_smart_contract(parameters); ``` > 备注:在ERC20中定义了一个函数transfer,它的参数是转账地址和代币数量。 下面的代码调用了合约的transfer函数,钱包将签名这个交易,然后发布到指定 的网络中: ``` erc20.functions.transfer(address, "1000000000000000000"); ``` **注意:无论任何时候你要创建一个交易,钱包里都需要以太币来支付交易手续费。** ### 修改启动脚本 在package.json中添加: ``` "deploy": "node compile.js && node deploy.js ERC20", "build": "webpack — mode production', ``` 修改后的package.json如下: ``` { "name": "ethers-template", "version": "1.0.0", "description": "", "main": "webpack.config.js", "scripts": { "deploy": "node compile.js && node deploy.js ERC20", "build": "webpack --mode production", "test": "echo \"Error: no test specified\" && exit 1" }, "keywords": [], "author": "", "license": "ISC", "dependencies": { "ethers": "^4.0.37", "fs-extra": "^8.1.0", "solc": "^0.5.11" }, "devDependencies": { "@babel/core": "^7.6.0", "@babel/plugin-proposal-object-rest-spread": "^7.5.5", "@babel/preset-env": "^7.6.0", "babel-loader": "^8.0.6", "babel-polyfill": "^6.26.0", "webpack": "^4.40.2", "webpack-cli": "^3.3.9", "webpack-dev-server": "^3.8.1" } } ``` 如果你后续修改了智能合约,就需要重新编译和部署。可以用一个命令来完成合约的编译和部署: ``` ~/ethers-template$ npm run deploy ``` 这个命令会自动修改配置文件和合约构件文件。这样在与合约交互时,你就不需要修改合约地址或者ABI接口了。 如果你修改了app.js,也需要重新构建前端代码: ``` ~/ethers-template$ npm run build ``` 这会生成新的发布版本:`dist/bundle.js`。 ### 创建宿主html文件 创建一个新的文件index.html: ``` ~/ethers-template$ touch index.html ``` 按如下修改: ``` <!doctype html> <html lang="en"> <head> <meta charset="utf-8"/> <title>Ethers Template</title> <style> body { padding-top: 75px; } .search-container { width: 490px; display: block; margin: 0 auto; } input#address { margin: 0 auto; width: 100%; height: 45px; padding: 0 20px; font-size: 1rem; border: 1px solid #D0CFCE; outline: none; } .center { text-align: center; } ol { counter-reset: list; list-style: none; } li { counter-increment: list; margin-bottom: 10px; } li::before { content: counter(list, decimal-leading-zero); background: #2b4353; font-family: Arial, sans-serif; color: #fff; font-size: 13px; text-align: center; border-radius: 50%; width: 2.2em; height: 2.2em; line-height: 2.3em; display: inline-block; margin-right: 1em; } .button { background-color: #4CAF50; border: none; color: white; padding: 15px 32px; text-align: center; text-decoration: none; display: inline-block; font-size: 16px; margin: 19px; cursor: pointer; } </style> </head> <body> <div class="center"> <h1>Ethers Template</h1> <form class="search-container" id="send"> <input type="text" id="address" placeholder="Enter you address to get kanchan Coin"> <button type="submit" class="button">Send</button> </form> <h2>Status:</h2> <p id="status"></p> <h2>Transactions</h2> <ol id="transactions"> </ol> </div> <script src="dist/bundle.js"></script> </body> </html> ``` 现在你的文件夹看起来就是这样了: 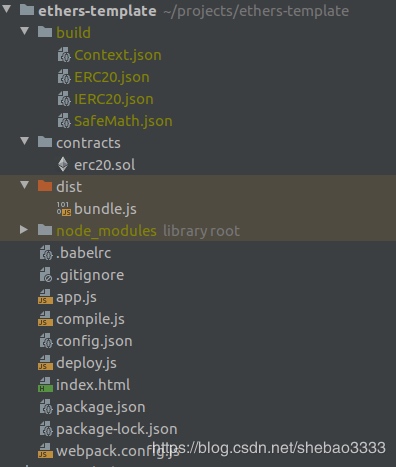 其中build文件夹将在运行compile.js之后自动创建,而dist 文件夹是在`npm run build`执行后自动创建。 用浏览器访问看起来是这样: 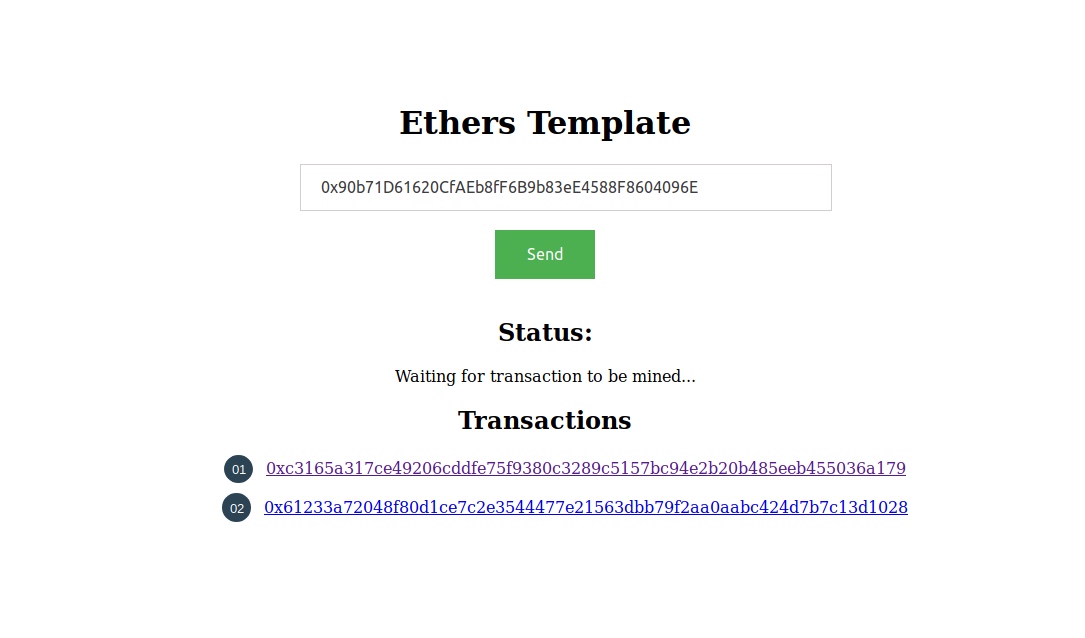 原文链接:[Compiling, Deploying and Interacting with Smart Contract using JavaScript](https://medium.com/coinmonks/compiling-deploying-and-interacting-with-smart-contract-using-javascript-641cf0342824)
与Web3.js相比,Ethers.js有很多优点,如Ethers.js提供的状态和密钥管理就非常的好用。
Web3的设计场景是DApp应该连接到一个本地节点, 由这个节点负责保存密钥、签名交易并与以太坊区块链交互。现实并不是这样的,绝大多数用户不会在本地运行一个geth节点。Metamask在浏览器应用中有效地模拟了这种节点环境,因此绝大多数web3应用需要使用Metamask 来保存密钥、签名交易并完成与以太坊的交互。
Ethers.js采取了不同的设计思路,它提供给开发者更大的灵活性。Ethers.js 将“节点”拆分为两个不同的角色:
- 钱包:负责密钥保存和交易签名
- 提供器:负责以太坊网络的匿名连接、状态检查和交易发送
编译、部署智能合约
本文中我们要与一个ERC20智能合约交互,需要在机器里先安装 nodejs和npm。
创建项目文件夹
首先创建一个文件夹ethers-template,然后在这个文件夹里再创建另一个 contracts文件夹:
~$ mkdir -p ethers-template/contracts初始化npm配置
然后进入ethers-template目录初始化npm配置:
~$ cd ethers-template
~/ethers-template$ npm init -y
创建项目配置文件
接下来创建一个config.json文件保存你的项目配置:
{
  "private_key": "24C4FE6063E62710EAD956611B71825B778B041B18ED53118CE5DA5F02E494BA",
  "network": "kovan",
  "ERC20": "0x0DEd9F7D82a24099F09AF7831CaB61B31Df10487",
  "name": "Kanchan Coin",
  "symbol": "SNK",
  "total_supply": "1000000000000000000000000",
  "decimals": 18
}
说明如下:
- private_key:账户私钥,将使用这个私钥对应的账户在指定网络上部署智能合约。
- network:要接入的以太坊网络,ethers.js支持以下网络:
- homestead:主网
- rinkeby
- ropsten
- kovan
- goerli
- ERC20:声明要交互的已部署合约,可选
- name/symbol/decimals:ERC20合约的参数
安装ethers.js
现在可以安装ethers.js了:
~/ethers-template$ npm install --save ethers安装编译合约需要的npm包
为了编译合约,我们还需要安装solc和fs-extra:
~/ethers-template$ npm install fs-extra@8.1.0 solc@0.5.11 --save创建ERC20合约代码
在contracts目录下创建文件erc20.sol:
~/ethers-template$ touch contracts/erc20.sol并按如下修改:
pragma solidity ^0.5.0;

contract ERC20 {

    using SafeMath for uint256;
    event Approval(address indexed tokenOwner, address indexed spender, uint tokens);
    event Transfer(address indexed from, address indexed to, uint tokens);
    mapping(address => uint256) balances;
    mapping(address => mapping (address => uint256)) allowed;
    string public symbol;
    uint8 public decimals;
    string public  name;
    uint256 private _totalSupply;

    constructor(uint8 _decimals, string memory _symbol, string memory _name, uint256 _total_supply) public{
        decimals = _decimals;
        symbol = _symbol;
        name = _name;
        _totalSupply = _total_supply;
        balances[msg.sender] = _totalSupply;
    }

    function totalSupply() public view returns (uint256) {
        return _totalSupply;
    }

    function balanceOf(address tokenOwner) public view returns (uint) {
        return balances[tokenOwner];
    }

    function transfer(address receiver, uint numTokens) public returns (bool) {
        require(numTokens <= balances[msg.sender]);
        balances[msg.sender] = balances[msg.sender].sub(numTokens);
        balances[receiver] = balances[receiver].add(numTokens);
        emit Transfer(msg.sender, receiver, numTokens);
        return true;
    }

    function approve(address delegate, uint numTokens) public returns (bool) {
        allowed[msg.sender][delegate] = numTokens;
        emit Approval(msg.sender, delegate, numTokens);
        return true;
    }

    function allowance(address owner, address delegate) public view returns (uint) {
        return allowed[owner][delegate];
    }

    function transferFrom(address owner, address buyer, uint numTokens) public returns (bool) {
        require(numTokens <= balances[owner]);
        require(numTokens <= allowed[owner][msg.sender]);

        balances[owner] = balances[owner].sub(numTokens);
        allowed[owner][msg.sender] = allowed[owner][msg.sender].sub(numTokens);
        balances[buyer] = balances[buyer].add(numTokens);
        emit Transfer(owner, buyer, numTokens);
        return true;
    }
}

library SafeMath {
    function sub(uint256 a, uint256 b) internal pure returns (uint256) {
      assert(b <= a);
      return a - b;
    }

    function add(uint256 a, uint256 b) internal pure returns (uint256) {
      uint256 c = a + b;
      assert(c >= a);
      return c;
    }
}
编写合约编译脚本
下面的代码使用solc编译合约文件,将其保存为compile.js:
const path = require('path');
const fs = require('fs-extra');
const solc = require('solc');
const config = require('./config.json');

const sourceFolderPath = path.resolve(__dirname, 'contracts');
const buildFolderPath = path.resolve(__dirname, 'build');

const getContractSource = contractFileName => {
  const contractPath = path.resolve(__dirname, 'contracts', contractFileName);
  const source = fs.readFileSync(contractPath, 'utf8');
  return source;
};

let sources = {};

fs.readdirSync(sourceFolderPath).forEach(contractFileName => {
  sources = {
    ...sources,
    [contractFileName]: {
      content: getContractSource(contractFileName)
    }
  }
});

const input = {
    language: 'Solidity',
    sources,
    settings: {
        outputSelection: {
            '*': {
                '*': [ '*' ]
            }
        }
    }
}

console.log('\nCompiling contracts...');
const output = JSON.parse(solc.compile(JSON.stringify(input)));
console.log('Done');

let shouldBuild = true;

if (output.errors) {
  console.error(output.errors);
  // throw '\nError in compilation please check the contract\n';
  for(error of output.errors) {
    if(error.severity === 'error') {
      shouldBuild = false;
      throw 'Error found';
      break;
    }
  }
}

if(shouldBuild) {
  console.log('\nBuilding please wait...');

  fs.removeSync(buildFolderPath);
  fs.ensureDirSync(buildFolderPath);

  for (let contractFile in output.contracts) {
    for(let key in output.contracts[contractFile]) {
      fs.outputJsonSync(
        path.resolve(buildFolderPath, `${key}.json`),
        {
          abi: output.contracts[contractFile][key]["abi"],
          bytecode: output.contracts[contractFile][key]["evm"]["bytecode"]["object"]
        },
        {
          spaces:2,
          EOL: "\n"
        }
      );
    }
  }
  console.log('Build finished successfully!\n');
} else {
  console.log('\nBuild failed\n');
}
上面的代码将读入并编译contracts目录中的所有合约文件, 然后将编译得到的abi和字节码保存为json文件。
编译合约
现在使用compile.js来编译erc20.sol合约:
~/ethers-template$ node compile.js编译结束后,我们得到如下的目录结构;
+ethers-template
    +compile.js
    +contracts
        -erc20.sol
    +build
        -ERC.json
        -Context.json
        -IERC20.sjon
        -SafeMath.json
   -package.json
编写合约部署脚本
创建文件deploy.js:
~/ethers-template$ touch deploy.js然后按如下修改:
const startTimestamp = Date.now();
const ethers = require('ethers');
const config = require('./config.json');
const fs = require('fs-extra');

const provider = ethers.getDefaultProvider(config["network"]);

const wallet = new ethers.Wallet(config["private_key"], provider);
console.log(`Loaded wallet ${wallet.address}`);

let compiled = require(`./build/${process.argv[2]}.json`);

(async() => {
  console.log(`\nDeploying ${process.argv[2]} in ${config["network"]}...`);
  let contract = new ethers.ContractFactory(
    compiled.abi,
    compiled.bytecode,
    wallet
  );

  let instance =  await contract.deploy(config["decimals"], config["symbol"], config["name"], config["total_supply"]);
  console.log(`deployed at ${instance.address}`)
  config[`${process.argv[2]}`] = instance.address
  console.log("Waiting for the contract to get mined...")
  await instance.deployed()
  console.log("Contract deployed")
  fs.outputJsonSync(
    'config.json',
    config,
    {
      spaces:2,
      EOL: "\n"
    }
  );

})();
注意:
- 上面代码中的默认网络是kovan测试网
- 在这个测试网中,你的账号需要一些以太币来支付部署交易的手续费
- 将使用config.json中的private_key来部署合约
部署合约
运行deploy.js脚本时,需要在命令行传入要部署的合约名称ERC20:
~/ethers-template$ node deploy.js ERC20输出结果:
Loaded wallet 0xC8e1F3B9a0CdFceF9fFd2343B943989A22517b26
Deploying ERC20 in kovan...
deployed at 0x77Bb3546f5ee356E4026BaA96b7DDf22141bd77B
Waiting for the contract to get mined...
Contract deployed
在与合约交互时需要合约部署地址,上面的代码会自动将合约部署 地址保存到config.json文件中。
与智能合约交互
在本文中,我们使用ES6来编写合约交互代码,然后使用webpack 和babel将ES6代码转换为ES5代码。
安装ES6构建工具
首先安装这些依赖项:
~/ethers-template$ npm i webpack webpack-cli @babel/core \
                          @babel/plugin-proposal-object-rest-spread \
                          @babel/preset-env babel-loader \
                          babel-polyfill -D
编写前端脚本
创建一个文件app.js:
~/ethers-template$ touch app.js然后按照如下修改:
const ethers = require('ethers');
const config = require('./config.json');

// Import the json file from build to get the abi
const erc_json = require('./build/ERC20.json'); //import the json of the contract which you want to interact

// You can use any standard network name
//  - "homestead"
//  - "rinkeby"
//  - "ropsten"
//  - "kovan"
//  - "goerli"
const provider = ethers.getDefaultProvider(config['network']);

// Make a wallet instance using private key and provider
const wallet = new ethers.Wallet(config['private_key'] , provider);

const address = config["ERC20"];
const abi = erc_json.abi;

erc20 = new ethers.Contract( address , abi , wallet );

document.getElementById("send").onsubmit = async function(e) {
    e.preventDefault();
    let address = document.getElementById("address").value;
    document.getElementById("status").innerText = "Waiting for transaction to get published...";
    let tx = await erc20.functions.transfer(address, "1000000000000000000");
    let tx_hash = tx.hash;
    let node = document.createElement("LI");
    let link = document.createElement("A");
    link.target = "_blank";
    link.href = `https://${config["network"]}.etherscan.io/tx/` + tx_hash;
    let textnode = document.createTextNode(tx_hash);
    link.appendChild(textnode);
    node.appendChild(link);
    document.getElementById("transactions").appendChild(node);
    document.getElementById("status").innerText = "Waiting for transaction to be mined...";
    await tx.wait();
    document.getElementById("status").innerText = "Transaction confirmed";
    return false;
};
首先需要指定要使用的网络/提供器:
const provider = ethers.getDefaultProvider(config['network']);为了与合约交互,需要2个东西:
- 合约部署地址
- 合约ABI接口
在上面app.js中,我们从配置文件引入了合约地址,从合约编译结果目录中 引入了合约ABI:
//import the json of the contract which you want to interact
const erc_json = require('./build/ERC20.json');
const config = require('./config.json');
const address = config["ERC20"];
const abi = erc_json.abi;
创建钱包实例
为了创建合约实例,我们需要先创建一个钱包实例,这样不管什么时候调用 setter方法,都需要一个私钥来签名交易。在ethers.js中,你只需要 创建钱包,所有的setter方法就会由这个钱包签名。
const wallet = new ethers.Wallet(config['private_key'] , provider);你也可以使用keystore和助记词来创建一个钱包。如果你希望用这个钱包与 智能合约交互,你还需要传入提供器。如果你只是想用私钥签名消息,那么 就不需要提供器了。
erc20 = new ethers.Contract( address , abi , wallet );上面的代码创建了一个合约实例,然后你就可以像这样调用合约函数:
erc20.functions.function_name_in_smart_contract(parameters);备注:在ERC20中定义了一个函数transfer,它的参数是转账地址和代币数量。 下面的代码调用了合约的transfer函数,钱包将签名这个交易,然后发布到指定 的网络中:
erc20.functions.transfer(address, "1000000000000000000");
注意:无论任何时候你要创建一个交易,钱包里都需要以太币来支付交易手续费。
修改启动脚本
在package.json中添加:
"deploy": "node compile.js && node deploy.js ERC20",
"build": "webpack — mode production',
修改后的package.json如下:
{
  "name": "ethers-template",
  "version": "1.0.0",
  "description": "",
  "main": "webpack.config.js",
  "scripts": {
    "deploy": "node compile.js && node deploy.js ERC20",
    "build": "webpack --mode production",
    "test": "echo \"Error: no test specified\" && exit 1"
  },
  "keywords": [],
  "author": "",
  "license": "ISC",
  "dependencies": {
    "ethers": "^4.0.37",
    "fs-extra": "^8.1.0",
    "solc": "^0.5.11"
  },
  "devDependencies": {
    "@babel/core": "^7.6.0",
    "@babel/plugin-proposal-object-rest-spread": "^7.5.5",
    "@babel/preset-env": "^7.6.0",
    "babel-loader": "^8.0.6",
    "babel-polyfill": "^6.26.0",
    "webpack": "^4.40.2",
    "webpack-cli": "^3.3.9",
    "webpack-dev-server": "^3.8.1"
  }
}
如果你后续修改了智能合约,就需要重新编译和部署。可以用一个命令来完成合约的编译和部署:
~/ethers-template$ npm run deploy这个命令会自动修改配置文件和合约构件文件。这样在与合约交互时,你就不需要修改合约地址或者ABI接口了。
如果你修改了app.js,也需要重新构建前端代码:
~/ethers-template$ npm run build这会生成新的发布版本:dist/bundle.js。
创建宿主html文件
创建一个新的文件index.html:
~/ethers-template$ touch index.html按如下修改:
<!doctype html>
<html lang="en">
    <head>
        <meta charset="utf-8"/>
        <title>Ethers Template</title>
        <style>
body {
    padding-top: 75px;
}
        .search-container {
            width: 490px;
            display: block;
            margin: 0 auto;
        }
        input#address {
            margin: 0 auto;
            width: 100%;
            height: 45px;
            padding: 0 20px;
            font-size: 1rem;
            border: 1px solid #D0CFCE;
            outline: none;
        }
        .center {
            text-align: center;
        }
        ol {
            counter-reset: list;
            list-style: none;
        }
        li {
            counter-increment: list;
            margin-bottom: 10px;
        }
        li::before {
            content: counter(list, decimal-leading-zero);
            background: #2b4353;
            font-family: Arial, sans-serif;
            color: #fff;
            font-size: 13px;
            text-align: center;
            border-radius: 50%;
            width: 2.2em;
            height: 2.2em;
            line-height: 2.3em;
            display: inline-block;
            margin-right: 1em;
        }
        .button {
            background-color: #4CAF50;
            border: none;
            color: white;
            padding: 15px 32px;
            text-align: center;
            text-decoration: none;
            display: inline-block;
            font-size: 16px;
            margin: 19px;
            cursor: pointer;
        }
        </style>
    </head>

    <body>
        <div class="center">
            <h1>Ethers Template</h1>
            <form class="search-container" id="send">
                <input type="text" id="address" placeholder="Enter you address to get kanchan Coin">
                <button type="submit" class="button">Send</button>
            </form>
            <h2>Status:</h2>
            <p id="status"></p>
            <h2>Transactions</h2>
            <ol id="transactions">
            </ol>
        </div>
        <script src="dist/bundle.js"></script>
    </body>
</html>
现在你的文件夹看起来就是这样了:
其中build文件夹将在运行compile.js之后自动创建,而dist 文件夹是在npm run build执行后自动创建。
用浏览器访问看起来是这样:
原文链接:Compiling, Deploying and Interacting with Smart Contract using JavaScript
区块链技术网。
- 发表于 2020-01-08 15:23
- 阅读 ( 1980 )
- 学分 ( 50 )
- 分类:DApp


评论