用Substrate框架实现一个简单的游戏应用


Substrate是开发应用特定区块链 (Application Specific Blockchain )的快速开发框架。 与基于以太坊等公链开发的DApp相比,应用特定区块链是围绕单一应用特别构建的专用区块链, 因此具有最大的灵活性和最少的限制。本文将详细介绍如何使用Substrate框架快速实现一个简单的游戏应用专用区块链
## 前序环节 在开始之前,首先在计算机中安装以下软件: * [node和npm](https://www.npmjs.com/get-npm) * [substrate](https://substrate.dev/docs/en/getting-started/installing-substrate) 接下来还需要克隆这两个软件仓库并进行相应的配置: * [Substrate Node Template](https://substrate.dev/docs/en/getting-started/installing-substrate) * [Substrate UI](https://github.com/paritytech/substrate-ui) ## STEP 1:启动区块链 如果安装没有问题,现在可以启动一个substrate开发链了!在 `substrate-node-template`目录运行生成的可执行文件: ``` ./target/release/substrate-node-template --dev ``` 如果在启动节点时碰到任何错误,你可能需要使用下面命令清理区块链数据文件: ``` ./target/release/substrate-node-template purge-chain --dev ``` 一切正常的话,就可以看到它出块了! 要和区块链交互,你需要启动Substrate UI。进入substrate-ui目录然后运行: ``` yarn run dev ``` 最后,在浏览器中访问http://localhost:8000 ,应该就可以访问你的区块链了! ## STEP 2:将Alice加入网络 Alice是硬编码在你的区块链创世块配置中的账户,这个账户是预充值的而且 是负责区块链升级的超级用户。 要访问Alice账户,在Substrate UI中进入Wallet,然后在Seed输入栏填写:`//Alice`: 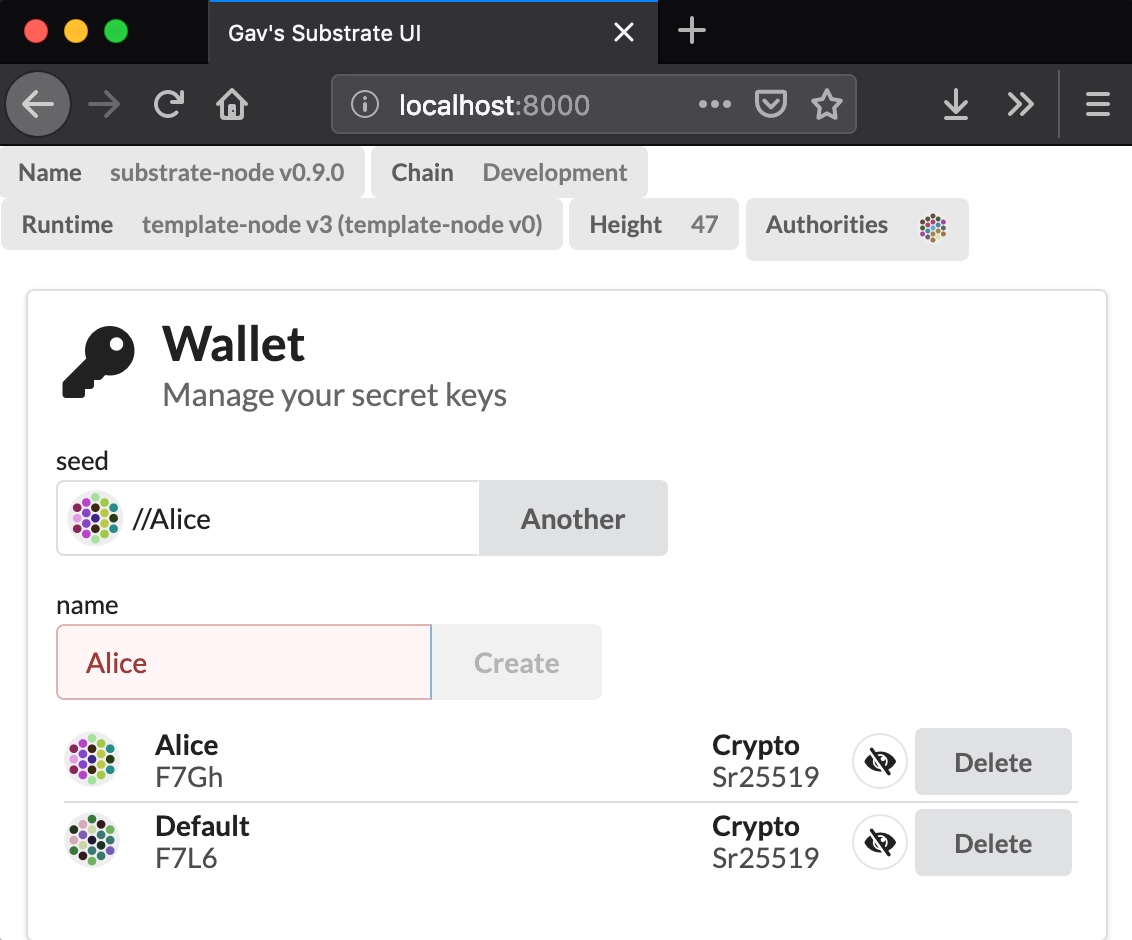 如果一切正常的话,你现在可以进入Send Funds功能区,从Alice向Default账户转账。 可以看到Alice账户已经预充值,因此向Default账户转5000,然后等待绿色对号出现 并显示转账后Default的余额: 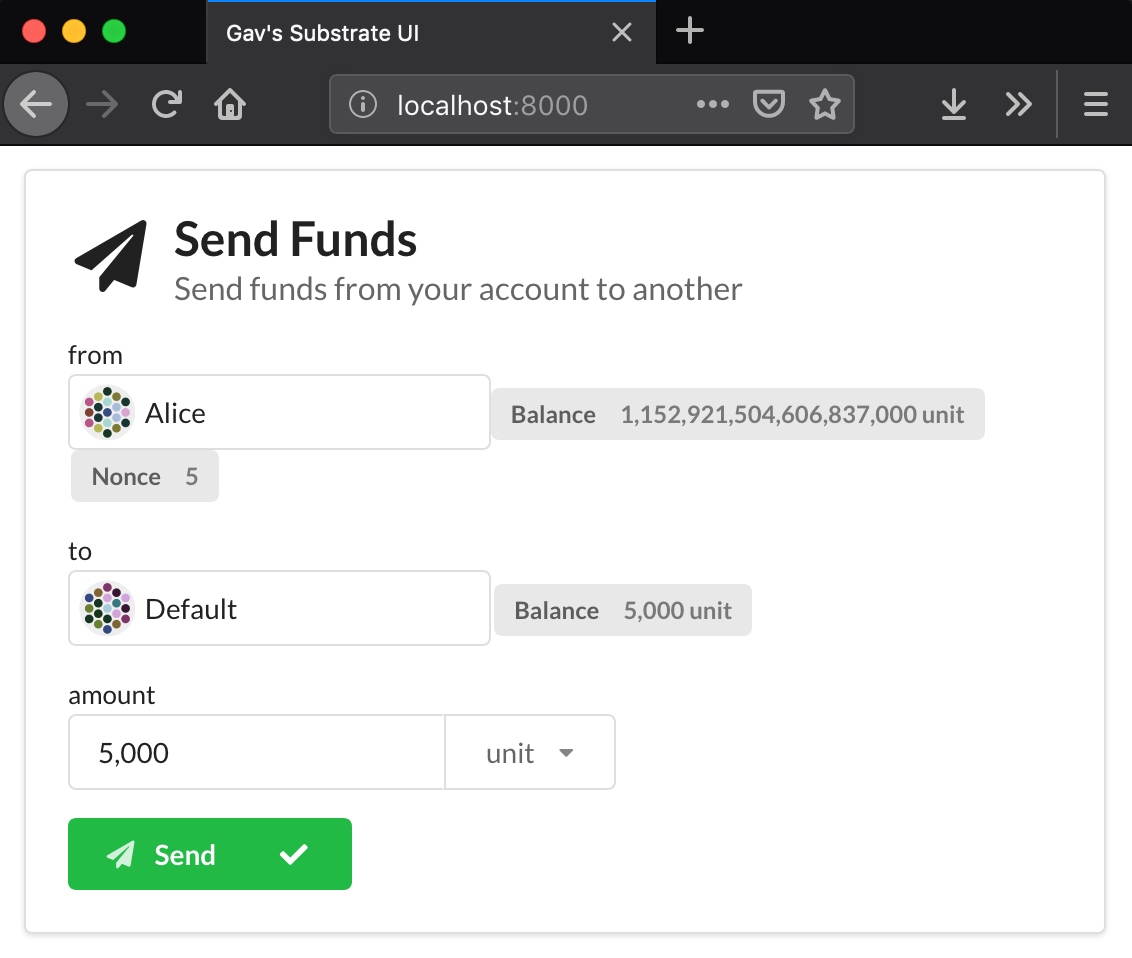 ## STEP 3:创建一个新的运行时模块 现在是时间创建我们自己的运行时(Runtime)模块了。 打开substrate-node-template文件夹,创建一个新文件: ``` ./runtime/src/demo.rs ``` 首先需要在文件开头引入一些库: ``` // Encoding library use parity_codec::Encode; // Enables access to store a value in runtime storage // Imports the `Result` type that is returned from runtime functions // Imports the `decl_module!` and `decl_storage!` macros use support::{StorageValue, dispatch::Result, decl_module, decl_storage}; // Traits used for interacting with Substrate's Balances module // `Currency` gives you access to interact with the on-chain currency // `WithdrawReason` and `ExistenceRequirement` are enums for balance functions use support::traits::{Currency, WithdrawReason, ExistenceRequirement}; // These are traits which define behavior around math and hashing use runtime_primitives::traits::{Zero, Hash, Saturating}; // Enables us to verify an call to our module is signed by a user account use system::ensure_signed; ``` 所有的模块都需要声明一个名为Trait的trait,它用来定义模块需要的独有的类型。在这个教程中,我们的运行时模块没有自己的特殊类型,但是 会继承在balances模块中定义的类型(例如Balance): ``` pub trait Trait: balances::Trait {} ``` 在这个例子中,我们将创建一个简单的抛硬币游戏。用户需要支付入门费才可以玩游戏,也就是掷一次硬币,如果赢了就可以得到罐子中的东西。无论结果如何,用户的进门费都会在开出结果后再放到罐子里,供后续用户赢取。 我们可以使用宏`decl_storage`来定义模块需要跟踪的存储条目: ``` decl_storage! { trait Store for Module<T: Trait> as Demo { Payment get(payment): Option<T::Balance>; Pot get(pot): T::Balance; Nonce get(nonce): u64; } } ``` Rust中的宏用来生成其他代码,属于一种元编程。这里我们引入了一个宏以及自定义的语法以便简化存储的定义并使其易懂。这个宏负责生成所有 与Substrate存储数据库交互的实际代码。 你可以看到在我们的存储中,有三个条目,其中两个负责跟踪Balance, 另一个跟踪Nonce。Payment的声明为可选值,因此无论是否初始化过它的值 都不会有问题。 接下来我们将需要定义分发函数:那些供用户调用我们的区块链系统的函数。 这个游戏有两个用户可以交互的函数:一个允许我们支付进门费,另一个 让我们开始玩游戏: ``` decl_module! { pub struct Module<T: Trait> for enum Call where origin: T::Origin { fn set_payment(_origin, value: T::Balance) -> Result { // Logic for setting the game payment } play(origin) -> Result { // Logic for playing the game } } } ``` 现在我们已经搭建好模块的结构,可以添加这些函数的实现逻辑了。首先我们 添加初始化存储条目的逻辑: ``` // This function initializes the `payment` storage item // It also populates the pot with an initial value fn set_payment(origin, value: T::Balance) -> Result { // Ensure that the function call is a signed message (i.e. a transaction) let _ = ensure_signed(origin)?; // If `payment` is not initialized with some value if Self::payment().is_none() { // Set the value of `payment` <Payment<T>>::put(value); // Initialize the `pot` with the same value <Pot<T>>::put(value); } // Return Ok(()) when everything happens successfully Ok(()) } ``` 然后我们将编写`play()`函数的实现代码: ``` // This function is allows a user to play our coin-flip game fn play(origin) -> Result { // Ensure that the function call is a signed message (i.e. a transaction) // Additionally, derive the sender address from the signed message let sender = ensure_signed(origin)?; // Ensure that `payment` storage item has been set let payment = Self::payment().ok_or("Must have payment amount set")?; // Read our storage values, and place them in memory variables let mut nonce = Self::nonce(); let mut pot = Self::pot(); // Try to withdraw the payment from the account, making sure that it will not kill the account let _ = <balances::Module<T> as Currency<_>>::withdraw(&sender, payment, WithdrawReason::Reserve, ExistenceRequirement::KeepAlive)?; // Generate a random hash between 0-255 using a csRNG algorithm if (<system::Module<T>>::random_seed(), &sender, nonce) .using_encoded(<T as system::Trait>::Hashing::hash) .using_encoded(|e| e[0] < 128) { // If the user won the coin flip, deposit the pot winnings; cannot fail let _ = <balances::Module<T> as Currency<_>>::deposit_into_existing(&sender, pot) .expect("`sender` must exist since a transaction is being made and withdraw will keep alive; qed."); // Reduce the pot to zero pot = Zero::zero(); } // No matter the outcome, increase the pot by the payment amount pot = pot.saturating_add(payment); // Increment the nonce nonce = nonce.wrapping_add(1); // Store the updated values for our module <Pot<T>>::put(pot); <Nonce<T>>::put(nonce); // Return Ok(()) when everything happens successfully Ok(()) } ``` 好了!你看用Substrate构建新的运行时模块多么简单,作为参照,你可以和上述代码的完整版本进行对比。 ## STEP 4:将新模块整合入Substrate运行时 要实际应用我们上面开发的模块,还需要告诉运行时这个模块的存在,这需要修改 `./runtime/src/lib.rs`文件。 首先我们需要在项目中包含我们创建的模块文件: ``` ... /// Index of an account's extrinsic in the chain. pub type Nonce = u64; mod demo; // 添加这一行 ``` 接下来,我们需要告诉运行时demo模块暴露的Trait: ``` ... impl sudo::Trait for Runtime { /// The uniquitous event type. type Event = Event; type Proposal = Call; } impl demo::Trait for Runtime {} //添加这一行 ``` 最后,我们需要在运行时构造函数中包含demo模块: ``` construct_runtime!( pub enum Runtime with Log(InternalLog: DigestItem<Hash, Ed25519AuthorityId>) where Block = Block, NodeBlock = opaque::Block, UncheckedExtrinsic = UncheckedExtrinsic { System: system::{default, Log(ChangesTrieRoot)}, Timestamp: timestamp::{Module, Call, Storage, Config<T>, Inherent}, Consensus: consensus::{Module, Call, Storage, Config<T>, Log(AuthoritiesChange), Inherent}, Aura: aura::{Module}, Indices: indices, Balances: balances, Sudo: sudo, Demo: demo::{Module, Call, Storage}, // 添加这一行 } ); ``` 为了在升级成功时更容易观察一些,我们可以同时升级运行时规范与实现的名字: ``` /// This runtime version.\npub const VERSION: RuntimeVersion = RuntimeVersion { spec_name: create_runtime_str!("demo"), // 更新这个名称 impl_name: create_runtime_str!("demo-node"), // 更新这个名称 authoring_version: 3, spec_version: 3, impl_version: 0, apis: RUNTIME_API_VERSIONS, }; ``` 同样,你可以参考[完整实现代码](https://github.com/substrate-developer-hub/substrate-package/blob/gav-demo/substrate-node-template/runtime/src/lib.rs)。 ## STEP 5:升级区块链 现在我们已经创建了一个新的运行时模块,是时候升级我们的区块链了。 为此首先我们需要将新的运行时编译为Wasm二进制文件。进入substrate-node-template 然后运行: ``` ./scripts/build.sh ``` 如果上述命令成功执行,它将会更新文件`./runtime/wasm/target/wasm32-unknown-unknown/release/node_runtime.compact.wasm`。 你可以回到Substrate UI,然后再Runtime Upgrade功能区,选择这个文件,然后点击upgrade按钮: 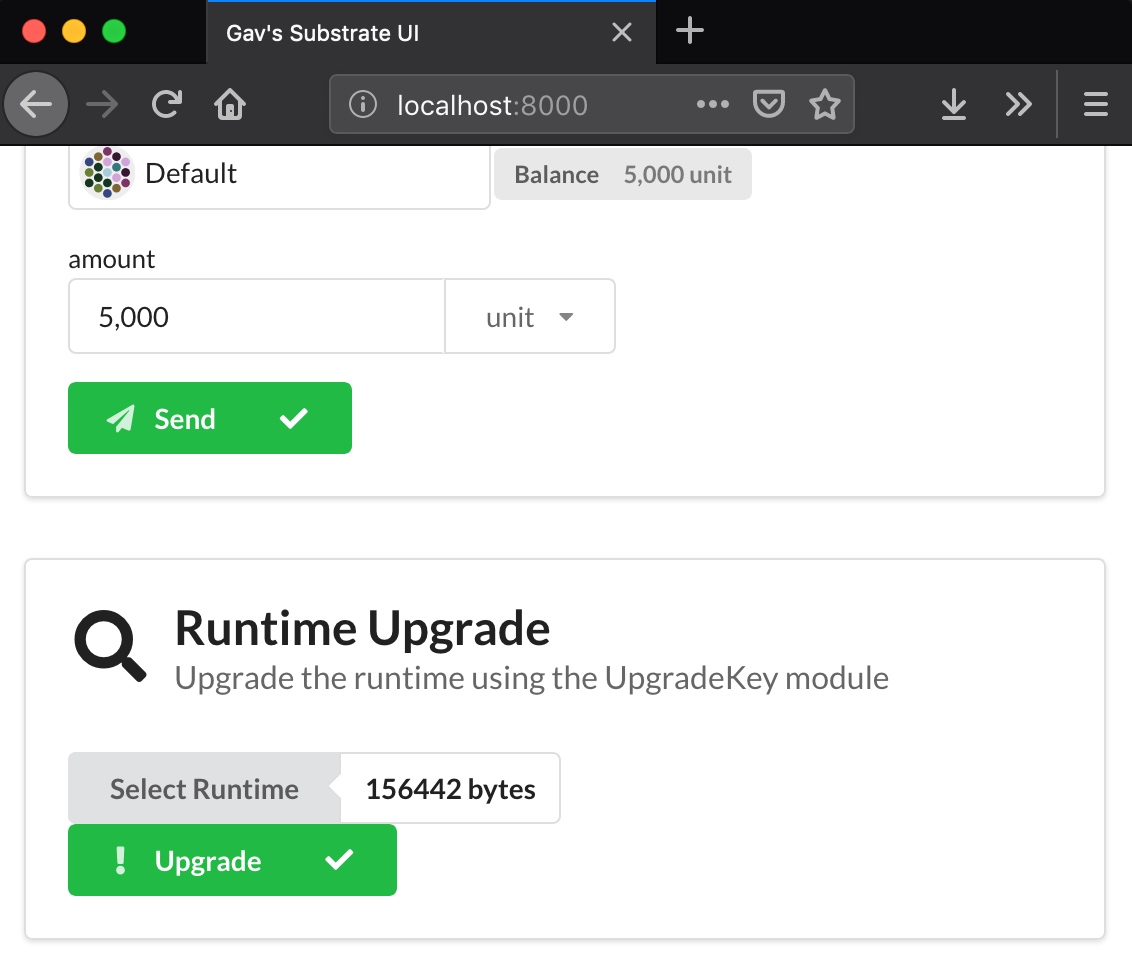 一切顺利的话,你可以在Substrate UI的顶部看到我们为运行时新起的名字: 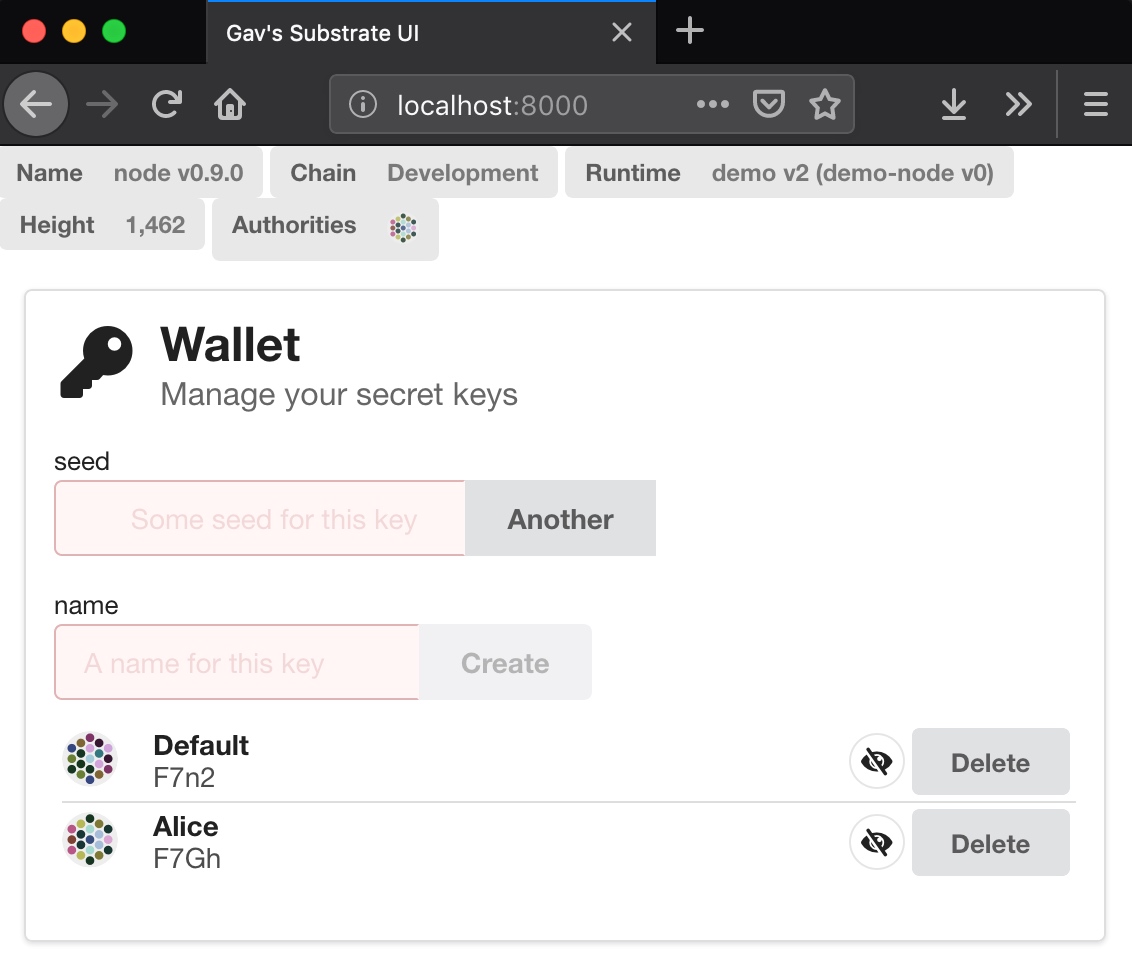 ## STEP 6:与新模块交互 在本文的最后,我们可以试玩新创建的游戏。使用浏览器的控制台开始交互。 在Susbtrate UI页面中,按F12打开开发者控制台。我们需要借助于这个页面加载 的一些JavaScript库。 在可以玩游戏之前,我们需要使用一个账户初始`set_payment`。我们将以Alice 的名义调用这个函数。她会使用一个签名消息慷慨的初始化钱罐: ``` post({ sender: runtime.indices.ss58Decode('F7Hs'), call: calls.demo.setPayment(1000), }).tie(console.log) ``` 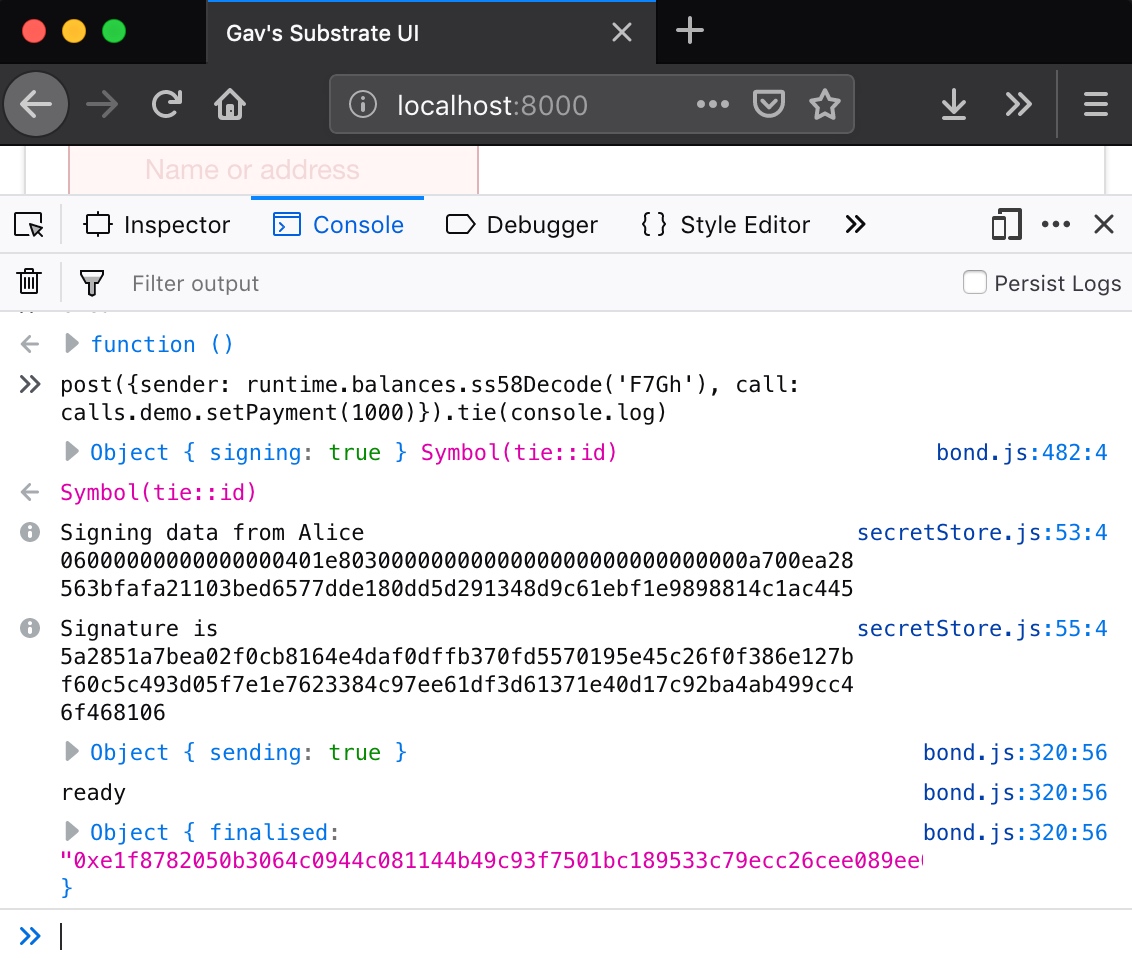 当这个调用完成后,你应当会看到`{finalized: "..."}`,表示已经添加到区块链了。 可以通过查询钱罐中的余额来确认这一点: ``` runtime.demo.pot.then(console.log) ``` 这应当会返回`Number {1000}`。 ## STEP 7:更新Substrate UI 现在我们看到的都是在后台运行的,现在我们更新用户界面来展示这些变化。 让我们添加一个用户界面以便可以玩游戏。为此我们需要修改substrate-ui仓库。 打开`./src/app.jsx`文件,在`readyRender()`函数中,你会看到生成不同 UX组件的代码。例如,这个代码片段控制着我们刚用过的Runtime升级用户界面: ``` class UpgradeSegment extends React.Component { constructor() { super() this.conditionBond = runtime.metadata.map(m => m.modules && m.modules.some(o => o.name === 'sudo') || m.modules.some(o => o.name === 'upgrade_key') ) this.runtime = new Bond } render() { return <If condition={this.conditionBond} then={ <Segment style={{ margin: '1em' }} padded> <Header as='h2'> <Icon name='search' /> <Header.Content> Runtime Upgrade <Header.Subheader>Upgrade the runtime using the UpgradeKey module</Header.Subheader> </Header.Content> </Header> <div style={{ paddingBottom: '1em' }}></div> <FileUploadBond bond={this.runtime} content='Select Runtime' /> <TransactButton content="Upgrade" icon='warning' tx={{ sender: runtime.sudo ? runtime.sudo.key : runtime.upgrade_key.key, call: calls.sudo ? calls.sudo.sudo(calls.consensus.setCode(this.runtime)) : calls.upgrade_key.upgrade(this.runtime) }} /> </Segment> } /> } } ``` 我们可以以此为模板实现游戏界面。在文件的结尾添加下面的代码: ``` class DemoSegment extends React.Component { constructor() { super() this.player = new Bond } render() { return <Segment style={{ margin: '1em' }} padded> <Header as='h2'> <Icon name='game' /> <Header.Content> Play the game <Header.Subheader>Play the game here!</Header.Subheader> </Header.Content> </Header> <div style={{ paddingBottom: '1em' }}> <div style={{ fontSize: 'small' }}>player</div> <SignerBond bond={this.player} /> <If condition={this.player.ready()} then={<span> <Label>Balance <Label.Detail> <Pretty value={runtime.balances.balance(this.player)} /> </Label.Detail> </Label> </span>} /> </div> <TransactButton content="Play" icon='game' tx={{ sender: this.player, call: calls.demo.play() }} /> <Label>Pot Balance <Label.Detail> <Pretty value={runtime.demo.pot} /> </Label.Detail> </Label> </Segment> } } ``` this.player表示游戏用户上下文。我们可以利用它获取用户余额: ``` runtime.balances.balance(this.player) ``` 并以该用户的身份提交交易: ``` tx={{ sender: this.player, call: calls.demo.play() }} ``` 类似于在开发者控制台中的方式,我们可以动态显示钱罐中的当前余额: ``` <Label>Pot Balance <Label.Detail> <Pretty value={runtime.demo.pot}/> </Label.Detail> </Label> ``` 唯一还需要我们做的事情,就是将这个组件加入到文件开头的App类: ``` readyRender() { return (<div> <Heading /> <WalletSegment /> <Divider hidden /> <AddressBookSegment /> <Divider hidden /> <FundingSegment /> <Divider hidden /> <UpgradeSegment /> <Divider hidden /> <PokeSegment /> <Divider hidden /> <TransactionsSegment /> <Divider hidden /> <DemoSegment /> // 添加这一行 </div>) } ``` 保存上述修改然后重新载入页面,你应当可以看到新的UI了!现在可以使用 Default账户来玩游戏:  这里你可以看到玩家输掉了游戏,这意味着他们的1000单位币存入了钱罐, 同时从他们的账户余额中扣除额外的1单位币交易费。 如果我们多尝试几次,最终玩家会赢得比赛,钱罐将恢复到开始的金额等待 下一个玩家: 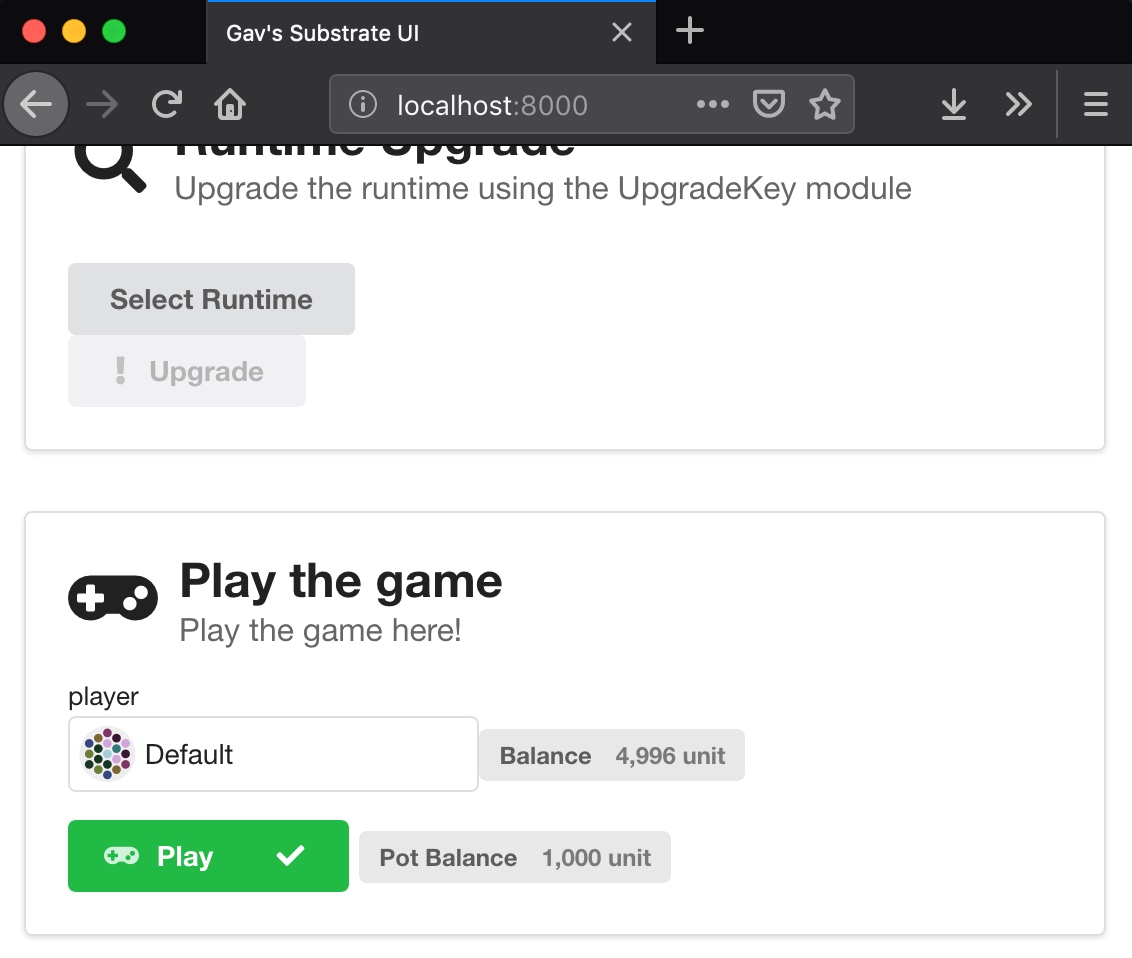 原文链接:[Creating Your First Substrate chain](https://substrate.dev/docs/en/tutorials/creating-your-first-substrate-chain)
前序环节
在开始之前,首先在计算机中安装以下软件:
- node和npm
- substrate
接下来还需要克隆这两个软件仓库并进行相应的配置:
- Substrate Node Template
- Substrate UI
STEP 1:启动区块链
如果安装没有问题,现在可以启动一个substrate开发链了!在 substrate-node-template目录运行生成的可执行文件:
./target/release/substrate-node-template --dev如果在启动节点时碰到任何错误,你可能需要使用下面命令清理区块链数据文件:
./target/release/substrate-node-template purge-chain --dev一切正常的话,就可以看到它出块了!
要和区块链交互,你需要启动Substrate UI。进入substrate-ui目录然后运行:
yarn run dev最后,在浏览器中访问http://localhost:8000 ,应该就可以访问你的区块链了!
STEP 2:将Alice加入网络
Alice是硬编码在你的区块链创世块配置中的账户,这个账户是预充值的而且 是负责区块链升级的超级用户。
要访问Alice账户,在Substrate UI中进入Wallet,然后在Seed输入栏填写://Alice:
如果一切正常的话,你现在可以进入Send Funds功能区,从Alice向Default账户转账。 可以看到Alice账户已经预充值,因此向Default账户转5000,然后等待绿色对号出现 并显示转账后Default的余额:
STEP 3:创建一个新的运行时模块
现在是时间创建我们自己的运行时(Runtime)模块了。
打开substrate-node-template文件夹,创建一个新文件:
./runtime/src/demo.rs首先需要在文件开头引入一些库:
// Encoding library
use parity_codec::Encode;

// Enables access to store a value in runtime storage
// Imports the `Result` type that is returned from runtime functions
// Imports the `decl_module!` and `decl_storage!` macros
use support::{StorageValue, dispatch::Result, decl_module, decl_storage};

// Traits used for interacting with Substrate's Balances module
// `Currency` gives you access to interact with the on-chain currency
// `WithdrawReason` and `ExistenceRequirement` are enums for balance functions
use support::traits::{Currency, WithdrawReason, ExistenceRequirement};

// These are traits which define behavior around math and hashing
use runtime_primitives::traits::{Zero, Hash, Saturating};

// Enables us to verify an call to our module is signed by a user account
use system::ensure_signed;
所有的模块都需要声明一个名为Trait的trait,它用来定义模块需要的独有的类型。在这个教程中,我们的运行时模块没有自己的特殊类型,但是 会继承在balances模块中定义的类型(例如Balance):
pub trait Trait: balances::Trait {}在这个例子中,我们将创建一个简单的抛硬币游戏。用户需要支付入门费才可以玩游戏,也就是掷一次硬币,如果赢了就可以得到罐子中的东西。无论结果如何,用户的进门费都会在开出结果后再放到罐子里,供后续用户赢取。
我们可以使用宏decl_storage来定义模块需要跟踪的存储条目:
decl_storage! {
  trait Store for Module<T: Trait> as Demo {
    Payment get(payment): Option<T::Balance>;
    Pot get(pot): T::Balance;
    Nonce get(nonce): u64;
  }
}
Rust中的宏用来生成其他代码,属于一种元编程。这里我们引入了一个宏以及自定义的语法以便简化存储的定义并使其易懂。这个宏负责生成所有 与Substrate存储数据库交互的实际代码。
你可以看到在我们的存储中,有三个条目,其中两个负责跟踪Balance, 另一个跟踪Nonce。Payment的声明为可选值,因此无论是否初始化过它的值 都不会有问题。
接下来我们将需要定义分发函数:那些供用户调用我们的区块链系统的函数。 这个游戏有两个用户可以交互的函数:一个允许我们支付进门费,另一个 让我们开始玩游戏:
decl_module! {
    pub struct Module<T: Trait> for enum Call where origin: T::Origin {
        fn set_payment(_origin, value: T::Balance) -> Result {
              // Logic for setting the game payment
        }

        play(origin) -> Result {
              // Logic for playing the game
        }
    }
}
现在我们已经搭建好模块的结构,可以添加这些函数的实现逻辑了。首先我们 添加初始化存储条目的逻辑:
// This function initializes the `payment` storage item
// It also populates the pot with an initial value
fn set_payment(origin, value: T::Balance) -> Result {
  // Ensure that the function call is a signed message (i.e. a transaction)
  let _ = ensure_signed(origin)?;

  // If `payment` is not initialized with some value
  if Self::payment().is_none() {
    // Set the value of `payment`
    <Payment<T>>::put(value);

    // Initialize the `pot` with the same value
    <Pot<T>>::put(value);
  }

  // Return Ok(()) when everything happens successfully
  Ok(())
}然后我们将编写play()函数的实现代码:
// This function is allows a user to play our coin-flip game
fn play(origin) -> Result {
  // Ensure that the function call is a signed message (i.e. a transaction)
  // Additionally, derive the sender address from the signed message
  let sender = ensure_signed(origin)?;

  // Ensure that `payment` storage item has been set
  let payment = Self::payment().ok_or("Must have payment amount set")?;

  // Read our storage values, and place them in memory variables
  let mut nonce = Self::nonce();
  let mut pot = Self::pot();

  // Try to withdraw the payment from the account, making sure that it will not kill the account
  let _ = <balances::Module<T> as Currency<_>>::withdraw(&sender, payment, WithdrawReason::Reserve, ExistenceRequirement::KeepAlive)?;

  // Generate a random hash between 0-255 using a csRNG algorithm
  if (<system::Module<T>>::random_seed(), &sender, nonce)
    .using_encoded(<T as system::Trait>::Hashing::hash)
    .using_encoded(|e| e[0] < 128)
    {
      // If the user won the coin flip, deposit the pot winnings; cannot fail
      let _ = <balances::Module<T> as Currency<_>>::deposit_into_existing(&sender, pot)
        .expect("`sender` must exist since a transaction is being made and withdraw will keep alive; qed.");

      // Reduce the pot to zero
      pot = Zero::zero();
  }

  // No matter the outcome, increase the pot by the payment amount
  pot = pot.saturating_add(payment);

  // Increment the nonce
  nonce = nonce.wrapping_add(1);

  // Store the updated values for our module
  <Pot<T>>::put(pot);
  <Nonce<T>>::put(nonce);

  // Return Ok(()) when everything happens successfully
  Ok(())
}
好了!你看用Substrate构建新的运行时模块多么简单,作为参照,你可以和上述代码的完整版本进行对比。
STEP 4:将新模块整合入Substrate运行时
要实际应用我们上面开发的模块,还需要告诉运行时这个模块的存在,这需要修改 ./runtime/src/lib.rs文件。
首先我们需要在项目中包含我们创建的模块文件:
...
/// Index of an account's extrinsic in the chain.
pub type Nonce = u64;

mod demo;     // 添加这一行
接下来,我们需要告诉运行时demo模块暴露的Trait:
...
impl sudo::Trait for Runtime {
  /// The uniquitous event type.
  type Event = Event;
  type Proposal = Call;
}

impl demo::Trait for Runtime {}      //添加这一行
最后,我们需要在运行时构造函数中包含demo模块:
construct_runtime!(
  pub enum Runtime with Log(InternalLog: DigestItem<Hash, Ed25519AuthorityId>) where
    Block = Block,
    NodeBlock = opaque::Block,
    UncheckedExtrinsic = UncheckedExtrinsic
  {
    System: system::{default, Log(ChangesTrieRoot)},
    Timestamp: timestamp::{Module, Call, Storage, Config<T>, Inherent},
    Consensus: consensus::{Module, Call, Storage, Config<T>, Log(AuthoritiesChange), Inherent},
    Aura: aura::{Module},
    Indices: indices,
    Balances: balances,
    Sudo: sudo,
    Demo: demo::{Module, Call, Storage},    // 添加这一行
  }
);
为了在升级成功时更容易观察一些,我们可以同时升级运行时规范与实现的名字:
/// This runtime version.\npub const VERSION: RuntimeVersion = RuntimeVersion {
  spec_name: create_runtime_str!("demo"),      // 更新这个名称
  impl_name: create_runtime_str!("demo-node"), // 更新这个名称
  authoring_version: 3,
  spec_version: 3,
  impl_version: 0,
  apis: RUNTIME_API_VERSIONS,
};
同样,你可以参考完整实现代码。
STEP 5:升级区块链
现在我们已经创建了一个新的运行时模块,是时候升级我们的区块链了。
为此首先我们需要将新的运行时编译为Wasm二进制文件。进入substrate-node-template 然后运行:
./scripts/build.sh如果上述命令成功执行,它将会更新文件./runtime/wasm/target/wasm32-unknown-unknown/release/node_runtime.compact.wasm。 你可以回到Substrate UI,然后再Runtime Upgrade功能区,选择这个文件,然后点击upgrade按钮:
一切顺利的话,你可以在Substrate UI的顶部看到我们为运行时新起的名字:
STEP 6:与新模块交互
在本文的最后,我们可以试玩新创建的游戏。使用浏览器的控制台开始交互。
在Susbtrate UI页面中,按F12打开开发者控制台。我们需要借助于这个页面加载 的一些JavaScript库。
在可以玩游戏之前,我们需要使用一个账户初始set_payment。我们将以Alice 的名义调用这个函数。她会使用一个签名消息慷慨的初始化钱罐:
post({
  sender: runtime.indices.ss58Decode('F7Hs'),
  call: calls.demo.setPayment(1000),
}).tie(console.log)当这个调用完成后,你应当会看到{finalized: "..."},表示已经添加到区块链了。 可以通过查询钱罐中的余额来确认这一点:
runtime.demo.pot.then(console.log)这应当会返回Number {1000}。
STEP 7:更新Substrate UI
现在我们看到的都是在后台运行的,现在我们更新用户界面来展示这些变化。 让我们添加一个用户界面以便可以玩游戏。为此我们需要修改substrate-ui仓库。
打开./src/app.jsx文件,在readyRender()函数中,你会看到生成不同 UX组件的代码。例如,这个代码片段控制着我们刚用过的Runtime升级用户界面:
class UpgradeSegment extends React.Component {
  constructor() {
    super()
    this.conditionBond = runtime.metadata.map(m =>
      m.modules && m.modules.some(o => o.name === 'sudo')
      || m.modules.some(o => o.name === 'upgrade_key')
      )
    this.runtime = new Bond
  }

  render() {
    return <If condition={this.conditionBond} then={
      <Segment style={{ margin: '1em' }} padded>
        <Header as='h2'>
          <Icon name='search' />
          <Header.Content>
            Runtime Upgrade
            <Header.Subheader>Upgrade the runtime using the UpgradeKey module</Header.Subheader>
          </Header.Content>
        </Header>
        <div style={{ paddingBottom: '1em' }}></div>
        <FileUploadBond bond={this.runtime} content='Select Runtime' />
        <TransactButton
          content="Upgrade"
          icon='warning'
          tx={{
            sender: runtime.sudo
              ? runtime.sudo.key
              : runtime.upgrade_key.key,
            call: calls.sudo
              ? calls.sudo.sudo(calls.consensus.setCode(this.runtime))
              : calls.upgrade_key.upgrade(this.runtime)
          }}
        />
      </Segment>
    } />
  }
}
我们可以以此为模板实现游戏界面。在文件的结尾添加下面的代码:
class DemoSegment extends React.Component {
  constructor() {
    super()
    this.player = new Bond
  }

  render() {
    return <Segment style={{ margin: '1em' }} padded>
      <Header as='h2'>
        <Icon name='game' />
        <Header.Content>
          Play the game
          <Header.Subheader>Play the game here!</Header.Subheader>
        </Header.Content>
      </Header>
      <div style={{ paddingBottom: '1em' }}>
        <div style={{ fontSize: 'small' }}>player</div>
        <SignerBond bond={this.player} />
        <If condition={this.player.ready()} then={<span>
          <Label>Balance
            <Label.Detail>
              <Pretty value={runtime.balances.balance(this.player)} />
            </Label.Detail>
          </Label>
        </span>} />
      </div>
      <TransactButton
        content="Play"
        icon='game'
        tx={{
          sender: this.player,
          call: calls.demo.play()
        }}
      />
      <Label>Pot Balance
        <Label.Detail>
          <Pretty value={runtime.demo.pot} />
        </Label.Detail>
      </Label>
    </Segment>
  }
}
this.player表示游戏用户上下文。我们可以利用它获取用户余额:
runtime.balances.balance(this.player)并以该用户的身份提交交易:
tx={{
  sender: this.player,
  call: calls.demo.play()
}}
类似于在开发者控制台中的方式,我们可以动态显示钱罐中的当前余额:
<Label>Pot Balance
  <Label.Detail>
    <Pretty value={runtime.demo.pot}/>
  </Label.Detail>
</Label>
唯一还需要我们做的事情,就是将这个组件加入到文件开头的App类:
readyRender() {
  return (<div>
    <Heading />
    <WalletSegment />
    <Divider hidden />
    <AddressBookSegment />
    <Divider hidden />
    <FundingSegment />
    <Divider hidden />
    <UpgradeSegment />
    <Divider hidden />
    <PokeSegment />
    <Divider hidden />
    <TransactionsSegment />
    <Divider hidden />
    <DemoSegment />      // 添加这一行
  </div>)
}
保存上述修改然后重新载入页面,你应当可以看到新的UI了!现在可以使用 Default账户来玩游戏:
这里你可以看到玩家输掉了游戏,这意味着他们的1000单位币存入了钱罐, 同时从他们的账户余额中扣除额外的1单位币交易费。
如果我们多尝试几次,最终玩家会赢得比赛,钱罐将恢复到开始的金额等待 下一个玩家:
原文链接:Creating Your First Substrate chain
区块链技术网。
- 发表于 2020-01-09 15:11
- 阅读 ( 1220 )
- 学分 ( 30 )
- 分类:Polkadot


!缩略图")
评论