Filecoin – PoREP电路介绍


PoREP的电路验证了Sector的计算过程,从Labeling,Encoding到Column Hash。注意的是,在Sector大小为32G的情况下,电路包括144个挑战节点的计算。电路相应的公开输入除了comm_d和comm_r外,还有各个Merkle树的路径信息。
PoREP电路相关的逻辑在storage-proofs/src/porep/stacked/circuit/目录中。Rust-fil-proofs代码更新比较快,本文中用的代码的最后一个commit信息如下: commit 14870d715f1f6019aba3f72772659e38184378bf Author: Rod Vagg Date: Fri Mar 20 22:30:18 2020 +1100 feat(filecoin-proofs): expose filecoin_proofs::pad_reader 只要SDR算法不变,大致的电路逻辑不会有大的变化。对SDR算法不熟悉对小伙伴,可以看看: [Filecoin - 为什么SDR这么慢?](http://mp.weixin.qq.com/s?__biz=MzU5MzMxNTk2Nw==&mid=2247486980&idx=1&sn=d525f288bd1305191a7cd7a4d26acb8c&chksm=fe131f14c9649602fdb874443a0b09ead774208e3fa1ca6dc4bb35322390299aa7eeeffe2141&scene=21#wechat_redirect) 整个PoREP电路的代码框架如下图所示: 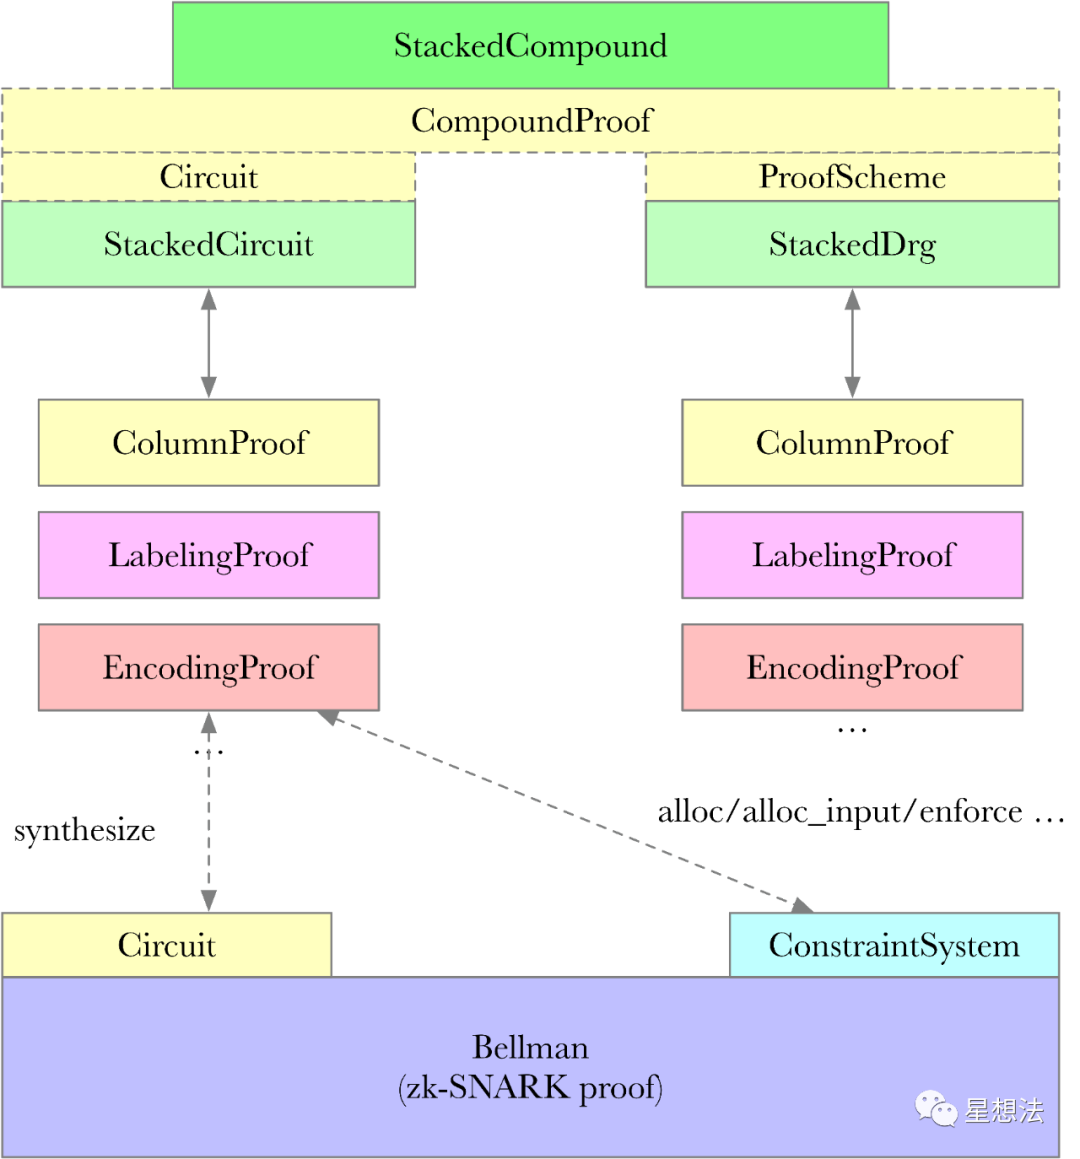 从StackedCircuit讲起。 ## 01 StackedCircuit StackedCircuit就是PoREP的整体电路。StackedCircuit定义在storage-proofs/src/porep/stacked/circuit/proof.rs中。 ``` pub struct StackedCircuit { params: &'a E::Params, public_params: as ProofScheme>::PublicParams, replica_id: Option, comm_d: Option, comm_r: Option, comm_r_last: Option, comm_c: Option, proofs: Vec>, } ``` 其中 * params - JubjubEngine的相关参数, * public_params - StackedDrg(深度鲁棒图)相关的参数,包括图本身的参数以及挑战的个数。 * replica_id - Sector复制id * comm_d - 原始数据的二叉树的树根 * comm_r - comm_r_last和comm_c的hash结果 * comm_r_last - encoding之后的数据的八叉树的树根 * comm_c - column hash结果的八叉树的树根 * proofs - 挑战对应的证明电路 整个电路的搭建,从StackedCircuit的synthesize接口函数开始。 ``` impl Circuit for StackedCircuit { fn synthesize>(self, cs: &mut CS) -> Result { ``` 整个synthesize函数,将电路分割成两部分:1/ 树根校验电路 2/ 挑战的节点信息证明电路。其中树根校验电路比较简单易懂。申请replica_id_bits, comm_d,comm_r,comm_r_last以及comm_c变量,并验证comm_c和comm_r_last是否可以正确计算出comm_r。 ## 02 挑战节点证明电路 Sector大小为32G的情况下,挑战个数为144个。也就是说,整个挑战节点证明电路由144个小电路组成。 ``` for (i, proof) in proofs.into_iter().enumerate() { proof.synthesize( &mut cs.namespace(|| format!("challenge_{}", i)), &self.params, public_params.layer_challenges.layers(), &comm_d_num, &comm_c_num, &comm_r_last_num, &replica_id_bits, )?; } ``` 每个挑战节点的小电路,由Proof结构表示(storage-proofs/src/porep/stacked/circuit/params.rs)。 ``` pub struct Proof { pub comm_d_proof: InclusionPath, pub comm_r_last_proof: InclusionPath, pub replica_column_proof: ReplicaColumnProof, pub labeling_proofs: Vec, pub encoding_proof: EncodingProof, } ``` Proof的结构比较清晰,分别包括了: * comm_d_proof - 原始数据的Merkle树证明 * encoding_proof - Encoding的结果证明 * comm_r_last_proof - Encoding结果的Merkle树证明 * labeling_proofs - Labeling计算证明 * replica_column_proof - column hash的计算证明 Proof的synthesize函数构建如上的证明。 ## 03 原始数据的Merkle树证明电路 原始数据的Merkle树证明电路证明comm_d_leaf的节点,在以comm_d为树根的Merkle树上。 ``` let comm_d_leaf = comm_d_proof.alloc_value(cs.namespace(|| "comm_d_leaf"))?; comm_d_proof.synthesize( cs.namespace(|| "comm_d_inclusion"), params, comm_d.clone(), comm_d_leaf.clone(), )?; ``` 其中comm_d_leaf是电路中的变量。comm_d_proof是InclusionPath结构,定义在storage-proofs/src/porep/stacked/circuit/params.rs中。InclusionPath电路的核心逻辑在synthesize函数中: ``` pub fn synthesize>( self, cs: CS, params: &::Params, root: num::AllocatedNum, leaf: num::AllocatedNum, ) -> Result { let InclusionPath { auth_path, .. } = self; let root = Root::from_allocated::(root); let value = Root::from_allocated::(leaf); PoRCircuit::::synthesize(cs, params, value, auth_path, root, true) } ``` 可以发现,所有证明Retrieval的电路,都是通过PoRCircuit实现。也就是说,目前的PoR是通过Merkle树实现的。PoRCircuit电路定义在storage-proofs/src/**gadgets**/por.rs。PoRCircuit的电路就是结合叶子节点和路径信息,查看最后“计算”出来的树根和提供的树根是否一致。具体相关逻辑,小伙伴可以自行查看。 ## 04 Labeling计算证明 Labeling计算的证明电路就是证明某个节点按照SDR算法正确计算。 ``` for (layer, proof) in labeling_proofs.into_iter() { let raw = replica_column_proof.c_x.get_node_at_layer(layer); let labeled_node = num::AllocatedNum::alloc(cs.namespace(|| format!("label_node_{}", layer)), || { raw.map(Into::into) .ok_or_else(|| SynthesisError::AssignmentMissing) })?; proof.synthesize( cs.namespace(|| format!("labeling_proof_{}", layer)), params, replica_id, &labeled_node, )?; } ``` 在某一层上的某个节点的Labeling的结果数据通过replica_column_proof.c_x.get_node_at_layer(layer)可以获取。Labeling的计算电路由LabelingProof结构的synthesize函数实现: ``` pub fn synthesize>( self, mut cs: CS, params: &::Params, replica_id: &[Boolean], exp_encoded_node: &num::AllocatedNum, ) -> Result { let LabelingProof { node, parents } = self; let key = Self::create_label( cs.namespace(|| "create_label"), params, replica_id, node, parents, )?; // enforce equality constraint::equal(&mut cs, || "equality_key", &exp_encoded_node, &key); Ok(()) } } ``` 其中的create_label函数又是由两个电路构成:create_label_circuit和sha256_circuit。也就是说,这两个电路就是把依赖的(parents)的节点数据进行sha256计算。constraint::equal就是来确认“计算”出的节点数据和提供的节点数据是否一致。 ## 05 Encoding证明电路 Encoding计算就是将最后一层的节点数据和原始数据进行Encoding。Encoding的计算方式就是大数加法,具体的计算storage-proofs/src/gadgets/encode.rs文件中。 ``` encoding_proof.synthesize( cs.namespace(|| format!("encoding_proof_{}", layers)), params, replica_id, &comm_r_last_data_leaf, &comm_d_leaf, )?; ``` 整个Encoding证明电路由EncodingProof的synthesize函数实现。简单的说,Encoding的电路验证过程首先计算Labeling,然后对comm_d_leaf进行Encoding计算,判断结果是否和comm_r_last_data_leaf一致。 ## 06 Encoding结果的Merkle树证明 类似于原始数据的Merkle树证明电路证明,证明comm_r_last_data_leaf在comm_r_last的Merkle树上。只是这棵树是八叉树。 ``` comm_r_last_proof.synthesize( cs.namespace(|| "comm_r_last_data_inclusion"), params, comm_r_last.clone(), comm_r_last_data_leaf, )?; ``` ## 07 Column hash证明电路 Column hash的证明电路是由ReplicaColumnProof结构的synthesize实现,具体定义在storage-proofs/src/porep/stacked/circuit/params.rs中。 ``` replica_column_proof.synthesize(cs.namespace(|| "replica_column_proof"), params, comm_c)?; ``` 大致的逻辑是,先处理挑战节点的Column信息,再分别处理base和exp依赖节点的Column信息: ``` // c_x c_x.synthesize(cs.namespace(|| "c_x"), params, comm_c)?; // drg parents for (i, parent) in drg_parents.into_iter().enumerate() { parent.synthesize(cs.namespace(|| format!("drg_parent_{}", i)), params, comm_c)?; } // exp parents for (i, parent) in exp_parents.into_iter().enumerate() { parent.synthesize(cs.namespace(|| format!("exp_parent_{}", i)), params, comm_c)?; } ``` 也就是说,证明电路由15个ColumnProof子电路组成。ColumnProof定义在storage-proofs/src/porep/stacked/circuit/column_proof.rs中。 ``` pub struct ColumnProof { column: Column, inclusion_path: InclusionPath, } ``` 相应的电路生成逻辑在ColumnProof的synthesize函数中: ``` let c_i = column.hash(cs.namespace(|| "column_hash"), params)?; let leaf_num = inclusion_path.alloc_value(cs.namespace(|| "leaf"))?; constraint::equal(&mut cs, || "enforce column_hash = leaf", &c_i, &leaf_num); // TODO: currently allocating the leaf twice, inclusion path should take the already allocated leaf. inclusion_path.synthesize( cs.namespace(|| "column_proof_all_inclusion"), params, comm_c.clone(), leaf_num, )?; ``` column.hash计算出Column对应的hash结果。检查这个结果是否与leaf_num相等。同时查看这个leaf_num是否在comm_c的Merkle树上。 到目前为止,整个电路的全貌已经出现:  ## 08 电路的公开输入 整个PoREP的电路的公开输入由StackedCompound的generate_public_inputs函数实现,具体实现在storage-proofs/src/porep/stacked/circuit/proof.rs文件中。 ``` fn generate_public_inputs( pub_in: & as ProofScheme>::PublicInputs, pub_params: & as ProofScheme>::PublicParams, k: Option, ) -> Result> { ``` 其中k为parition的编号。对于32G的Sector,总共有9个Paritition。 ``` **comm_d & comm_r** let comm_d = pub_in.tau.as_ref().expect("missing tau").comm_d; let comm_r = pub_in.tau.as_ref().expect("missing tau").comm_r; ``` **挑战对应comm_d的存在性证明** 目前PoRCompound,只把Merkle树的路径信息作为公开输入。 ``` inputs.extend(PoRCompound::::generate_public_inputs( &pub_inputs, &por_params, k, )?); ``` **挑战对应的一系列comm_c的存在性证明** 注意,comm_d的计算是二叉树,comm_c的计算是八叉树。 ``` // c_x inputs.extend(generate_inclusion_inputs(challenge)?); // drg parents let mut drg_parents = vec![0; graph.base_graph().degree()]; graph.base_graph().parents(challenge, &mut drg_parents)?; for parent in drg_parents.into_iter() { inputs.extend(generate_inclusion_inputs(parent as usize)?); } // exp parents let mut exp_parents = vec![0; graph.expansion_degree()]; graph.expanded_parents(challenge, &mut exp_parents); for parent in exp_parents.into_iter() { inputs.extend(generate_inclusion_inputs(parent as usize)?); } ``` **挑战对应的comm_r_last的存在性证明** ``` inputs.extend(generate_inclusion_inputs(challenge)?); ``` **总结:** PoREP的电路验证了Sector的计算过程,从Labeling,Encoding到Column Hash。注意的是,在Sector大小为32G的情况下,电路包括144个挑战节点的计算。电路相应的公开输入除了comm_d和comm_r外,还有各个Merkle树的路径信息。
PoREP电路相关的逻辑在storage-proofs/src/porep/stacked/circuit/目录中。Rust-fil-proofs代码更新比较快,本文中用的代码的最后一个commit信息如下:
commit 14870d715f1f6019aba3f72772659e38184378bf Author: Rod Vagg Date: Fri Mar 20 22:30:18 2020 +1100
feat(filecoin-proofs): expose filecoin_proofs::pad_reader
只要SDR算法不变,大致的电路逻辑不会有大的变化。对SDR算法不熟悉对小伙伴,可以看看:
Filecoin - 为什么SDR这么慢?
整个PoREP电路的代码框架如下图所示:
从StackedCircuit讲起。
01 StackedCircuit
StackedCircuit就是PoREP的整体电路。StackedCircuit定义在storage-proofs/src/porep/stacked/circuit/proof.rs中。
pub struct StackedCircuit {
 params: &'a E::Params,
 public_params:  as ProofScheme>::PublicParams,
 replica_id: Option,
 comm_d: Option,
 comm_r: Option,
 comm_r_last: Option,
 comm_c: Option,

 proofs: Vec>,
}
其中
-
params - JubjubEngine的相关参数,
-
public_params - StackedDrg(深度鲁棒图)相关的参数,包括图本身的参数以及挑战的个数。
-
replica_id - Sector复制id
-
comm_d - 原始数据的二叉树的树根
-
comm_r - comm_r_last和comm_c的hash结果
-
comm_r_last - encoding之后的数据的八叉树的树根
-
comm_c - column hash结果的八叉树的树根
-
proofs - 挑战对应的证明电路
整个电路的搭建,从StackedCircuit的synthesize接口函数开始。
impl Circuit for StackedCircuit {
 fn synthesize>(self, cs: &mut CS) -> Result {
整个synthesize函数,将电路分割成两部分:1/ 树根校验电路 2/ 挑战的节点信息证明电路。其中树根校验电路比较简单易懂。申请replica_id_bits, comm_d,comm_r,comm_r_last以及comm_c变量,并验证comm_c和comm_r_last是否可以正确计算出comm_r。
02 挑战节点证明电路
Sector大小为32G的情况下,挑战个数为144个。也就是说,整个挑战节点证明电路由144个小电路组成。
for (i, proof) in proofs.into_iter().enumerate() {
 proof.synthesize(
 &mut cs.namespace(|| format!("challenge_{}", i)),
 &self.params,
 public_params.layer_challenges.layers(),
 &comm_d_num,
 &comm_c_num,
 &comm_r_last_num,
 &replica_id_bits,
 )?;
 }
每个挑战节点的小电路,由Proof结构表示(storage-proofs/src/porep/stacked/circuit/params.rs)。
pub struct Proof {
 pub comm_d_proof: InclusionPath,
 pub comm_r_last_proof: InclusionPath,
 pub replica_column_proof: ReplicaColumnProof,
 pub labeling_proofs: Vec,
 pub encoding_proof: EncodingProof,
}
Proof的结构比较清晰,分别包括了:
-
comm_d_proof - 原始数据的Merkle树证明
-
encoding_proof - Encoding的结果证明
-
comm_r_last_proof - Encoding结果的Merkle树证明
-
labeling_proofs - Labeling计算证明
-
replica_column_proof - column hash的计算证明
Proof的synthesize函数构建如上的证明。
03 原始数据的Merkle树证明电路
原始数据的Merkle树证明电路证明comm_d_leaf的节点,在以comm_d为树根的Merkle树上。
let comm_d_leaf = comm_d_proof.alloc_value(cs.namespace(|| "comm_d_leaf"))?;
comm_d_proof.synthesize(
 cs.namespace(|| "comm_d_inclusion"),
 params,
 comm_d.clone(),
 comm_d_leaf.clone(),
)?;
其中comm_d_leaf是电路中的变量。comm_d_proof是InclusionPath结构,定义在storage-proofs/src/porep/stacked/circuit/params.rs中。InclusionPath电路的核心逻辑在synthesize函数中:
pub fn synthesize>(
 self,
 cs: CS,
 params: &::Params,
 root: num::AllocatedNum,
 leaf: num::AllocatedNum,
) -> Result {
 let InclusionPath { auth_path, .. } = self;

 let root = Root::from_allocated::(root);
 let value = Root::from_allocated::(leaf);
 PoRCircuit::::synthesize(cs, params, value, auth_path, root, true)
}可以发现,所有证明Retrieval的电路,都是通过PoRCircuit实现。也就是说,目前的PoR是通过Merkle树实现的。PoRCircuit电路定义在storage-proofs/src/gadgets/por.rs。PoRCircuit的电路就是结合叶子节点和路径信息,查看最后“计算”出来的树根和提供的树根是否一致。具体相关逻辑,小伙伴可以自行查看。
04 Labeling计算证明
Labeling计算的证明电路就是证明某个节点按照SDR算法正确计算。
for (layer, proof) in labeling_proofs.into_iter() {
 let raw = replica_column_proof.c_x.get_node_at_layer(layer);
 let labeled_node =
 num::AllocatedNum::alloc(cs.namespace(|| format!("label_node_{}", layer)), || {
 raw.map(Into::into)
 .ok_or_else(|| SynthesisError::AssignmentMissing)
 })?;
 proof.synthesize(
 cs.namespace(|| format!("labeling_proof_{}", layer)),
 params,
 replica_id,
 &labeled_node,
 )?;
}
在某一层上的某个节点的Labeling的结果数据通过replica_column_proof.c_x.get_node_at_layer(layer)可以获取。Labeling的计算电路由LabelingProof结构的synthesize函数实现:
pub fn synthesize>(
 self,
 mut cs: CS,
 params: &::Params,
 replica_id: &[Boolean],
 exp_encoded_node: &num::AllocatedNum,
 ) -> Result {
 let LabelingProof { node, parents } = self;

 let key = Self::create_label(
 cs.namespace(|| "create_label"),
 params,
 replica_id,
 node,
 parents,
 )?;

 // enforce equality
 constraint::equal(&mut cs, || "equality_key", &exp_encoded_node, &key);

 Ok(())
 }
}
其中的create_label函数又是由两个电路构成:create_label_circuit和sha256_circuit。也就是说,这两个电路就是把依赖的(parents)的节点数据进行sha256计算。constraint::equal就是来确认“计算”出的节点数据和提供的节点数据是否一致。
05 Encoding证明电路
Encoding计算就是将最后一层的节点数据和原始数据进行Encoding。Encoding的计算方式就是大数加法,具体的计算storage-proofs/src/gadgets/encode.rs文件中。
encoding_proof.synthesize(
 cs.namespace(|| format!("encoding_proof_{}", layers)),
 params,
 replica_id,
 &comm_r_last_data_leaf,
 &comm_d_leaf,
 )?;
整个Encoding证明电路由EncodingProof的synthesize函数实现。简单的说,Encoding的电路验证过程首先计算Labeling,然后对comm_d_leaf进行Encoding计算,判断结果是否和comm_r_last_data_leaf一致。
06 Encoding结果的Merkle树证明
类似于原始数据的Merkle树证明电路证明,证明comm_r_last_data_leaf在comm_r_last的Merkle树上。只是这棵树是八叉树。
comm_r_last_proof.synthesize(
 cs.namespace(|| "comm_r_last_data_inclusion"),
 params,
 comm_r_last.clone(),
 comm_r_last_data_leaf,
)?;
07 Column hash证明电路
Column hash的证明电路是由ReplicaColumnProof结构的synthesize实现,具体定义在storage-proofs/src/porep/stacked/circuit/params.rs中。
replica_column_proof.synthesize(cs.namespace(|| "replica_column_proof"), params, comm_c)?;大致的逻辑是,先处理挑战节点的Column信息,再分别处理base和exp依赖节点的Column信息:
// c_x
c_x.synthesize(cs.namespace(|| "c_x"), params, comm_c)?;

// drg parents
for (i, parent) in drg_parents.into_iter().enumerate() {
 parent.synthesize(cs.namespace(|| format!("drg_parent_{}", i)), params, comm_c)?;
}

// exp parents
for (i, parent) in exp_parents.into_iter().enumerate() {
 parent.synthesize(cs.namespace(|| format!("exp_parent_{}", i)), params, comm_c)?;
}
也就是说,证明电路由15个ColumnProof子电路组成。ColumnProof定义在storage-proofs/src/porep/stacked/circuit/column_proof.rs中。
pub struct ColumnProof {
 column: Column,
 inclusion_path: InclusionPath,
}
相应的电路生成逻辑在ColumnProof的synthesize函数中:
let c_i = column.hash(cs.namespace(|| "column_hash"), params)?;
let leaf_num = inclusion_path.alloc_value(cs.namespace(|| "leaf"))?;
constraint::equal(&mut cs, || "enforce column_hash = leaf", &c_i, &leaf_num);

// TODO: currently allocating the leaf twice, inclusion path should take the already allocated leaf.
inclusion_path.synthesize(
 cs.namespace(|| "column_proof_all_inclusion"),
 params,
 comm_c.clone(),
 leaf_num,
)?;
column.hash计算出Column对应的hash结果。检查这个结果是否与leaf_num相等。同时查看这个leaf_num是否在comm_c的Merkle树上。
到目前为止,整个电路的全貌已经出现:
08 电路的公开输入
整个PoREP的电路的公开输入由StackedCompound的generate_public_inputs函数实现,具体实现在storage-proofs/src/porep/stacked/circuit/proof.rs文件中。
fn generate_public_inputs(
 pub_in: & as ProofScheme>::PublicInputs,
 pub_params: & as ProofScheme>::PublicParams,
 k: Option,
) -> Result> {
其中k为parition的编号。对于32G的Sector,总共有9个Paritition。
**comm_d & comm_r**

let comm_d = pub_in.tau.as_ref().expect("missing tau").comm_d;
let comm_r = pub_in.tau.as_ref().expect("missing tau").comm_r;
挑战对应comm_d的存在性证明
目前PoRCompound,只把Merkle树的路径信息作为公开输入。
inputs.extend(PoRCompound::::generate_public_inputs(
 &pub_inputs,
 &por_params,
 k,
)?);
挑战对应的一系列comm_c的存在性证明
注意,comm_d的计算是二叉树,comm_c的计算是八叉树。
// c_x
inputs.extend(generate_inclusion_inputs(challenge)?);

// drg parents
let mut drg_parents = vec![0; graph.base_graph().degree()];
graph.base_graph().parents(challenge, &mut drg_parents)?;

for parent in drg_parents.into_iter() {
 inputs.extend(generate_inclusion_inputs(parent as usize)?);
}

// exp parents
let mut exp_parents = vec![0; graph.expansion_degree()];
graph.expanded_parents(challenge, &mut exp_parents);
for parent in exp_parents.into_iter() {
 inputs.extend(generate_inclusion_inputs(parent as usize)?);
}
挑战对应的comm_r_last的存在性证明
inputs.extend(generate_inclusion_inputs(challenge)?);总结:
PoREP的电路验证了Sector的计算过程,从Labeling,Encoding到Column Hash。注意的是,在Sector大小为32G的情况下,电路包括144个挑战节点的计算。电路相应的公开输入除了comm_d和comm_r外,还有各个Merkle树的路径信息。
区块链技术网。
- 发表于 2020-04-15 22:13
- 阅读 ( 2425 )
- 学分 ( 55 )
- 分类:FileCoin


评论