使用OpenZeppelin Truffle升级插件升级合约


在本文中,我们将展示使用OpenZeppelin Truffle升级插件和Gnosis Safe的生命周期,包含从创建合约,测试合约、部署合约一直到使用Gnosis Safe进行升级整个过程.
> * 原文:https://forum.openzeppelin.com/t/openzeppelin-truffle-upgrades/3579 作者:**[abcoathup](https://forum.openzeppelin.com/u/abcoathup)** > * 译文出自:[登链翻译计划](https://github.com/lbc-team/Pioneer) > * 译者:[Tiny熊](https://learnblockchain.cn/people/15) > * 本文永久链接:[learnblockchain.cn/article…](https://learnblockchain.cn/article/1403)  使用OpenZeppelin升级插件部署的合约具备可升级的特性:可以升级以修改其代码,同时保留其地址,状态和余额。 这使你可以迭代地向项目中添加新功能,或修复在线上版本中可能发现的任何错误。 在本文中,我们将展示使用OpenZeppelin Truffle升级插件和Gnosis Safe的生命周期,包含从创建合约,测试合约、部署合约一直到使用Gnosis Safe进行升级整个过程: 1. 创建可升级合约 2. 本地测试合约 3. 将合约部署到公共网络 4. 转移升级权限到 Gnosis Safe多签 5. 实现一个新的升级版本 6. 本地测试升级版本 7. 部署新的升级版本 8. 升级合约 ## 配置开发环境 我们将从创建一个新的npm项目开始: ```bash mkdir mycontract && cd mycontract npm init -y ``` 安装并初始化 Truffle。 注意:我们需要使用Truffle 5.1.35或更高版本。 ```bash npm i --save-dev truffle npx truffle init ``` 安装Truffle升级插件。 ```bash npm i --save-dev @openzeppelin/truffle-upgrades ``` ## 创建可升级合约 我们将使用[OpenZeppelin学习指南](https://docs.openzeppelin.com/learn/developing-smart-contracts#setting-up-a-solidity-project)中最受欢迎的Box合约。 使用以下[Solidity](https://learnblockchain.cn/docs/solidity/)代码在你的`Contracts`目录中创建Box.sol。 注意,可升级合约使用[`initialize`函数而不是构造函数](https://docs.openzeppelin.com/learn/upgrading-smart-contracts#initialization)来初始化状态。 为了保持简单,任何帐户都可以多次调用的公开的`store`函数来初始化状态(而不是受保护的一次性 `initialize` 函数)。 ### Box.sol ```js // contracts/Box.sol // SPDX-License-Identifier: MIT pragma solidity ^0.7.0; contract Box { uint256 private value; // Emitted when the stored value changes event ValueChanged(uint256 newValue); // Stores a new value in the contract function store(uint256 newValue) public { value = newValue; emit ValueChanged(newValue); } // Reads the last stored value function retrieve() public view returns (uint256) { return value; } } ``` ## 本地测试合约 我们的合约应该始终有相应的测试。 要测试合约,我们应该为合约实现创建单元测试。 我们将在测试中使用chai(一个 Js 测试框架),因此首先需要安装它。 ```bash npm i --save-dev chai ``` 我们将为合约实现创建单元测试。 使用以下JavaScript在你的`test`目录中创建`Box.test.js`。 ### Box.test.js ```js // test/Box.test.js // 加载依赖 const { expect } = require('chai'); // Load compiled artifacts const Box = artifacts.require('Box'); // Start test block contract('Box', function () { beforeEach(async function () { // 为每个测试部署一个新的Box合约 this.box = await Box.new(); }); // 测试用 it('retrieve returns a value previously stored', async function () { // Store a value await this.box.store(42); // 测试是否返回了同一个设置的值 // Note that we need to use strings to compare the 256 bit integers expect((await this.box.retrieve()).toString()).to.equal('42'); }); }); ``` 我们还可以通过(升级)代理创建测试进行交互。 注意:我们不需要在此处重复单元测试,这是为了测试代理交互和测试升级。 使用以下JavaScript在你的`test`目录中创建`Box.proxy.test.js`。 ### Box.proxy.test.js ```js // test/Box.proxy.test.js // Load dependencies const { expect } = require('chai'); const { deployProxy } = require('@openzeppelin/truffle-upgrades'); // Load compiled artifacts const Box = artifacts.require('Box'); // Start test block contract('Box (proxy)', function () { beforeEach(async function () { // 为每个测试部署一个新的Box合约 this.box = await deployProxy(Box, [42], {initializer: 'store'}); }); // 测试用例 it('retrieve returns a value previously initialized', async function () { // 测试是否返回了同一个设置的值 // 注意需要使用字符串去对比256位的整数 expect((await this.box.retrieve()).toString()).to.equal('42'); }); }); ``` 在我们编译合约之前,我们需要在`truffle-config.js`中将solc版本更改为`^0.7.0`,因为我们的合约标记为`pragma solidity ^0.7.0` 然后,我们可以运行测试。 ```bash $ npx truffle test ... Contract: Box (proxy) retrieve returns a value previously initialized (43ms) Contract: Box retrieve returns a value previously stored (100ms) 2 passing (3s) ``` ## 将合约部署到公共网络 我们将使用[Truffle迁移](https://learnblockchain.cn/docs/truffle/getting-started/running-migrations.html)来部署Box合约。 Truffle升级插件提供了一个 `deployProxy`功能来部署可升级合约。 它将部署我们实现的合约,ProxyAdmin会作为项目代理和代理管理员,并调用(任何的)初始化函数。 在migrations目录中创建以下`2_deploy_box.js`脚本。 在本文中,我们还没有`initialize`函数,因此我们将使用`store` 函数来初始化状态。 ### 2_deploy_box.js ```js // migrations/2_deploy_box.js const Box = artifacts.require('Box'); const { deployProxy } = require('@openzeppelin/truffle-upgrades'); module.exports = async function (deployer) { await deployProxy(Box, [42], { deployer, initializer: 'store' }); }; ``` 我们通常先将合约部署到本地测试环境(例如`ganache-cli`),然后手动与之交互。 为了节省时间,我们将跳过这步,而直接部署到公共测试网络。 在本文中,我们将部署到Rinkeby。 如果需要配置方面的帮助,请参阅[使用Truffle连接到公共测试网络](https://forum.openzeppelin.com/t/connecting-to-public-test-networks-with-truffle/2960)。 注意:助记符或Infura项目ID之类的机密内容都不应提交给版本控制。 使用Rinkeby网络运行`truffle migration`进行部署。 我们可以看到3 个合约:`Box.sol`、`ProxyAdmin` 和 代理合约`AdminUpgradeabilityProxy`。 ```bash $ npx truffle migrate --network rinkeby ... 2_deploy_box.js =============== Deploying 'Box' --------------- > transaction hash: 0x3263d01ce2e3eb4ba51abf882abbdd9252364b51eb972f82958719d60a8b9ebe > Blocks: 0 Seconds: 5 > contract address: 0xd568071213Ea31B01AA2247BC9eC7285087cf882 ... Deploying 'ProxyAdmin' ---------------------- > transaction hash: 0xf39e8cb97c332b8bbdf0c66b13f26a9a3dc97b207d2caec73ba6df8d5bb6b211 > Blocks: 1 Seconds: 17 > contract address: 0x2A210B6d5EffC0A3BB47dD3791a4C26B8E31f161 ... Deploying 'AdminUpgradeabilityProxy' ------------------------------------ > transaction hash: 0x439711597b694f03b1065582ab44ac0bea5e22b0c6e3c460ae7b4536f004c355 > Blocks: 1 Seconds: 17 > contract address: 0xF325bB49f91445F97241Ec5C286f90215a7E3BC6 ... ``` 我们可以使用Truffle控制台(truffle console)与我们的合约进行交互。 注意: `Box.deployed()` 是我们的代理合约的地址。 ```bash $ npx truffle console --network rinkeby truffle(rinkeby)> box = await Box.deployed() truffle(rinkeby)> box.address '0xF325bB49f91445F97241Ec5C286f90215a7E3BC6' truffle(rinkeby)> (await box.retrieve()).toString() '42' ``` ## 转移升级权限到 Gnosis Safe多签 我们将使用Gnosis Safe来控制合约的升级。 > 译者注: Gnosis Safe 是一款多签名钱包,可设置满足 n/m (例如: 2/3)的签名才可以进行交易。 首先,我们需要在Rinkeby网络上为自己创建一个Gnosis Safe。 可参考文档:[创建Safe Multisig](https://help.gnosis-safe.io/en/articles/3876461-create-a-safe-multisig)的说明。 为简单起见,在本文中,本例使用1/1,在正式产品中,你应考虑使用至少2/3。 在Rinkeby上创建Gnosis Safe之后,请复制地址,以便我们转移所有权。 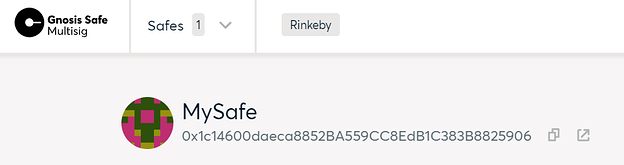 当前代理的管理员(可以执行升级)是ProxyAdmin合约。 只有ProxyAdmin的所有者可以升级代理。 警告:ProxyAdmin 所有权转移时请确保转到我们控制的地址上。 使用以下JavaScript在`migrations`目录中创建`3_transfer_ownership.js`。 将gnosisSafe的值更改为你的Gnosis Safe 地址。 ### 3_transfer_ownership.js ```js // migrations/3_transfer_ownership.js const { admin } = require('@openzeppelin/truffle-upgrades'); module.exports = async function (deployer, network) { // 使用你的 Gnosis Safe 地址 const gnosisSafe = '0x1c14600daeca8852BA559CC8EdB1C383B8825906'; // Don't change ProxyAdmin ownership for our test network if (network !== 'test') { // The owner of the ProxyAdmin can upgrade our contracts await admin.transferProxyAdminOwnership(gnosisSafe); } }; ``` 我们可以在Rinkeby网络上运行迁移。 ```bash $ npx truffle migrate --network rinkeby ... 3_transfer_ownership.js ======================= > Saving migration to chain. ------------------------------------- ... ``` ## 实现一个新的升级版本 一段时间后,我们决定要向合约添加功能。 在本文中,我们将添加一个`increment`函数。 注意:我们无法更改之前合约实现的存储布局,有关技术限制的更多详细信息,请参阅[升级](https://docs.openzeppelin.com/learn/upgrading-smart-contracts#upgrading)。 使用以下Solidity代码在你的`contracts`目录中创建新的实现`BoxV2.sol` 。 ### BoxV2.sol ```js // contracts/BoxV2.sol // SPDX-License-Identifier: MIT pragma solidity ^0.7.0; contract BoxV2 { uint256 private value; // Emitted when the stored value changes event ValueChanged(uint256 newValue); // Stores a new value in the contract function store(uint256 newValue) public { value = newValue; emit ValueChanged(newValue); } // Reads the last stored value function retrieve() public view returns (uint256) { return value; } // Increments the stored value by 1 function increment() public { value = value + 1; emit ValueChanged(value); } } ``` ## 本地测试升级的版本 为了测试我们的升级版本,我们应该为新的合约创建单元测试,并为通过代理测试交互,并检查升级之间是否保持状态。 我们将为新的合约实现创建单元测试。 我们可以在已经创建的单元测试中添加新测试,以确保高覆盖率。 使用以下JavaScript在你的`test`目录中创建`BoxV2.test.js`。 ### BoxV2.test.js ```js // test/BoxV2.test.js // Load dependencies const { expect } = require('chai'); // Load compiled artifacts const BoxV2 = artifacts.require('BoxV2'); // Start test block contract('BoxV2', function () { beforeEach(async function () { // Deploy a new BoxV2 contract for each test this.boxV2 = await BoxV2.new(); }); // Test case it('retrieve returns a value previously stored', async function () { // Store a value await this.boxV2.store(42); // 测试是否返回了同一个设置的值 // 注意需要使用字符串去对比256位的整数 expect((await this.boxV2.retrieve()).toString()).to.equal('42'); }); // Test case it('retrieve returns a value previously incremented', async function () { // Increment await this.boxV2.increment(); // 测试是否返回了同一个设置的值 // 注意需要使用字符串去对比256位的整数 expect((await this.boxV2.retrieve()).toString()).to.equal('1'); }); }); ``` 升级后,我们还可以通过代理进行交互来创建测试。 注意:我们不需要在此处重复单元测试,这是为了测试代理交互和测试升级后的状态。 使用以下JavaScript在你的`test`目录中创建`BoxV2.proxy.test.js`。 ### BoxV2.proxy.test.js ```js // test/Box.proxy.test.js // Load dependencies const { expect } = require('chai'); const { deployProxy, upgradeProxy} = require('@openzeppelin/truffle-upgrades'); // Load compiled artifacts const Box = artifacts.require('Box'); const BoxV2 = artifacts.require('BoxV2'); // Start test block contract('BoxV2 (proxy)', function () { beforeEach(async function () { // Deploy a new Box contract for each test this.box = await deployProxy(Box, [42], {initializer: 'store'}); this.boxV2 = await upgradeProxy(this.box.address, BoxV2); }); // Test case it('retrieve returns a value previously incremented', async function () { // Increment await this.boxV2.increment(); // Test if the returned value is the same one // Note that we need to use strings to compare the 256 bit integers expect((await this.boxV2.retrieve()).toString()).to.equal('43'); }); }); ``` 然后,我们可以运行测试。 ```bash $ npx truffle test Using network 'test'. ... Contract: Box (proxy) retrieve returns a value previously initialized (38ms) Contract: Box retrieve returns a value previously stored (87ms) Contract: BoxV2 (proxy) retrieve returns a value previously incremented (90ms) Contract: BoxV2 retrieve returns a value previously stored (91ms) retrieve returns a value previously incremented (86ms) 5 passing (1s) ``` ## 部署新的升级版本 一旦测试了新的实现,就可以准备升级。 这将验证并部署新合约。 注意:我们仅是准备升级。 我们将使用Gnosis Safe执行实际升级。 使用以下JavaScript在`migrations`目录中创建`4_prepare_upgrade_boxv2.js`。 ### 4_prepare_upgrade_boxv2.js ```js // migrations/4_prepare_upgrade_boxv2.js const Box = artifacts.require('Box'); const BoxV2 = artifacts.require('BoxV2'); const { prepareUpgrade } = require('@openzeppelin/truffle-upgrades'); module.exports = async function (deployer) { const box = await Box.deployed(); await prepareUpgrade(box.address, BoxV2, { deployer }); }; ``` 我们可以在Rinkeby网络上运行迁移,以部署新的合约实现。 注意:运行此迁移时,我们需要跳过之前运行过的迁移。 ```bash $ npx truffle migrate --network rinkeby ... 4_prepare_upgrade_boxv2.js ========================== Deploying 'BoxV2' ----------------- > transaction hash: 0x078c4c4454bb15e3791bc80396975e6e8fc8efb76c6f54c321cdaa01f5b960a7 > Blocks: 1 Seconds: 17 > contract address: 0xEc784bE1CC7F5deA6976f61f578b328E856FB72c ... ``` ## 升级合约 要管理我们在Gnosis Safe中的升级,我们使用OpenZeppelin应用程序(找一下OpenZeppelin的 logo)。 首先,我们需要代理的地址(box.address)和新实现的地址(boxV2.address)。 我们可以从truffle迁移的输出或truffle console中获得。 ```bash $ npx truffle console --network rinkeby truffle(rinkeby)> box = await Box.deployed() truffle(rinkeby)> boxV2 = await BoxV2.deployed() truffle(rinkeby)> box.address '0xF325bB49f91445F97241Ec5C286f90215a7E3BC6' truffle(rinkeby)> boxV2.address '0xEc784bE1CC7F5deA6976f61f578b328E856FB72c' ``` 在“应用程序(APPS)”选项卡中,选择“ OpenZeppelin”应用程序,然后将代理地址粘贴到“合约地址(Contract address)”字段中,然后将新实现的地址粘贴到“新实现的地址( New implementation address)”字段中。 该应用程序应显示该合约是[EIP1967](https://learnblockchain.cn/docs/eips/eip-1967.html)兼容的。  仔细检查地址,然后按“升级(Upgrade)”按钮。 确认显示对话框以提交交易。 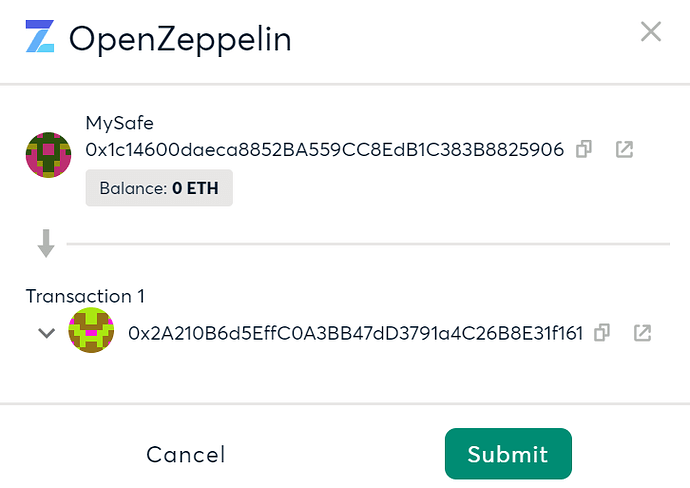 然后,我们需要在MetaMask(或你正使用的钱包)中签署交易。 现在,我们可以与升级后的合约进行交互。 我们需要使用代理地址与BoxV2进行交互。 然后,我们可以调用新的“增量”功能,观察到整个升级过程中都保持了状态。 ```bash $ npx truffle console --network rinkeby truffle(rinkeby)> box = await Box.deployed() truffle(rinkeby)> boxV2 = await BoxV2.at(box.address) truffle(rinkeby)> (await boxV2.retrieve()).toString() '42' truffle(rinkeby)> await boxV2.increment() { tx: ... truffle(rinkeby)> (await boxV2.retrieve()).toString() '43' ``` ## 接下来 我们已经创建了一个可升级的合约,将升级的控制权转移到了Gnosis Safe,并升级了我们的合约。 可以在主网上执行相同的过程。 注意:我们应该始终首先在公共测试网上测试升级。 如果你对本文有任何疑问或建议的改进,请发布在[openzeppelin社区论坛](https://forum.openzeppelin.com/)中。 --- 本翻译由 [Cell Network](https://www.cellnetwork.io/?utm_souce=learnblockchain) 赞助支持。
- 原文:https://forum.openzeppelin.com/t/openzeppelin-truffle-upgrades/3579 作者:abcoathup
- 译文出自:登链翻译计划
- 译者:Tiny熊
- 本文永久链接:learnblockchain.cn/article…
使用OpenZeppelin升级插件部署的合约具备可升级的特性:可以升级以修改其代码,同时保留其地址,状态和余额。 这使你可以迭代地向项目中添加新功能,或修复在线上版本中可能发现的任何错误。
在本文中,我们将展示使用OpenZeppelin Truffle升级插件和Gnosis Safe的生命周期,包含从创建合约,测试合约、部署合约一直到使用Gnosis Safe进行升级整个过程:
- 创建可升级合约
- 本地测试合约
- 将合约部署到公共网络
- 转移升级权限到 Gnosis Safe多签
- 实现一个新的升级版本
- 本地测试升级版本
- 部署新的升级版本
- 升级合约
配置开发环境
我们将从创建一个新的npm项目开始:
mkdir mycontract && cd mycontract
npm init -y
安装并初始化 Truffle。 注意:我们需要使用Truffle 5.1.35或更高版本。
npm i --save-dev truffle
npx truffle init
安装Truffle升级插件。
npm i --save-dev @openzeppelin/truffle-upgrades创建可升级合约
我们将使用OpenZeppelin学习指南中最受欢迎的Box合约。 使用以下Solidity代码在你的Contracts目录中创建Box.sol。
注意,可升级合约使用initialize函数而不是构造函数来初始化状态。 为了保持简单,任何帐户都可以多次调用的公开的store函数来初始化状态(而不是受保护的一次性 initialize 函数)。
Box.sol
// contracts/Box.sol
// SPDX-License-Identifier: MIT
pragma solidity ^0.7.0;

contract Box {
    uint256 private value;

    // Emitted when the stored value changes
    event ValueChanged(uint256 newValue);

    // Stores a new value in the contract
    function store(uint256 newValue) public {
        value = newValue;
        emit ValueChanged(newValue);
    }

    // Reads the last stored value
    function retrieve() public view returns (uint256) {
        return value;
    }
}
本地测试合约
我们的合约应该始终有相应的测试。 要测试合约,我们应该为合约实现创建单元测试。
我们将在测试中使用chai(一个 Js 测试框架),因此首先需要安装它。
npm i --save-dev chai我们将为合约实现创建单元测试。 使用以下JavaScript在你的test目录中创建Box.test.js。
Box.test.js
// test/Box.test.js
// 加载依赖
const { expect } = require('chai');

// Load compiled artifacts
const Box = artifacts.require('Box');

// Start test block
contract('Box', function () {
  beforeEach(async function () {
    // 为每个测试部署一个新的Box合约
    this.box = await Box.new();
  });

  // 测试用
  it('retrieve returns a value previously stored', async function () {
    // Store a value
    await this.box.store(42);

    // 测试是否返回了同一个设置的值
    // Note that we need to use strings to compare the 256 bit integers
    expect((await this.box.retrieve()).toString()).to.equal('42');
  });
});
我们还可以通过(升级)代理创建测试进行交互。
注意:我们不需要在此处重复单元测试,这是为了测试代理交互和测试升级。
使用以下JavaScript在你的test目录中创建Box.proxy.test.js。
Box.proxy.test.js
// test/Box.proxy.test.js
// Load dependencies
const { expect } = require('chai');
const { deployProxy } = require('@openzeppelin/truffle-upgrades');

// Load compiled artifacts
const Box = artifacts.require('Box');

// Start test block
contract('Box (proxy)', function () {
  beforeEach(async function () {
    // 为每个测试部署一个新的Box合约
    this.box = await deployProxy(Box, [42], {initializer: 'store'});
  });

  // 测试用例
  it('retrieve returns a value previously initialized', async function () {
    // 测试是否返回了同一个设置的值
    // 注意需要使用字符串去对比256位的整数
    expect((await this.box.retrieve()).toString()).to.equal('42');
  });
});在我们编译合约之前,我们需要在truffle-config.js中将solc版本更改为^0.7.0,因为我们的合约标记为pragma solidity ^0.7.0
然后,我们可以运行测试。
$ npx truffle test
...
  Contract: Box (proxy)
     retrieve returns a value previously initialized (43ms)

  Contract: Box
     retrieve returns a value previously stored (100ms)

  2 passing (3s)
将合约部署到公共网络
我们将使用Truffle迁移来部署Box合约。 Truffle升级插件提供了一个 deployProxy功能来部署可升级合约。 它将部署我们实现的合约,ProxyAdmin会作为项目代理和代理管理员,并调用(任何的)初始化函数。
在migrations目录中创建以下2_deploy_box.js脚本。
在本文中,我们还没有initialize函数,因此我们将使用store 函数来初始化状态。
2_deploy_box.js
// migrations/2_deploy_box.js
const Box = artifacts.require('Box');

const { deployProxy } = require('@openzeppelin/truffle-upgrades');

module.exports = async function (deployer) {
  await deployProxy(Box, [42], { deployer, initializer: 'store' });
};我们通常先将合约部署到本地测试环境(例如ganache-cli),然后手动与之交互。 为了节省时间,我们将跳过这步,而直接部署到公共测试网络。
在本文中,我们将部署到Rinkeby。 如果需要配置方面的帮助,请参阅使用Truffle连接到公共测试网络。 注意:助记符或Infura项目ID之类的机密内容都不应提交给版本控制。
使用Rinkeby网络运行truffle migration进行部署。 我们可以看到3 个合约:Box.sol、ProxyAdmin 和 代理合约AdminUpgradeabilityProxy。
$ npx truffle migrate --network rinkeby
...
2_deploy_box.js
===============

   Deploying 'Box'
   ---------------
   > transaction hash:    0x3263d01ce2e3eb4ba51abf882abbdd9252364b51eb972f82958719d60a8b9ebe
   > Blocks: 0            Seconds: 5
   > contract address:    0xd568071213Ea31B01AA2247BC9eC7285087cf882
...
   Deploying 'ProxyAdmin'
   ----------------------
   > transaction hash:    0xf39e8cb97c332b8bbdf0c66b13f26a9a3dc97b207d2caec73ba6df8d5bb6b211
   > Blocks: 1            Seconds: 17
   > contract address:    0x2A210B6d5EffC0A3BB47dD3791a4C26B8E31f161
...
   Deploying 'AdminUpgradeabilityProxy'
   ------------------------------------
   > transaction hash:    0x439711597b694f03b1065582ab44ac0bea5e22b0c6e3c460ae7b4536f004c355
   > Blocks: 1            Seconds: 17
   > contract address:    0xF325bB49f91445F97241Ec5C286f90215a7E3BC6
...
我们可以使用Truffle控制台(truffle console)与我们的合约进行交互。
注意: Box.deployed() 是我们的代理合约的地址。
$ npx truffle console --network rinkeby
truffle(rinkeby)> box = await Box.deployed()
truffle(rinkeby)> box.address
'0xF325bB49f91445F97241Ec5C286f90215a7E3BC6'
truffle(rinkeby)> (await box.retrieve()).toString()
'42'
转移升级权限到 Gnosis Safe多签
我们将使用Gnosis Safe来控制合约的升级。
译者注: Gnosis Safe 是一款多签名钱包,可设置满足 n/m (例如: 2/3)的签名才可以进行交易。
首先,我们需要在Rinkeby网络上为自己创建一个Gnosis Safe。 可参考文档:创建Safe Multisig的说明。 为简单起见,在本文中,本例使用1/1,在正式产品中,你应考虑使用至少2/3。
在Rinkeby上创建Gnosis Safe之后,请复制地址,以便我们转移所有权。
当前代理的管理员(可以执行升级)是ProxyAdmin合约。 只有ProxyAdmin的所有者可以升级代理。 警告:ProxyAdmin 所有权转移时请确保转到我们控制的地址上。
使用以下JavaScript在migrations目录中创建3_transfer_ownership.js。 将gnosisSafe的值更改为你的Gnosis Safe 地址。
3_transfer_ownership.js
// migrations/3_transfer_ownership.js
const { admin } = require('@openzeppelin/truffle-upgrades');

module.exports = async function (deployer, network) {
  // 使用你的 Gnosis Safe 地址
  const gnosisSafe = '0x1c14600daeca8852BA559CC8EdB1C383B8825906';

  // Don't change ProxyAdmin ownership for our test network
  if (network !== 'test') {
    // The owner of the ProxyAdmin can upgrade our contracts
    await admin.transferProxyAdminOwnership(gnosisSafe);
  }
};
我们可以在Rinkeby网络上运行迁移。
$ npx truffle migrate --network rinkeby
...
3_transfer_ownership.js
=======================

   > Saving migration to chain.
   -------------------------------------
...
实现一个新的升级版本
一段时间后,我们决定要向合约添加功能。 在本文中,我们将添加一个increment函数。
注意:我们无法更改之前合约实现的存储布局,有关技术限制的更多详细信息,请参阅升级。
使用以下Solidity代码在你的contracts目录中创建新的实现BoxV2.sol 。
BoxV2.sol
// contracts/BoxV2.sol
// SPDX-License-Identifier: MIT
pragma solidity ^0.7.0;

contract BoxV2 {
    uint256 private value;

    // Emitted when the stored value changes
    event ValueChanged(uint256 newValue);

    // Stores a new value in the contract
    function store(uint256 newValue) public {
        value = newValue;
        emit ValueChanged(newValue);
    }

    // Reads the last stored value
    function retrieve() public view returns (uint256) {
        return value;
    }

    // Increments the stored value by 1
    function increment() public {
        value = value + 1;
        emit ValueChanged(value);
    }
}
本地测试升级的版本
为了测试我们的升级版本,我们应该为新的合约创建单元测试,并为通过代理测试交互,并检查升级之间是否保持状态。
我们将为新的合约实现创建单元测试。 我们可以在已经创建的单元测试中添加新测试,以确保高覆盖率。 使用以下JavaScript在你的test目录中创建BoxV2.test.js。
BoxV2.test.js
// test/BoxV2.test.js
// Load dependencies
const { expect } = require('chai');

// Load compiled artifacts
const BoxV2 = artifacts.require('BoxV2');

// Start test block
contract('BoxV2', function () {
  beforeEach(async function () {
    // Deploy a new BoxV2 contract for each test
    this.boxV2 = await BoxV2.new();
  });

  // Test case
  it('retrieve returns a value previously stored', async function () {
    // Store a value
    await this.boxV2.store(42);

    // 测试是否返回了同一个设置的值
    // 注意需要使用字符串去对比256位的整数
    expect((await this.boxV2.retrieve()).toString()).to.equal('42');
  });

  // Test case
  it('retrieve returns a value previously incremented', async function () {
    // Increment
    await this.boxV2.increment();

     // 测试是否返回了同一个设置的值
    // 注意需要使用字符串去对比256位的整数
    expect((await this.boxV2.retrieve()).toString()).to.equal('1');
  });
});
升级后,我们还可以通过代理进行交互来创建测试。 注意:我们不需要在此处重复单元测试,这是为了测试代理交互和测试升级后的状态。
使用以下JavaScript在你的test目录中创建BoxV2.proxy.test.js。
BoxV2.proxy.test.js
// test/Box.proxy.test.js
// Load dependencies
const { expect } = require('chai');
const { deployProxy, upgradeProxy} = require('@openzeppelin/truffle-upgrades');

// Load compiled artifacts
const Box = artifacts.require('Box');
const BoxV2 = artifacts.require('BoxV2');

// Start test block
contract('BoxV2 (proxy)', function () {

  beforeEach(async function () {
    // Deploy a new Box contract for each test
    this.box = await deployProxy(Box, [42], {initializer: 'store'});
    this.boxV2 = await upgradeProxy(this.box.address, BoxV2);
  });

  // Test case
  it('retrieve returns a value previously incremented', async function () {
    // Increment
    await this.boxV2.increment();

    // Test if the returned value is the same one
    // Note that we need to use strings to compare the 256 bit integers
    expect((await this.boxV2.retrieve()).toString()).to.equal('43');
  });
});
然后,我们可以运行测试。
$ npx truffle test
Using network 'test'.
...
  Contract: Box (proxy)
     retrieve returns a value previously initialized (38ms)

  Contract: Box
     retrieve returns a value previously stored (87ms)

  Contract: BoxV2 (proxy)
     retrieve returns a value previously incremented (90ms)

  Contract: BoxV2
     retrieve returns a value previously stored (91ms)
     retrieve returns a value previously incremented (86ms)

  5 passing (1s)
部署新的升级版本
一旦测试了新的实现,就可以准备升级。 这将验证并部署新合约。 注意:我们仅是准备升级。 我们将使用Gnosis Safe执行实际升级。
使用以下JavaScript在migrations目录中创建4_prepare_upgrade_boxv2.js。
4_prepare_upgrade_boxv2.js
// migrations/4_prepare_upgrade_boxv2.js
const Box = artifacts.require('Box');
const BoxV2 = artifacts.require('BoxV2');

const { prepareUpgrade } = require('@openzeppelin/truffle-upgrades');

module.exports = async function (deployer) {
  const box = await Box.deployed();
  await prepareUpgrade(box.address, BoxV2, { deployer });
};
我们可以在Rinkeby网络上运行迁移,以部署新的合约实现。 注意:运行此迁移时,我们需要跳过之前运行过的迁移。
$ npx truffle migrate --network rinkeby
...
4_prepare_upgrade_boxv2.js
==========================

   Deploying 'BoxV2'
   -----------------
   > transaction hash:    0x078c4c4454bb15e3791bc80396975e6e8fc8efb76c6f54c321cdaa01f5b960a7
   > Blocks: 1            Seconds: 17
   > contract address:    0xEc784bE1CC7F5deA6976f61f578b328E856FB72c
...
升级合约
要管理我们在Gnosis Safe中的升级,我们使用OpenZeppelin应用程序(找一下OpenZeppelin的 logo)。
首先,我们需要代理的地址(box.address)和新实现的地址(boxV2.address)。 我们可以从truffle迁移的输出或truffle console中获得。
$ npx truffle console --network rinkeby
truffle(rinkeby)> box = await Box.deployed()
truffle(rinkeby)> boxV2 = await BoxV2.deployed()
truffle(rinkeby)> box.address
'0xF325bB49f91445F97241Ec5C286f90215a7E3BC6'
truffle(rinkeby)> boxV2.address
'0xEc784bE1CC7F5deA6976f61f578b328E856FB72c'
在“应用程序(APPS)”选项卡中,选择“ OpenZeppelin”应用程序,然后将代理地址粘贴到“合约地址(Contract address)”字段中,然后将新实现的地址粘贴到“新实现的地址( New implementation address)”字段中。
该应用程序应显示该合约是EIP1967兼容的。
仔细检查地址,然后按“升级(Upgrade)”按钮。
确认显示对话框以提交交易。
然后,我们需要在MetaMask(或你正使用的钱包)中签署交易。
现在,我们可以与升级后的合约进行交互。 我们需要使用代理地址与BoxV2进行交互。 然后,我们可以调用新的“增量”功能,观察到整个升级过程中都保持了状态。
$ npx truffle console --network rinkeby
truffle(rinkeby)> box = await Box.deployed()
truffle(rinkeby)> boxV2 = await BoxV2.at(box.address)
truffle(rinkeby)> (await boxV2.retrieve()).toString()
'42'
truffle(rinkeby)> await boxV2.increment()
{ tx:
...
truffle(rinkeby)> (await boxV2.retrieve()).toString()
'43'
接下来
我们已经创建了一个可升级的合约,将升级的控制权转移到了Gnosis Safe,并升级了我们的合约。
可以在主网上执行相同的过程。 注意:我们应该始终首先在公共测试网上测试升级。
如果你对本文有任何疑问或建议的改进,请发布在openzeppelin社区论坛中。
本翻译由 Cell Network 赞助支持。
- 发表于 2020-08-28 12:50
- 阅读 ( 2304 )
- 学分 ( 410 )
- 分类:以太坊


评论