The Graph入门教程:如何索引合约事件


一篇完整的TheGraph教程,学习到 定义数据索引的Subgraph并部署,以及前端 DApp 中查询索引数据。
编写智能的合约时,通常状态的变化是通过触发一个事件来表达,The Graph则是捕捉区块链事件并提供一个查询事件的GraphQL接口,让我们可以方便的跟踪数据的变化。 实际上很多 DEFI 协议及都是The Graph来基于查询数据。 这篇TheGraph教程在官方的教程基础上,进行了一些补充扩展主要包含以下内容: 1. 在Ropsten部署一个合约,并调用触发事件。 2. 创建定义数据索引的Subgraph。 3. 部署Subgraph到TheGraph,实现数据索引。 4. 在前端 DApp 中查询索引数据。 本教程的完整代码已上传到 GitHub: https://github.com/xilibi2003/Gameplayer ## 1. 合约开发与部署 克隆教程的代码,在contracts下可以看到`GravatarRegistry`智能合约,用户可以调用`GravatarRegistry`合约来创建及更新自己的昵称和头像,合约关键代码如下: ```javascript contract GravatarRegistry { event NewGravatar(uint id, address owner, string displayName, string imageUrl); event UpdatedGravatar(uint id, address owner, string displayName, string imageUrl); struct Gravatar { address owner; string displayName; string imageUrl; } Gravatar[] public gravatars; mapping (uint => address) public gravatarToOwner; mapping (address => uint) public ownerToGravatar; function createGravatar(string _displayName, string _imageUrl) public { require(ownerToGravatar[msg.sender] == 0); uint id = gravatars.push(Gravatar(msg.sender, _displayName, _imageUrl)) - 1; gravatarToOwner[id] = msg.sender; ownerToGravatar[msg.sender] = id; emit NewGravatar(id, msg.sender, _displayName, _imageUrl); } function updateGravatarName(string _displayName) public { require(ownerToGravatar[msg.sender] != 0); require(msg.sender == gravatars[ownerToGravatar[msg.sender]].owner); uint id = ownerToGravatar[msg.sender]; gravatars[id].displayName = _displayName; emit UpdatedGravatar(id, msg.sender, _displayName, gravatars[id].imageUrl); } } ``` 可以看到合约里在创建和更新时分别触发了 `NewGravatar` 和 `UpdatedGravatar` 事件,稍后再subgraph里,将跟踪这两个事件,但是需要我们先把合约部署到网络上,这里使用以太坊测试网Ropsten(使用其他的网络也是一样的): ``` module.exports = { networks: { ropsten: { provider: function() { return new HDWalletProvider( process.env.MNEMONIC, `https://ropsten.infura.io/v3/${process.env.ROPSTEN_INFURA_API_KEY}` ) }, network_id: '3', }, } } ``` > 这里为了安全考虑,把助记词和 API KEY 保存在`.env`文件中 添加部署脚本2_deploy_contract.js: ``` const GravatarRegistry = artifacts.require('./GravatarRegistry.sol') module.exports = async function(deployer) { await deployer.deploy(GravatarRegistry) } ``` 添加执行交易脚本,以便触发事件3_create_gravatars.js: ``` const GravatarRegistry = artifacts.require('./GravatarRegistry.sol') module.exports = async function(deployer, network, accounts) { const registry = await GravatarRegistry.deployed() console.log('Account address:', registry.address) await registry.createGravatar('Carl', 'https://thegraph.com/img/team/team_04.png', { from: accounts[0], }) } ``` 然后执行 `truffle migrate --network ropsten ` 以便完成部署和执行createGravatar交易,控制台里会打印出`GravatarRegistry`合约部署的地址,复制这个合约地址,后面在编写subgraph需要使用到。 ## 2. 创建定义数据索引的Subgraph TheGraph中定义如何为数据建立索引,称为Subgraph,它包含三个组件: 1. Manifest 清单(*subgraph.yaml*) - 定义配置项 2. Schema 模式(*schema.graphql*) - 定义数据 3. Mapping 映射(*mapping.ts*) - 定义事件到数据的转换 后面我们将逐一介绍他们的作用及如何来编写。 ### 在TheGraph创建一个 Subgraph 空间 因为需要借助 TheGraph 的节点来完成数据的索引,因此我们需要在[TheGraph网站]([Browse and Explore Subgraphs (thegraph.com)](https://thegraph.com/explorer/))上创建一个Subgraph。 > 如果你有自己的私有链,这可以克隆Graph节点代码(https://github.com/graphprotocol/graph-node/),自己运行Graph节点来完成数据的索引。 如果没有[The Graph ](https://thegraph.com/explorer/)的账户,可以用GitHub注册。创建账户之后,进入仪表盘就可以开始通过界面创建subgraph,进入你的[仪表板](https://thegraph.com/explorer/dashboard/),并点击**Add Subgraph**: 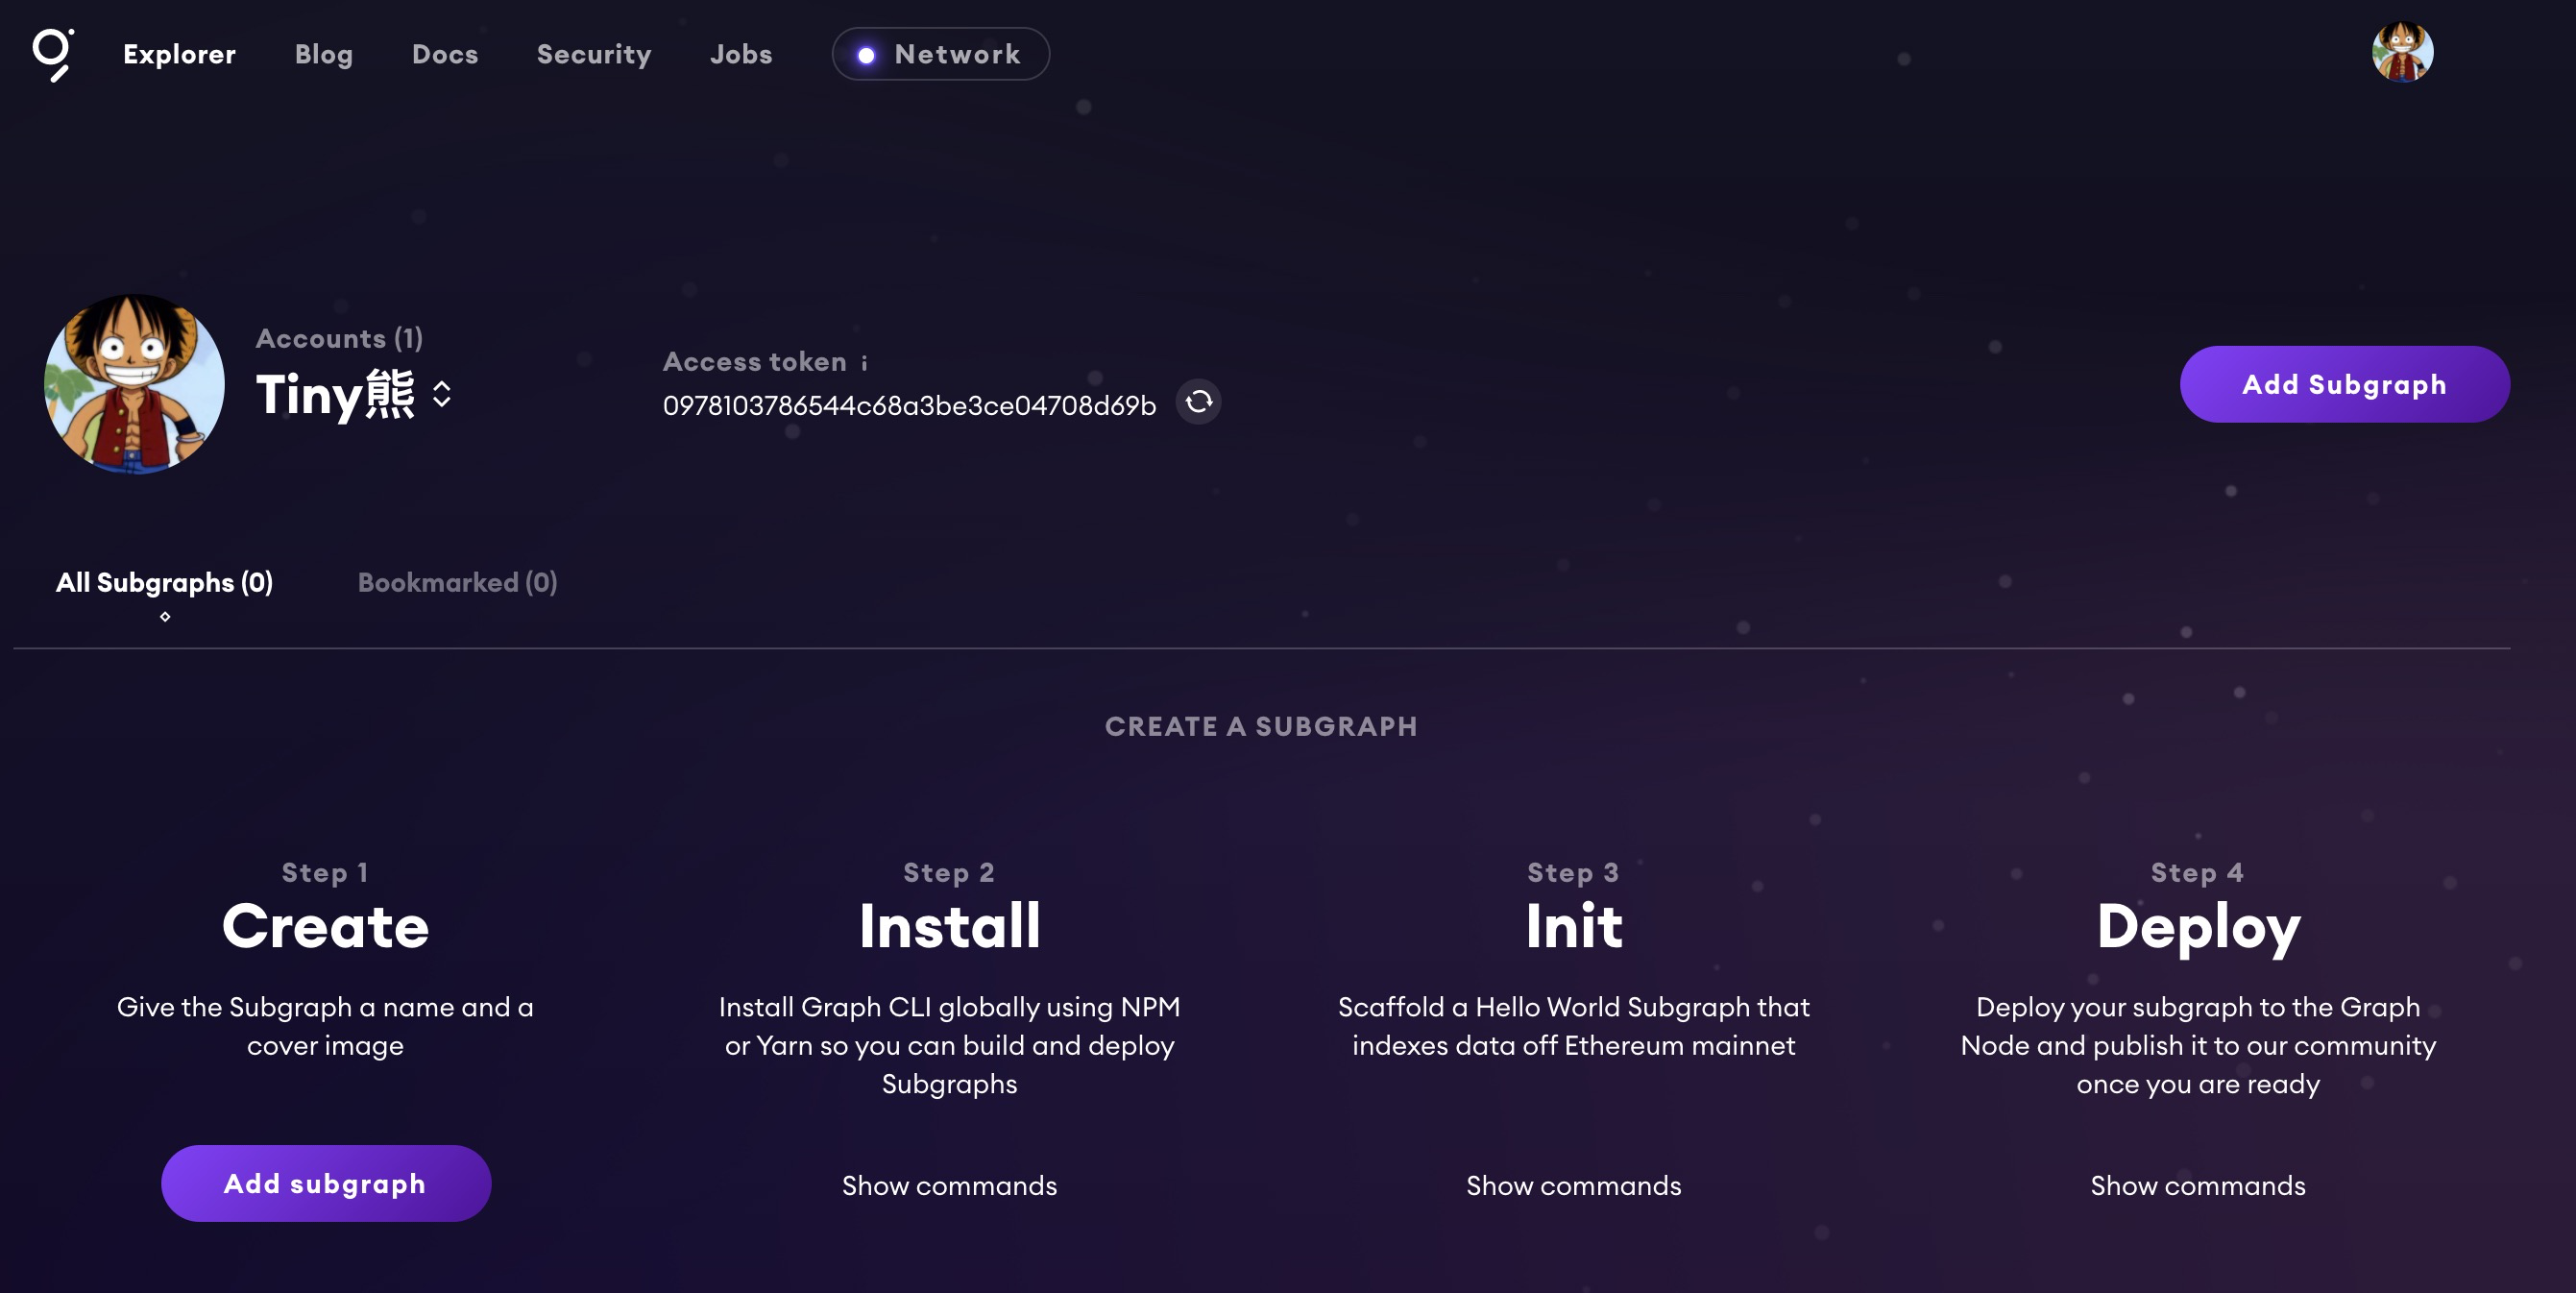 可以为你的 subgraph 选择一个图像,定义一个名称。完成后点击**保存**,一个新的、未部署的subgraph将显示在仪表板上。 ### 开发和部署subgraph 先使用Yarn或NPM在全局安装Graph CLI: ```sh $ npm install -g @graphprotocol/graph-cli $ yarn global add @graphprotocol/graph-cli ``` ### 初始化配置 使用graph init 创建一个subgraph项目: ```sh $ graph init <GITHUB_USERNAME>/<SUBGRAPH_NAME> <DIRECTORY> ``` - `<GITHUB_USERNAME>`是必需的,这是你的GitHub用户名 - `<SUBGRAPH_NAME>`是必需的,这是你的前面创建subgraph项目的名称 - `<DIRECTORY>`是可选的,它是创建subgraph的子目录的名称。 这个命令也可以加入参数 `--from-example` ,基于官方的示例创建项目。 ``` > graph init xilibi2003/Gameplayer Subgraph name · xilibi2003/Gameplayer Directory to create the subgraph in · Gameplayer Ethereum network · ropsten Contract address · 0x8CfDDbD441Fc6ffE3c02244a6B93EF9e89FaFA4D Failed to fetch ABI from Etherscan: request to https://api-ropsten.etherscan.io/api?module=contract&action=getabi&address=0x8CfDDbD441Fc6ffE3c02244a6B93EF9e89FaFA4D failed, reason: connect ETIMEDOUT 103.240.180.117:443 ABI file (path) · build/contracts/GravatarRegistry.json Contract Name · Gravatar ``` `graph init`会提示我们选择以太坊网络、输入合约地址、提供合约 ABI、及合约名称,这些信息用来帮助创建Subgraph的配置清单文件:*subgraph.yaml*: ```yaml specVersion: 0.0.1 schema: file: ./schema.graphql dataSources: - kind: ethereum/contract name: GravatarRegistry network: ropsten source: address: "0x8CfDDbD441Fc6ffE3c02244a6B93EF9e89FaFA4D" abi: GravatarRegistry mapping: kind: ethereum/events apiVersion: 0.0.2 language: wasm/assemblyscript entities: - NewGravatar - UpdatedGravatar abis: - name: GravatarRegistry file: ./abis/GravatarRegistry.json eventHandlers: - event: NewGravatar(uint256,address,string,string) handler: handleNewGravatar - event: UpdatedGravatar(uint256,address,string,string) handler: handleUpdatedGravatar file: ./src/mapping.ts ``` subgraph.yaml 配置文件通常会定义这些内容: - 要索引哪些智能合约(地址,网络,ABI...) - 监听哪些事件 - 其他要监听的内容,例如函数调用或块 - 被调用的映射函数(*mapping.ts*) 在这里可以找到如何[定义subgraph.yaml的详细文档](https://thegraph.com/docs/define-a-subgraph#the-subgraph-manifest)。 ### 定义模式 编写自己的模式 schema.graphql,**模式是GraphQL数据定义**。允许我们定义实体及其类型,这里我们在schema.graphql定义一个Gravatar实体: ``` type Gravatar @entity { id: ID! owner: Bytes! displayName: String! imageUrl: String! } ``` `ID` ,`Bytes`及 `String` 是GraphQL数据类型,`!`表示该值不能为空。模式的定义文档可以在这里找到:[https://thegraph.com/docs/define-a-subgraph#the-graphql-schema](https://thegraph.com/docs/define-a-subgraph#the-graphql-schema)。 ### 定义映射(mapping.ts) TheGraph中的映射文件定义了如何将传入事件转换为实体的函数。它用TypeScript的子集[AssemblyScript](https://www.assemblyscript.org/)编写。因此可以将其编译为WASM([WebAssembly](https://webassembly.org/)),以更高效,更便携式地执行映射。 需要定义*subgraph.yaml*文件中每个handler函数,因此在我们的例子中,我们需要实现函数:`handleNewGravatar` 及 `handleUpdatedGravatar`。 TheGraph 提供了一个命令:`graph codegen` 可以生成解析事件的代码及模式实体代码,因此只需要基于生成的代码编写映射函数,mapping.ts 定义如下: ```typescript import { NewGravatar, UpdatedGravatar } from '../generated/Gravity/Gravity' import { Gravatar } from '../generated/schema' export function handleNewGravatar(event: NewGravatar): void { let gravatar = new Gravatar(event.params.id.toHex()) gravatar.owner = event.params.owner gravatar.displayName = event.params.displayName gravatar.imageUrl = event.params.imageUrl gravatar.save() } export function handleUpdatedGravatar(event: UpdatedGravatar): void { let id = event.params.id.toHex() let gravatar = Gravatar.load(id) if (gravatar == null) { gravatar = new Gravatar(id) } gravatar.owner = event.params.owner gravatar.displayName = event.params.displayName gravatar.imageUrl = event.params.imageUrl gravatar.save() } ``` 在handler函数,我们使用事件的ID 创建`Gravatar`实体。并使用相应的字段填充数据,最后需要`.save()`来存储实体。 如何编写映射函数,还可以参考文档:[https://thegraph.com/docs/define-a-subgraph#writing-mappings](https://thegraph.com/docs/define-a-subgraph#writing-mappings)。 接下来就是 把编写好的Subgraph部署到 TheGraph ## 3. 部署 Subgraph 在控制台先用graph auth 进行授权: ``` graph auth https://api.thegraph.com/deploy/ <ACCESS_TOKEN> ``` <ACCESS_TOKEN> 请使用你在创建 Subgraph 空间提示的Access token。 然后使用graph deploy进行部署: ```bash graph deploy \ --debug \ --node https://api.thegraph.com/deploy/ \ --ipfs https://api.thegraph.com/ipfs/ \ <SUBGRAPH_NAME> ``` <SUBGRAPH_NAME> 使用完成的Subgraph名称,我们这里是:xilibi2003/Gameplayer 。 如果顺利的话,可以在TheGraph 的面板上观察到subgraph索引过程,初始索引可能需要等待几分钟, 如下图: 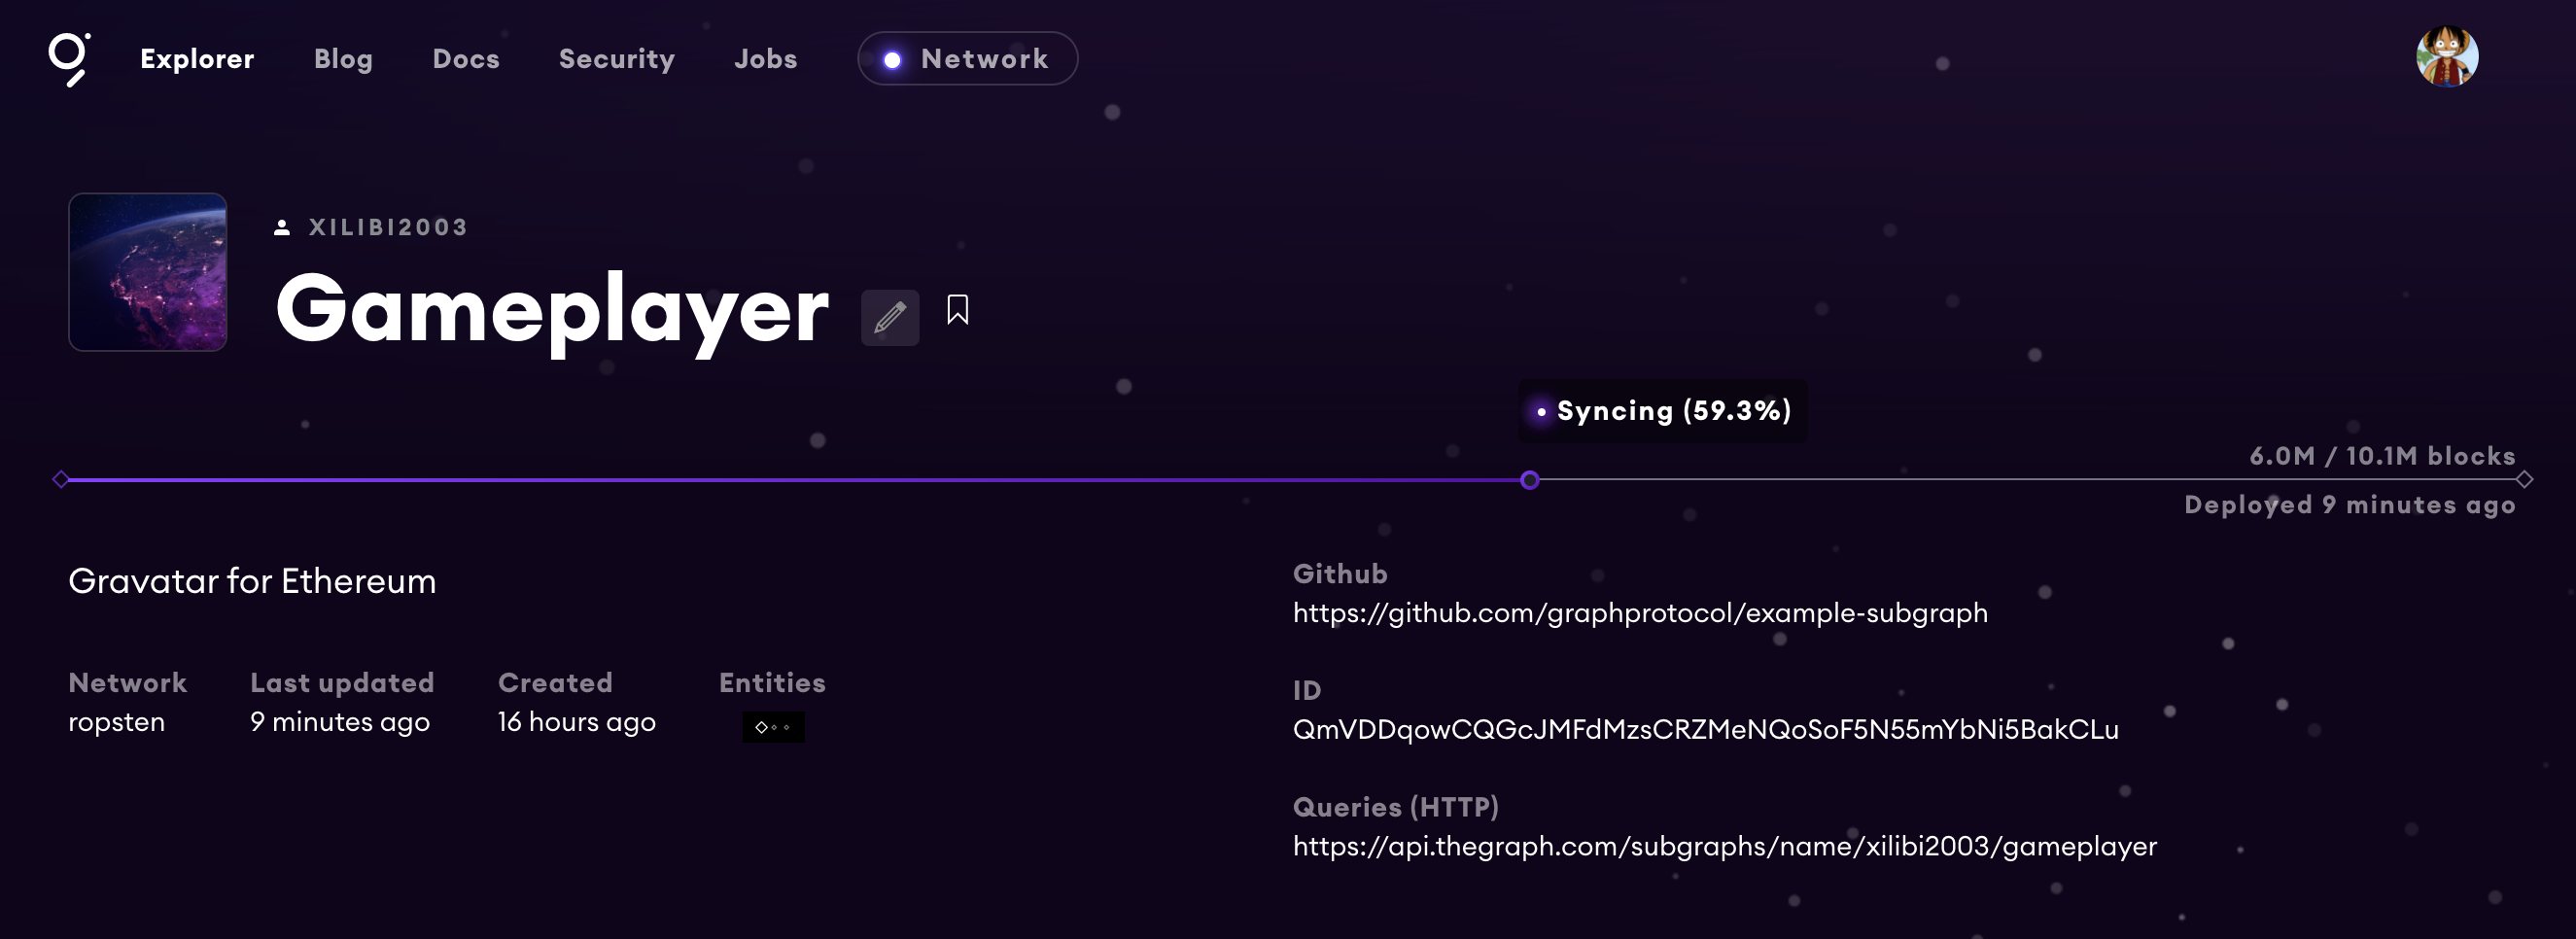 当索引完成后,通过Graph Explorer中的GraphQL playground 进行交互查询: 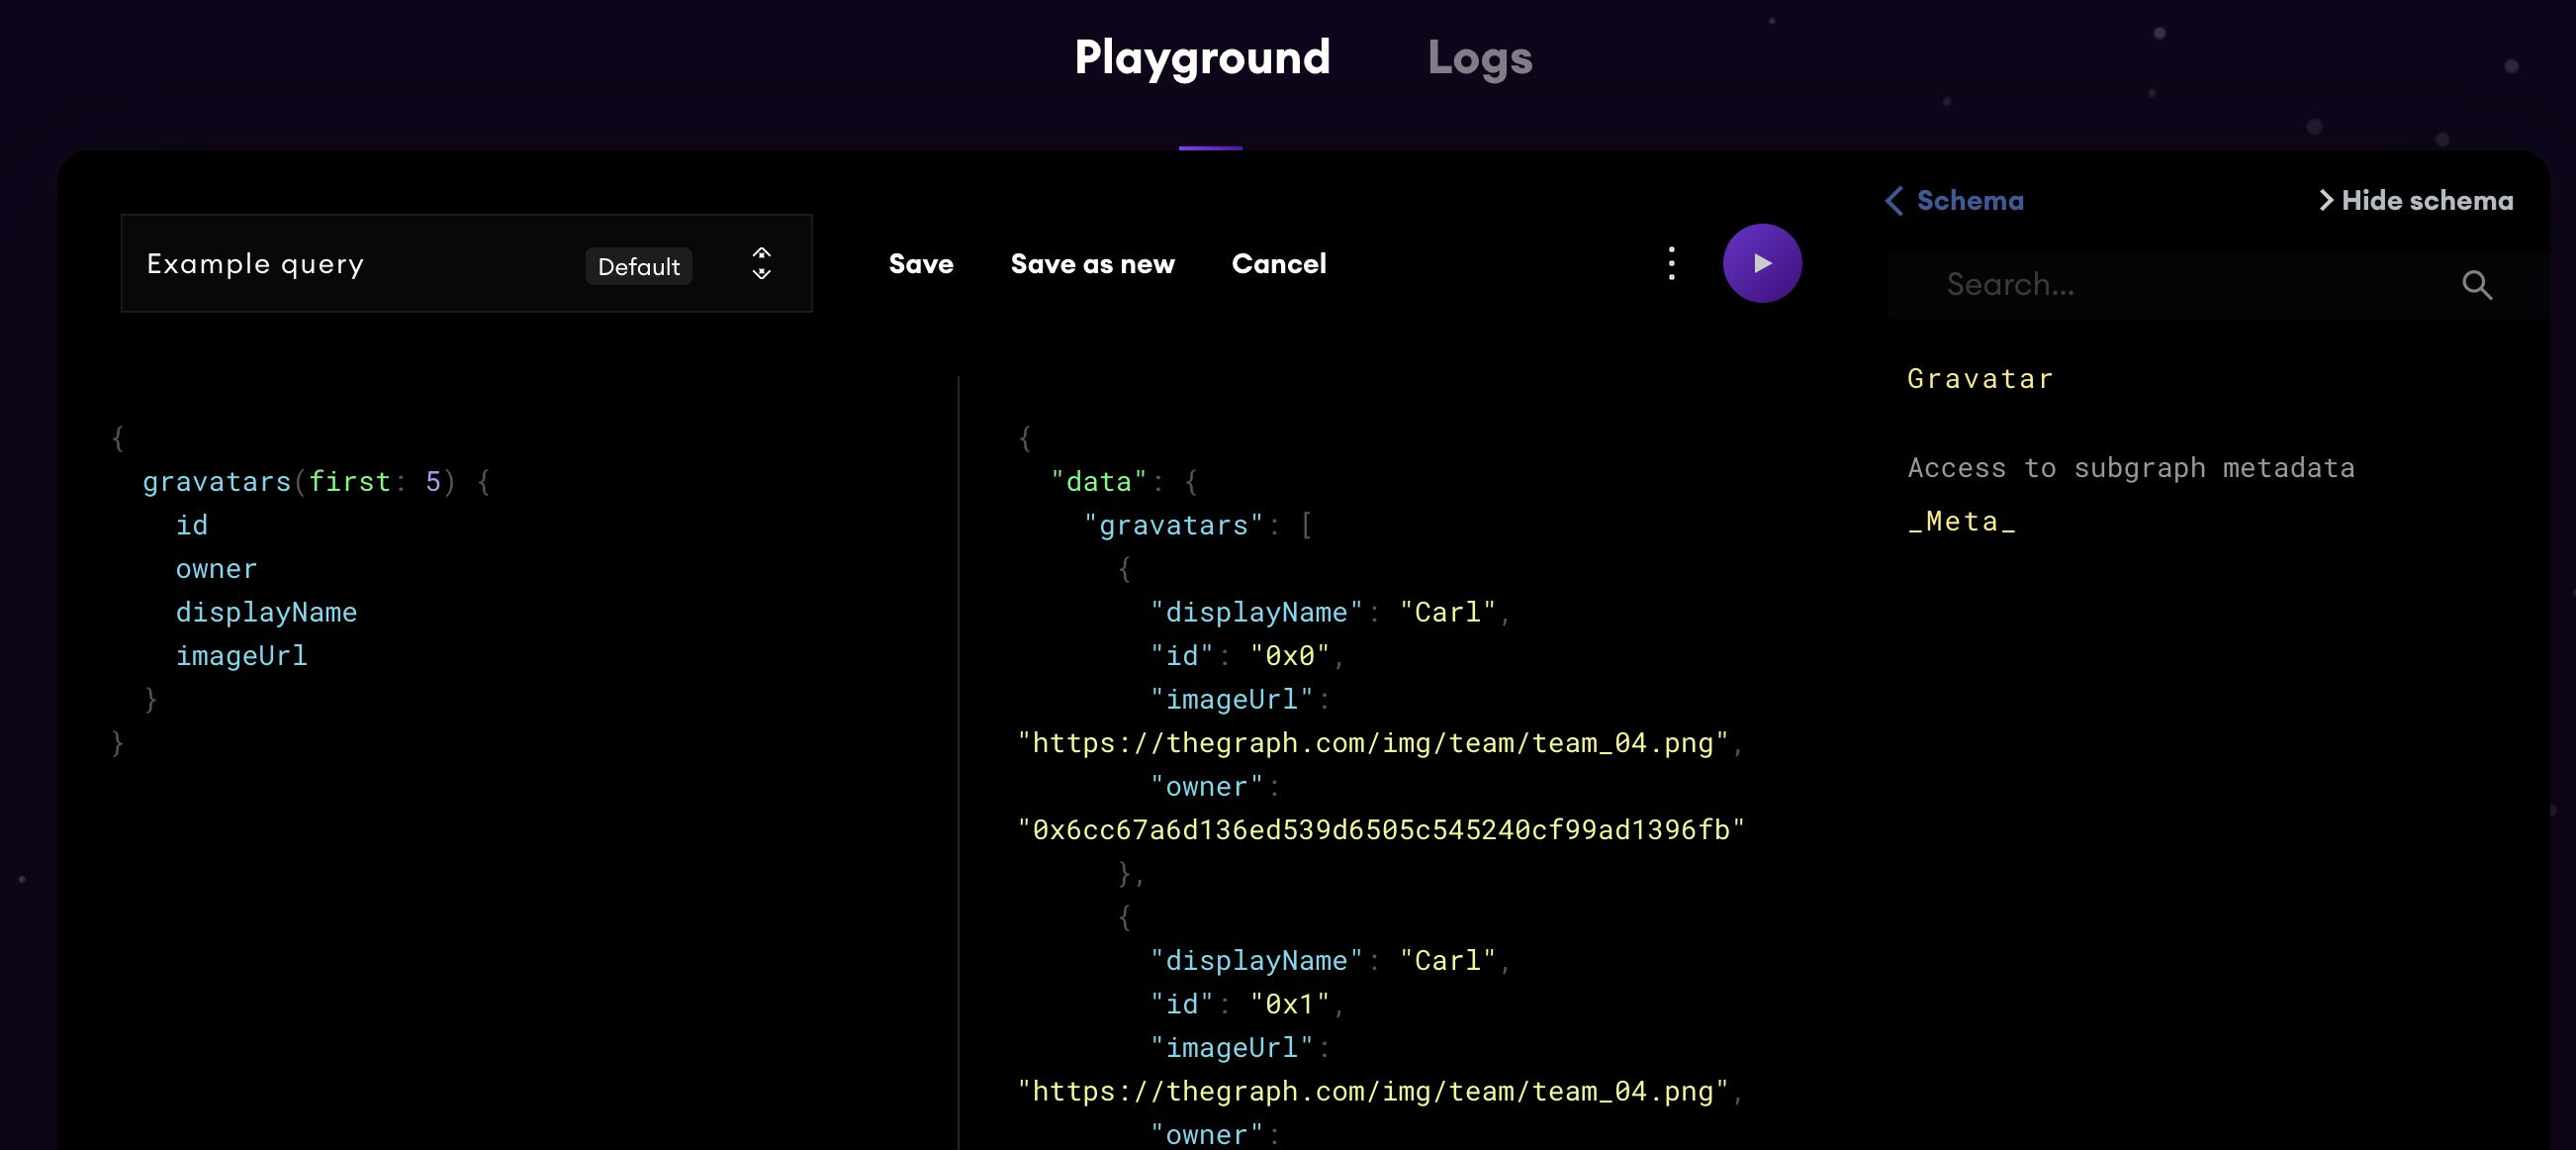 ## 4. DApp前端查询索引数据 在我们的代码库中,front 目录中,已经提供一个 示例DApp,用来访问数据。进入应用程序目录,配置查询subgraph的GraphQL端点地址: ```sh $ cd front $ echo 'REACT_APP_GRAPHQL_ENDPOINT=https://api.thegraph.com/subgraphs/name/<GITHUB_USERNAME>/<SUBGRAPH_NAME>' > .env ``` 最后,安装DApp的依赖并启动项目。 ```sh $ yarn && yarn start ``` 可以看到通过GraphQL查询出来了 3 条数据: 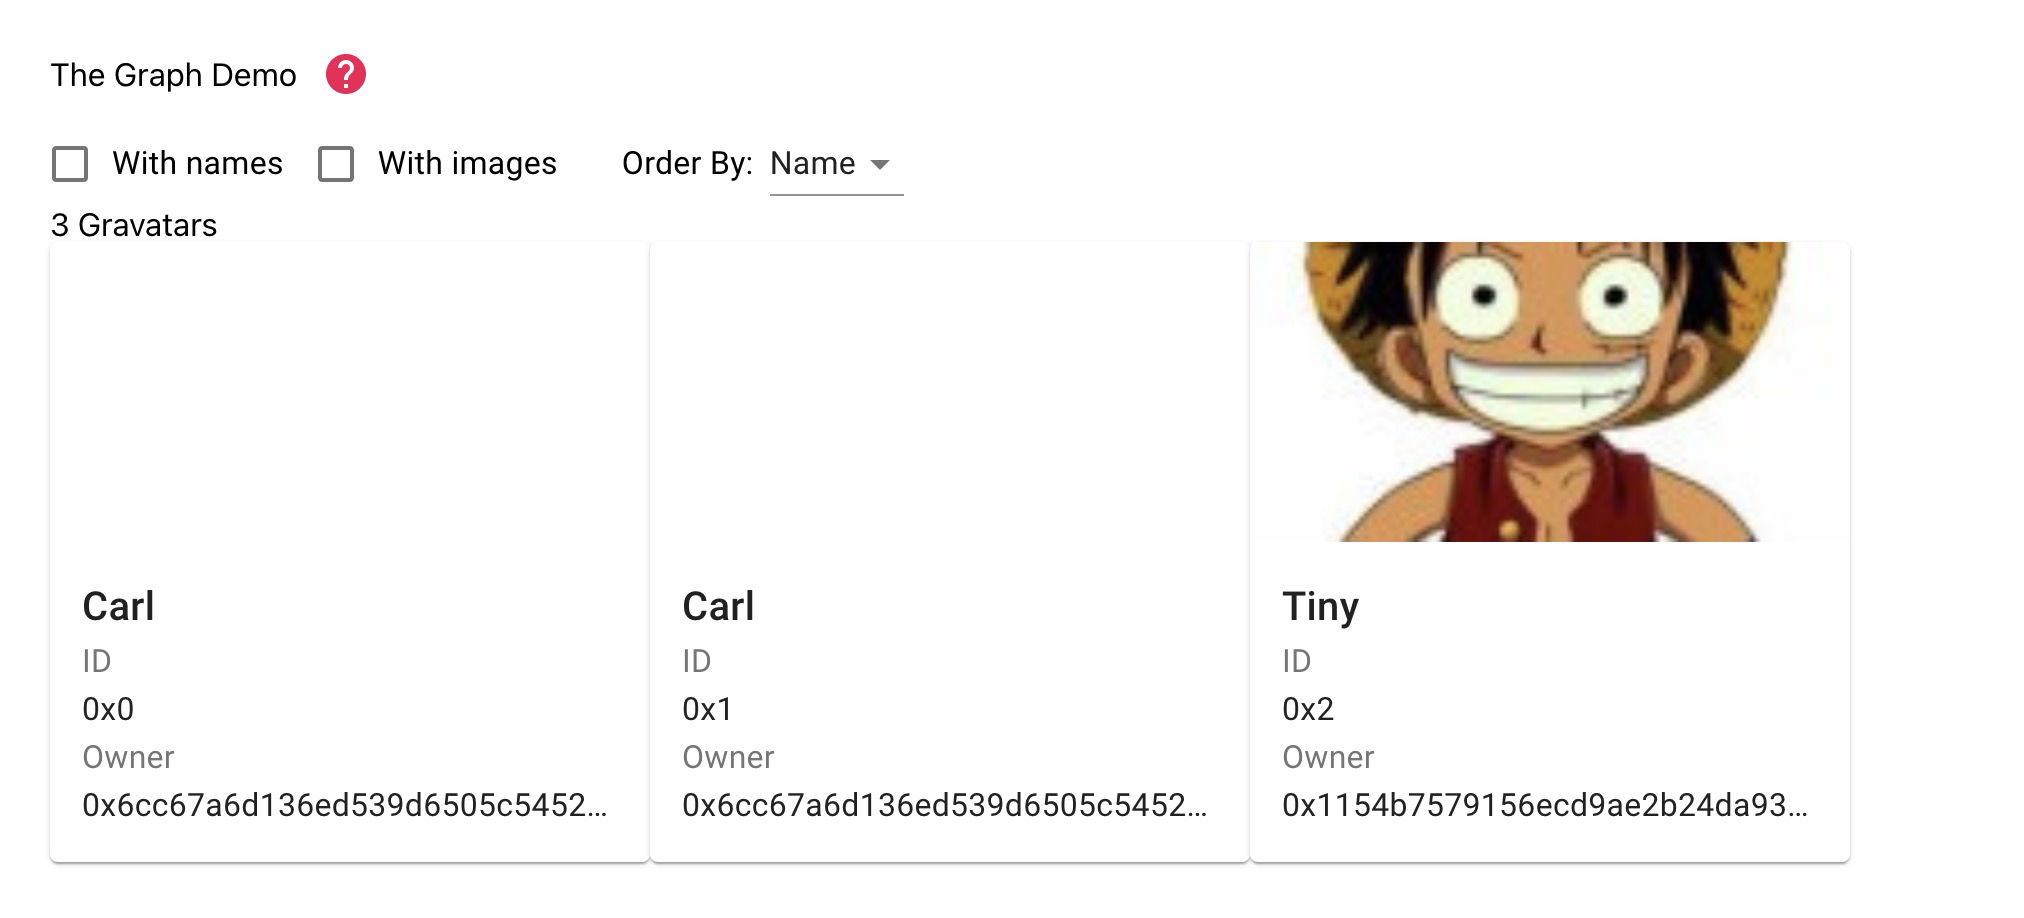 在React前端使用了ApolloClient 来集成GraphQL查询, 如果是 Vue 可以使用 [Vue Apollo](https://apollo.vuejs.org/guide/#become-a-sponsor) 。 GraphQL查询的代码可以在 `front/App.js` 找到,这里不做详细介绍。
编写智能的合约时,通常状态的变化是通过触发一个事件来表达,The Graph则是捕捉区块链事件并提供一个查询事件的GraphQL接口,让我们可以方便的跟踪数据的变化。 实际上很多 DEFI 协议及都是The Graph来基于查询数据。
这篇TheGraph教程在官方的教程基础上,进行了一些补充扩展主要包含以下内容:
- 在Ropsten部署一个合约,并调用触发事件。
- 创建定义数据索引的Subgraph。
- 部署Subgraph到TheGraph,实现数据索引。
- 在前端 DApp 中查询索引数据。
本教程的完整代码已上传到 GitHub: https://github.com/xilibi2003/Gameplayer
1. 合约开发与部署
克隆教程的代码,在contracts下可以看到GravatarRegistry智能合约,用户可以调用GravatarRegistry合约来创建及更新自己的昵称和头像,合约关键代码如下:
contract GravatarRegistry {
  event NewGravatar(uint id, address owner, string displayName, string imageUrl);
  event UpdatedGravatar(uint id, address owner, string displayName, string imageUrl);

  struct Gravatar {
    address owner;
    string displayName;
    string imageUrl;
  }

  Gravatar[] public gravatars;

  mapping (uint => address) public gravatarToOwner;
  mapping (address => uint) public ownerToGravatar;

  function createGravatar(string _displayName, string _imageUrl) public {
    require(ownerToGravatar[msg.sender] == 0);
    uint id = gravatars.push(Gravatar(msg.sender, _displayName, _imageUrl)) - 1;

    gravatarToOwner[id] = msg.sender;
    ownerToGravatar[msg.sender] = id;

    emit NewGravatar(id, msg.sender, _displayName, _imageUrl);
  }

  function updateGravatarName(string _displayName) public {
    require(ownerToGravatar[msg.sender] != 0);
    require(msg.sender == gravatars[ownerToGravatar[msg.sender]].owner);

    uint id = ownerToGravatar[msg.sender];

    gravatars[id].displayName = _displayName;
    emit UpdatedGravatar(id, msg.sender, _displayName, gravatars[id].imageUrl);
  }
}
可以看到合约里在创建和更新时分别触发了 NewGravatar 和 UpdatedGravatar 事件,稍后再subgraph里,将跟踪这两个事件,但是需要我们先把合约部署到网络上,这里使用以太坊测试网Ropsten(使用其他的网络也是一样的):
module.exports = {
  networks: {
    ropsten: {
      provider: function() {
        return new HDWalletProvider(
          process.env.MNEMONIC,
          `https://ropsten.infura.io/v3/${process.env.ROPSTEN_INFURA_API_KEY}`
        )
      },
      network_id: '3',
    },
  }
}
这里为了安全考虑,把助记词和 API KEY 保存在
.env文件中
添加部署脚本2_deploy_contract.js:
const GravatarRegistry = artifacts.require('./GravatarRegistry.sol')

module.exports = async function(deployer) {
  await deployer.deploy(GravatarRegistry)
}
添加执行交易脚本,以便触发事件3_create_gravatars.js:
const GravatarRegistry = artifacts.require('./GravatarRegistry.sol')

module.exports = async function(deployer, network, accounts) {
  const registry = await GravatarRegistry.deployed()
  console.log('Account address:', registry.address)
  await registry.createGravatar('Carl', 'https://thegraph.com/img/team/team_04.png', {
    from: accounts[0],
  })

}
然后执行 truffle migrate --network ropsten 以便完成部署和执行createGravatar交易,控制台里会打印出GravatarRegistry合约部署的地址,复制这个合约地址,后面在编写subgraph需要使用到。
2. 创建定义数据索引的Subgraph
TheGraph中定义如何为数据建立索引,称为Subgraph,它包含三个组件:
- Manifest 清单(subgraph.yaml) - 定义配置项
- Schema 模式(schema.graphql) - 定义数据
- Mapping 映射(mapping.ts) - 定义事件到数据的转换
后面我们将逐一介绍他们的作用及如何来编写。
在TheGraph创建一个 Subgraph 空间
因为需要借助 TheGraph 的节点来完成数据的索引,因此我们需要在[TheGraph网站](Browse and Explore Subgraphs (thegraph.com))上创建一个Subgraph。
如果你有自己的私有链,这可以克隆Graph节点代码(https://github.com/graphprotocol/graph-node/),自己运行Graph节点来完成数据的索引。
如果没有The Graph 的账户,可以用GitHub注册。创建账户之后,进入仪表盘就可以开始通过界面创建subgraph,进入你的仪表板,并点击Add Subgraph:
可以为你的 subgraph 选择一个图像,定义一个名称。完成后点击保存,一个新的、未部署的subgraph将显示在仪表板上。
开发和部署subgraph
先使用Yarn或NPM在全局安装Graph CLI:
$ npm install -g @graphprotocol/graph-cli
$ yarn global add @graphprotocol/graph-cli
初始化配置
使用graph init 创建一个subgraph项目:
$ graph init <GITHUB_USERNAME>/<SUBGRAPH_NAME> <DIRECTORY><GITHUB_USERNAME>是必需的,这是你的GitHub用户名<SUBGRAPH_NAME>是必需的,这是你的前面创建subgraph项目的名称<DIRECTORY>是可选的,它是创建subgraph的子目录的名称。
这个命令也可以加入参数 --from-example ,基于官方的示例创建项目。
> graph init xilibi2003/Gameplayer
 Subgraph name · xilibi2003/Gameplayer
 Directory to create the subgraph in · Gameplayer
 Ethereum network · ropsten
 Contract address · 0x8CfDDbD441Fc6ffE3c02244a6B93EF9e89FaFA4D
 Failed to fetch ABI from Etherscan: request to https://api-ropsten.etherscan.io/api?module=contract&action=getabi&address=0x8CfDDbD441Fc6ffE3c02244a6B93EF9e89FaFA4D failed, reason: connect ETIMEDOUT 103.240.180.117:443
 ABI file (path) · build/contracts/GravatarRegistry.json
 Contract Name · Gravatar
graph init会提示我们选择以太坊网络、输入合约地址、提供合约 ABI、及合约名称,这些信息用来帮助创建Subgraph的配置清单文件:subgraph.yaml:
specVersion: 0.0.1
schema:
  file: ./schema.graphql
dataSources:
  - kind: ethereum/contract
    name: GravatarRegistry
    network: ropsten
    source:
      address: "0x8CfDDbD441Fc6ffE3c02244a6B93EF9e89FaFA4D"
      abi: GravatarRegistry
    mapping:
      kind: ethereum/events
      apiVersion: 0.0.2
      language: wasm/assemblyscript
      entities:
        - NewGravatar
        - UpdatedGravatar
      abis:
        - name: GravatarRegistry
          file: ./abis/GravatarRegistry.json
      eventHandlers:
        - event: NewGravatar(uint256,address,string,string)
          handler: handleNewGravatar
        - event: UpdatedGravatar(uint256,address,string,string)
          handler: handleUpdatedGravatar
      file: ./src/mapping.ts
subgraph.yaml 配置文件通常会定义这些内容:
- 要索引哪些智能合约(地址,网络,ABI...)
- 监听哪些事件
- 其他要监听的内容,例如函数调用或块
- 被调用的映射函数(mapping.ts)
在这里可以找到如何定义subgraph.yaml的详细文档。
定义模式
编写自己的模式 schema.graphql,模式是GraphQL数据定义。允许我们定义实体及其类型,这里我们在schema.graphql定义一个Gravatar实体:
type Gravatar @entity {
  id: ID!
  owner: Bytes!
  displayName: String!
  imageUrl: String!
}
ID ,Bytes及 String 是GraphQL数据类型,!表示该值不能为空。模式的定义文档可以在这里找到:https://thegraph.com/docs/define-a-subgraph#the-graphql-schema。
定义映射(mapping.ts)
TheGraph中的映射文件定义了如何将传入事件转换为实体的函数。它用TypeScript的子集AssemblyScript编写。因此可以将其编译为WASM(WebAssembly),以更高效,更便携式地执行映射。
需要定义subgraph.yaml文件中每个handler函数,因此在我们的例子中,我们需要实现函数:handleNewGravatar 及 handleUpdatedGravatar。
TheGraph 提供了一个命令:graph codegen 可以生成解析事件的代码及模式实体代码,因此只需要基于生成的代码编写映射函数,mapping.ts 定义如下:
import { NewGravatar, UpdatedGravatar } from '../generated/Gravity/Gravity'
import { Gravatar } from '../generated/schema'

export function handleNewGravatar(event: NewGravatar): void {
  let gravatar = new Gravatar(event.params.id.toHex())
  gravatar.owner = event.params.owner
  gravatar.displayName = event.params.displayName
  gravatar.imageUrl = event.params.imageUrl
  gravatar.save()
}

export function handleUpdatedGravatar(event: UpdatedGravatar): void {
  let id = event.params.id.toHex()
  let gravatar = Gravatar.load(id)
  if (gravatar == null) {
    gravatar = new Gravatar(id)
  }
  gravatar.owner = event.params.owner
  gravatar.displayName = event.params.displayName
  gravatar.imageUrl = event.params.imageUrl
  gravatar.save()
}
在handler函数,我们使用事件的ID 创建Gravatar实体。并使用相应的字段填充数据,最后需要.save()来存储实体。
如何编写映射函数,还可以参考文档:https://thegraph.com/docs/define-a-subgraph#writing-mappings。
接下来就是 把编写好的Subgraph部署到 TheGraph
3. 部署 Subgraph
在控制台先用graph auth 进行授权:
graph auth https://api.thegraph.com/deploy/ <ACCESS_TOKEN><ACCESS_TOKEN> 请使用你在创建 Subgraph 空间提示的Access token。
然后使用graph deploy进行部署:
graph deploy \
    --debug \
    --node https://api.thegraph.com/deploy/ \
    --ipfs https://api.thegraph.com/ipfs/ \
    <SUBGRAPH_NAME>
<SUBGRAPH_NAME> 使用完成的Subgraph名称,我们这里是:xilibi2003/Gameplayer 。
如果顺利的话,可以在TheGraph 的面板上观察到subgraph索引过程,初始索引可能需要等待几分钟, 如下图:
当索引完成后,通过Graph Explorer中的GraphQL playground 进行交互查询:
4. DApp前端查询索引数据
在我们的代码库中,front 目录中,已经提供一个 示例DApp,用来访问数据。进入应用程序目录,配置查询subgraph的GraphQL端点地址:
$ cd front
$ echo 'REACT_APP_GRAPHQL_ENDPOINT=https://api.thegraph.com/subgraphs/name/<GITHUB_USERNAME>/<SUBGRAPH_NAME>' > .env
最后,安装DApp的依赖并启动项目。
$ yarn && yarn start可以看到通过GraphQL查询出来了 3 条数据:
在React前端使用了ApolloClient 来集成GraphQL查询, 如果是 Vue 可以使用 Vue Apollo 。
GraphQL查询的代码可以在 front/App.js 找到,这里不做详细介绍。
区块链技术网。
- 发表于 2021-04-29 18:48
- 阅读 ( 4160 )
- 学分 ( 220 )
- 分类:智能合约


评论