docker 部署BSC(币安智能链)v1.1.2版本开发网–ws协议
v1.1.2版本开发网–ws协议插图")
v1.1.2版本开发网–ws协议插图1")
v1.1.2版本开发网–ws协议插图2")
其实上次已经和大家分享过一篇关于BSC(币安智能链)开发网的部署《BSC(币安智能链)开发网部署》 《[docker 部署BSC v1.0.7-ht.3...
其实上次已经和大家分享过一篇关于BSC(币安智能链)开发网的部署《[BSC(币安智能链)开发网部署](https://blog.csdn.net/cljdsc/article/details/116460891)》 《[docker 部署BSC v1.0.7-ht.3版本开发网](https://learnblockchain.cn/article/2819)》 今天这篇同样也是关于BSC开发网部署的文档,但是也稍微的有一些不一样,共有以下几点: 那为什么还要出一篇BSC开发网的文档呢?因为BSC智能链在前几日发布了一个新版本:v1.1.2,此版本为修补 EVM 中的漏洞 ( CVE-2021-39137 ) 的修补程序。所有同步节点都应该尽快升级至此版本。 另外此文档中启用了websocket协议,可用于客户端的持久化连接。 # 一. 编写说明 ## 1.1 文档说明 - 文档内容 ``` 通过本文档对BSC币安智能链使用docker进行开发网部署启动ws协议过程进行描述 ``` - 部署服务 <table> <tr> <th>服务器</th> <th>程序</th> <th>默认端口</th> </tr> <tr> <td rowspan="9">127.0.0.1</td> <td>BSC开发网节点(BSC)</td> <td>rpc接口:8545<br>p2p接口:30303</td> </tr> </table> ## 1.2 配置信息 - 硬件配置 ``` 服务器系统:Centos7+ CPU:8核 内存:16GB 硬盘:1024 GB 网络:千兆网卡 ``` - 软件环境 ``` Docker:19.03.11 ``` > 注意:软件使用版本不强制使用与上面一样的版本 ## 1.3 部署文档信息 - BSC官网:https://www.binance.org/cn - BSC链github地址:https://github.com/binance-chain/bsc/releases - 主网区块链浏览器:https://bscscan.com/ - 主网链官方部署文档::https://docs.binance.org/smart-chain/developer/fullnode.html - 手续费(gasprice):https://bscgas.info/gas - 创世文件及配置文件参考:https://api.github.com/repos/binance-chain/bsc/releases/latest - 开发者文档:https://docs.binance.org/index.html - 公共节点:https://docs.binance.org/smart-chain/developer/rpc.html - 生态系统:https://github.com/binance-chain/bsc-ecosystem # 二.BSC开发网镜像生成 - 下载bsc基础镜像 ``` docker pull buildpack-deps:jessie-curl ``` - 编写Dockerfile ``` FROM buildpack-deps:jessie-curl RUN wget -P /usr/local/bin/ https://github.com/binance-chain/bsc/releases/download/v1.1.2/geth_linux && mv /usr/local/bin/geth_linux /usr/local/bin/geth && chmod +x /usr/local/bin/geth EXPOSE 8545 8546 30303 30303/udp WORKDIR /data ENTRYPOINT ["geth"] ``` - 生成heco主链镜像 ``` docker build . -t private_bsc:v1.1.2 ``` > 注:需要在与Dockerfile同一级目录下执行此命令 - 查看是否生成镜像 ``` # docker images REPOSITORY TAG IMAGE ID CREATED SIZE private_bsc v1.1.2 0ba0ebff1493 3 seconds ago 219MB ``` # 三.BSC开发网容器生成 ## 3.1 配置文件编写 参考: https://github.com/binance-chain/bsc/releases/download/v1.1.2/mainnet.zip ``` [Eth] NetworkId = 1024 NoPruning = false NoPrefetch = false LightPeers = 100 UltraLightFraction = 75 TrieTimeout = 100000000000 EnablePreimageRecording = false EWASMInterpreter = "" EVMInterpreter = "" [Eth.Miner] GasFloor = 30000000 GasCeil = 40000000 GasPrice = 1000000000 Recommit = 10000000000 Noverify = false [Eth.TxPool] Locals = [] NoLocals = true Journal = "transactions.rlp" Rejournal = 3600000000000 PriceLimit = 1000000000 PriceBump = 10 AccountSlots = 512 GlobalSlots = 10000 AccountQueue = 256 GlobalQueue = 5000 Lifetime = 10800000000000 [Eth.GPO] Blocks = 20 Percentile = 60 OracleThreshold = 20 [Node] IPCPath = "geth.ipc" HTTPHost = "0.0.0.0" NoUSB = true InsecureUnlockAllowed = false HTTPPort = 8545 HTTPVirtualHosts = ["*"] HTTPModules = ["eth", "net", "web3", "txpool", "parlia"] WSPort = 8546 WSModules = ["net", "web3", "eth"] WSHost = "0.0.0.0" WSOrigins = ["*"] [Node.P2P] MaxPeers = 30 NoDiscovery = false ListenAddr = ":30311" EnableMsgEvents = false [Node.HTTPTimeouts] ReadTimeout = 30000000000 WriteTimeout = 30000000000 IdleTimeout = 120000000000 [Node.LogConfig] FilePath = "bsc.log" MaxBytesSize = 10485760 Level = "info" FileRoot = "" ``` > config.toml 文件可创建在/opt/docker/bsc-private 注:本次部署最重要的目的是需要BSC开发网节点支持websocket协议,配置文件中需要注意以下参数: ``` WSPort = 8546 //指定WebSockets-RPC服务端口,默认值8546 WSModules = ["net", "web3", "eth"] //设定开放给WebSockets-RPC的接口,默认只开放eth、net、web3 WSHost = "0.0.0.0" //指定WebSockets-RPC服务监听地址,默认值localhost WSOrigins = ["*"] //指定WebSockets-RPC服务允许从哪些域过来的跨域请求,*表示接受表示所有的域 ``` ## 3.2 预先创建一个账户地址 使用MetaMask或者其他工具预先创建一个账户地址,并保存好私钥,后面这个地址会配置在genesis文件中,并用做挖矿coinbase地址及初始化地址 ## 3.3 创建genesis.json 参考: https://github.com/binance-chain/bsc/releases/download/v1.1.2/mainnet.zip **根据需要修改特定的字段,常规的比如** - chainId 修改为自己的独有链id - coinbase 修改为预先创建的地址 - alloc中的0x6e60F5243e1a3F0Be3F407b5AFE9e5395ee82aa2修改为初始资金接收地址,balance根据业务需要,计算相应预先发行数量(精度18位)的16进制 **对于共识参数,可以根据需要再做修改** ``` "congress": { "period": 3, // 出块间隔(秒) "epoch": 200 // 出块顺序刷新间隔(块数),epoch为一个周期设定,单位是block,每个epoch结束的时候,会对验证人进行相应调整; } ``` **genesis.json 文件创建** ``` { "config": { "chainId": 1024, "homesteadBlock": 0, "eip150Block": 0, "eip150Hash": "0x0000000000000000000000000000000000000000000000000000000000000000", "eip155Block": 0, "eip158Block": 0, "byzantiumBlock": 0, "constantinopleBlock": 0, "petersburgBlock": 0, "istanbulBlock": 0, "muirGlacierBlock": 0, "congress": { "period": 20, "epoch": 20000 } }, "nonce": "0x0000000000000061", "timestamp": "0x0", "parentHash": "0x0000000000000000000000000000000000000000000000000000000000000000", "gasLimit": "0x2625a00", "difficulty": "0x100", "mixhash": "0x0000000000000000000000000000000000000000000000000000000000000000", "coinbase": "0x6e60F5243e1a3F0Be3F407b5AFE9e5395ee82aa2", "alloc": { "0x6e60F5243e1a3F0Be3F407b5AFE9e5395ee82aa2":{ "balance": "6660010000000000000000000000" } } } ``` > 注:genesis.json 应创建在/opt/docker/bsc-private ## 3.4 初始化geth 将上面修改好的**geth.toml**和**genesis.json**以**及预生成的账户地址keystore文件**放到规划好的位置,我们此时放在 **/opt/docker/heco-private** - 初始化geth ``` cd /opt/docker/bsc-private docker run --rm -v $(pwd):/data private_bsc:v1.1.2 init /data/genesis.json --datadir /data/bsc ``` - 将预生成的账户地址keystore文件拷贝至初始数据文件中 ``` cp UTC--2017-11-21T05-46-23.555205600Z--6e60f5243e1a3f0be3f407b5afe9e5395ee82aa2 bsc/keystore/ ``` 或者可以将以上步骤编写为一个脚本,例如: ``` # vim /opt/docker/bsc-private/genesis.sh #!/bin/bash docker run --rm -v $(pwd):/data private_bsc:v1.1.2 init /data/genesis.json --datadir /data/bsc cp UTC--* ./bsc/keystore/ ``` ## 3.5 启动bsc - 启动bsc ``` docker run -itd --restart=unless-stopped -v /etc/localtime:/etc/localtime -v /etc/timezone:/etc/timezone --name private-bsc -v /opt/docker/bsc/bsc:/data -p 30311:30311 -p 8545:8545 -p 8546:8546 private_bsc:v1.1.2 --config config.toml --datadir /data/bsc --nodiscover --allow-insecure-unlock ``` - 查看bsc启动日志 ``` # tail -100 /opt/docker/bsc-private/bsc/bsc.log.2021-09-01_12 t=2021-09-01T12:58:10+0800 lvl=info msg="Writing clean trie cache to disk" path=/data/bsc/geth/triecache threads=1 t=2021-09-01T12:58:10+0800 lvl=info msg="Persisted the clean trie cache" path=/data/bsc/geth/triecache elapsed="893.611µs" ``` > 注意:此时heco私链并没有开启挖矿 ## 3.6 启动挖矿 启动后,进入ipc,解锁我们预先生成的地址,作为此节点的coinbase - 从另一个终端进入geth控制台 ``` # docker exec -it private-bsc bash root@602e93dadf6a:/data# geth attach /data/bsc/geth.ipc ``` - 查看当前的的coinbase地址 ``` > eth { accounts: ["0x6e60f5243e1a3f0be3f407b5afe9e5395ee82aa2"], blockNumber: 0, coinbase: "0x6e60f5243e1a3f0be3f407b5afe9e5395ee82aa2", ``` accounts和coinbase都为以上步骤预先生成的地址 - 设置该地址为无限期解锁,因为后面需要使用该私钥进行出块签名。0为无限期 ``` > personal.unlockAccount("0x6e60f5243e1a3f0be3f407b5afe9e5395ee82aa2","123456",0) true ``` - 启动挖矿 ``` > miner.start(1) null ``` > 注:开启一个线程进行挖矿 - 此时查看容器日志 ``` # tail -100 /opt/docker/bsc-private/bsc/bsc.log.2021-09-01_13 // 生成DAG数据 t=2021-09-01T13:34:51+0800 lvl=info msg="Generating DAG in progress" epoch=0 percentage=9 elapsed=7.342s t=2021-09-01T13:34:52+0800 lvl=info msg="Generating DAG in progress" epoch=0 percentage=10 elapsed=8.072s t=2021-09-01T13:34:52+0800 lvl=info msg="Generating DAG in progress" epoch=0 percentage=11 elapsed=8.816s // 开始出块 t=2021-09-01T13:35:58+0800 lvl=info msg="Successfully sealed new block" number=1 sealhash=0x0f990fcb956860fc1f050205d1aee1aff052f75327a0f1fe82a29b886d259f3b hash=0x8b79131b55f3447c988ac7c361dc0b903666c4dfcbae86bd08aed3f08d453c44 elapsed=1m15.471s t=2021-09-01T13:35:58+0800 lvl=info msg=" mined potential block" number=1 hash=0x8b79131b55f3447c988ac7c361dc0b903666c4dfcbae86bd08aed3f08d453c44 t=2021-09-01T13:35:58+0800 lvl=info msg="Commit new mining work" number=2 sealhash=0x42546fe2ddf49aacb6a5b87341035e41c55b74145a51fc0a60a364ae91228f15 uncles=0 txs=0 gas=0 elapsed="367.28µs" ``` 节点出块主要是以下日志 ``` // 成功封存新的区块 t=2021-09-01T14:58:03+0800 lvl=info msg="Successfully sealed new block" number=1421 sealhash=0x96c582534f19f90bf0c0a7d035723cbe131968d68c250b3b561c39d4e163543f hash=0x7a983d8db1630bb5d30b906d020e578f82608408150d23e08d41182d6f62f5d5 elapsed=13.696s // 区块进行上链 t=2021-09-01T14:58:03+0800 lvl=info msg=" block reached canonical chain" number=1410 hash=0x6cbcd8fa3606cb2d0a5395af3cd0c515eebb8b84ad864a1cf060eea5e852f107 // 挖掘可能的区块 t=2021-09-01T14:58:03+0800 lvl=info msg=" mined potential block" number=1421 hash=0x7a983d8db1630bb5d30b906d020e578f82608408150d23e08d41182d6f62f5d5 // 进行新的挖矿工作 t=2021-09-01T14:58:03+0800 lvl=info msg="Commit new mining work" number=1422 sealhash=0x51bcd69f824944147b113afc8da20a50f7af89e31793969be64c3e199bf9dd8b uncles=0 txs=0 gas=0 elapsed="268.173µs" ``` # 四.ws协议验证 ## 4.1 查看websocket协议端口是否启动 - 安装netstat工具 ``` docker exec -it private-bsc bash //进入容器 apt-get update //更新系统 apt-get install net-tools //安装网络工具 ``` - 查看容器内websocket协议端口8546是否启动 ``` # netstat -lnptu Active Internet connections (only servers) Proto Recv-Q Send-Q Local Address Foreign Address State PID/Program name tcp6 0 0 :::8545 :::* LISTEN 1/geth tcp6 0 0 :::8546 :::* LISTEN 1/geth tcp6 0 0 :::30311 :::* LISTEN 1/geth ``` ## 4.2 测试websocket协议是否可用 使用postman模拟发送一个websocket请求,查询区块高度,查看是否可正常返回 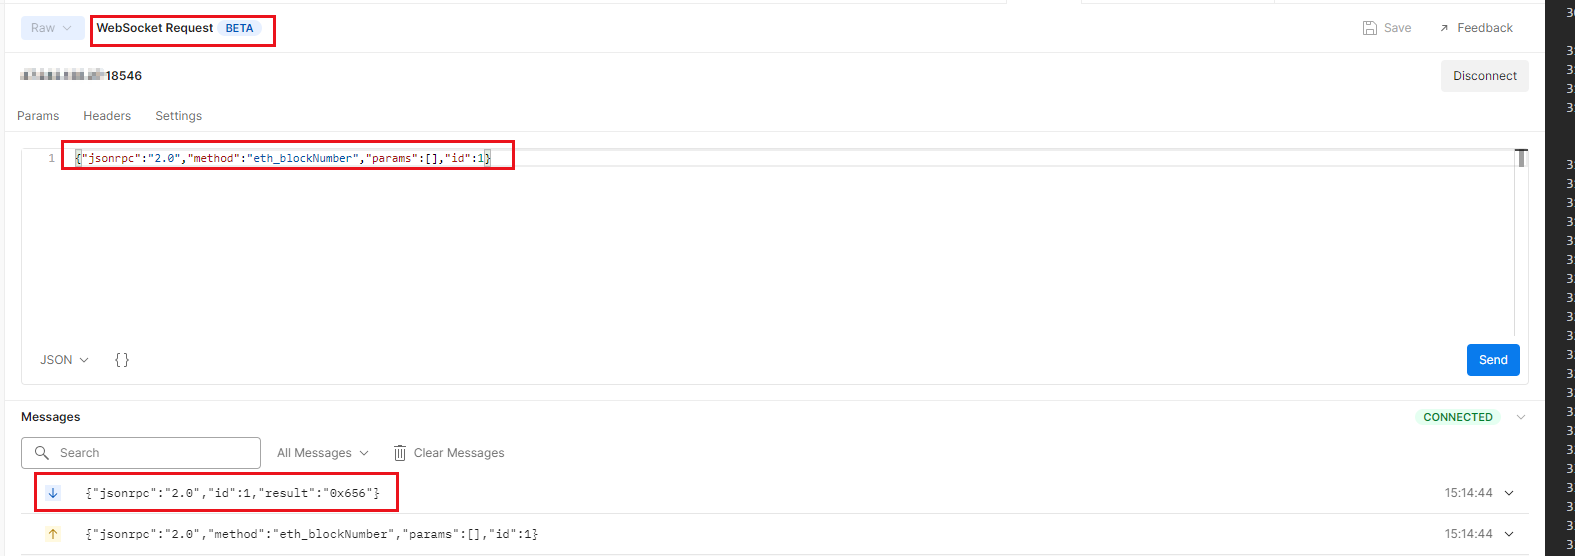 --- 以上,就是今天分享的全部内容了。 希望大家通过以上方式可以解决自己的实际需求,解决自己目前所遇到的问题。 如果在部署过程中有任何疑问,可以扫描下面的二维码,添加我的个人微信,备注:地区-职业方向-昵称,欢迎来撩,加入区块链技术交流群,与更多的区块链技术大佬学习交流。  原创不易,码字不易。 觉得这篇文章对你有点用的话,麻烦你为本文点个赞,留言或转发一下,因为这将是我输出更多优质文章的动力,感谢!
其实上次已经和大家分享过一篇关于BSC(币安智能链)开发网的部署《BSC(币安智能链)开发网部署》 《docker 部署BSC v1.0.7-ht.3版本开发网》 今天这篇同样也是关于BSC开发网部署的文档,但是也稍微的有一些不一样,共有以下几点:
那为什么还要出一篇BSC开发网的文档呢?因为BSC智能链在前几日发布了一个新版本:v1.1.2,此版本为修补 EVM 中的漏洞 ( CVE-2021-39137 ) 的修补程序。所有同步节点都应该尽快升级至此版本。
另外此文档中启用了websocket协议,可用于客户端的持久化连接。
一. 编写说明
1.1 文档说明
- 文档内容
通过本文档对BSC币安智能链使用docker进行开发网部署启动ws协议过程进行描述- 部署服务
<table> <tr> <th>服务器</th> <th>程序</th> <th>默认端口</th> </tr> <tr> <td rowspan="9">127.0.0.1</td> <td>BSC开发网节点(BSC)</td> <td>rpc接口:8545<br>p2p接口:30303</td> </tr> </table>
1.2 配置信息
- 硬件配置
服务器系统:Centos7+
CPU:8核
内存:16GB
硬盘:1024 GB
网络:千兆网卡- 软件环境
Docker:19.03.11注意:软件使用版本不强制使用与上面一样的版本
1.3 部署文档信息
- BSC官网:https://www.binance.org/cn
- BSC链github地址:https://github.com/binance-chain/bsc/releases
- 主网区块链浏览器:https://bscscan.com/
- 主网链官方部署文档::https://docs.binance.org/smart-chain/developer/fullnode.html
- 手续费(gasprice):https://bscgas.info/gas
- 创世文件及配置文件参考:https://api.github.com/repos/binance-chain/bsc/releases/latest
- 开发者文档:https://docs.binance.org/index.html
- 公共节点:https://docs.binance.org/smart-chain/developer/rpc.html
- 生态系统:https://github.com/binance-chain/bsc-ecosystem
二.BSC开发网镜像生成
- 下载bsc基础镜像
docker pull buildpack-deps:jessie-curl- 编写Dockerfile
FROM buildpack-deps:jessie-curl
RUN wget -P /usr/local/bin/ https://github.com/binance-chain/bsc/releases/download/v1.1.2/geth_linux && mv /usr/local/bin/geth_linux /usr/local/bin/geth && chmod +x /usr/local/bin/geth
EXPOSE 8545 8546 30303 30303/udp
WORKDIR /data
ENTRYPOINT ["geth"]- 生成heco主链镜像
docker build . -t private_bsc:v1.1.2注:需要在与Dockerfile同一级目录下执行此命令
- 查看是否生成镜像
# docker images
REPOSITORY           TAG                 IMAGE ID            CREATED             SIZE
private_bsc          v1.1.2              0ba0ebff1493        3 seconds ago       219MB
三.BSC开发网容器生成
3.1 配置文件编写
参考: https://github.com/binance-chain/bsc/releases/download/v1.1.2/mainnet.zip
[Eth]
NetworkId = 1024
NoPruning = false
NoPrefetch = false
LightPeers = 100
UltraLightFraction = 75
TrieTimeout = 100000000000
EnablePreimageRecording = false
EWASMInterpreter = ""
EVMInterpreter = ""

[Eth.Miner]
GasFloor = 30000000
GasCeil = 40000000
GasPrice = 1000000000
Recommit = 10000000000
Noverify = false

[Eth.TxPool]
Locals = []
NoLocals = true
Journal = "transactions.rlp"
Rejournal = 3600000000000
PriceLimit = 1000000000
PriceBump = 10
AccountSlots = 512
GlobalSlots = 10000
AccountQueue = 256
GlobalQueue = 5000
Lifetime = 10800000000000

[Eth.GPO]
Blocks = 20
Percentile = 60
OracleThreshold = 20

[Node]
IPCPath = "geth.ipc"
HTTPHost = "0.0.0.0"
NoUSB = true
InsecureUnlockAllowed = false
HTTPPort = 8545
HTTPVirtualHosts = ["*"]
HTTPModules = ["eth", "net", "web3", "txpool", "parlia"]
WSPort = 8546
WSModules = ["net", "web3", "eth"]
WSHost = "0.0.0.0"
WSOrigins = ["*"]

[Node.P2P]
MaxPeers = 30
NoDiscovery = false
ListenAddr = ":30311"
EnableMsgEvents = false

[Node.HTTPTimeouts]
ReadTimeout = 30000000000
WriteTimeout = 30000000000
IdleTimeout = 120000000000

[Node.LogConfig]
FilePath = "bsc.log"
MaxBytesSize = 10485760
Level = "info"
FileRoot = ""
config.toml 文件可创建在/opt/docker/bsc-private
注:本次部署最重要的目的是需要BSC开发网节点支持websocket协议,配置文件中需要注意以下参数:
WSPort = 8546                         //指定WebSockets-RPC服务端口,默认值8546
WSModules = ["net", "web3", "eth"]    //设定开放给WebSockets-RPC的接口,默认只开放eth、net、web3
WSHost = "0.0.0.0"                    //指定WebSockets-RPC服务监听地址,默认值localhost
WSOrigins = ["*"]                     //指定WebSockets-RPC服务允许从哪些域过来的跨域请求,*表示接受表示所有的域
3.2 预先创建一个账户地址
使用MetaMask或者其他工具预先创建一个账户地址,并保存好私钥,后面这个地址会配置在genesis文件中,并用做挖矿coinbase地址及初始化地址
3.3 创建genesis.json
参考: https://github.com/binance-chain/bsc/releases/download/v1.1.2/mainnet.zip
根据需要修改特定的字段,常规的比如
- chainId 修改为自己的独有链id
- coinbase 修改为预先创建的地址
- alloc中的0x6e60F5243e1a3F0Be3F407b5AFE9e5395ee82aa2修改为初始资金接收地址,balance根据业务需要,计算相应预先发行数量(精度18位)的16进制
对于共识参数,可以根据需要再做修改
"congress": {
    "period": 3, // 出块间隔(秒)
    "epoch": 200 // 出块顺序刷新间隔(块数),epoch为一个周期设定,单位是block,每个epoch结束的时候,会对验证人进行相应调整;
}
genesis.json 文件创建
{
  "config": {
    "chainId": 1024,
    "homesteadBlock": 0,
    "eip150Block": 0,
    "eip150Hash": "0x0000000000000000000000000000000000000000000000000000000000000000",
    "eip155Block": 0,
    "eip158Block": 0,
    "byzantiumBlock": 0,
    "constantinopleBlock": 0,
    "petersburgBlock": 0,
    "istanbulBlock": 0,
    "muirGlacierBlock": 0,
    "congress": {
     "period": 20,
      "epoch": 20000
    }
  },
     "nonce": "0x0000000000000061",
     "timestamp": "0x0",
     "parentHash": "0x0000000000000000000000000000000000000000000000000000000000000000",
     "gasLimit": "0x2625a00",
     "difficulty": "0x100",
     "mixhash": "0x0000000000000000000000000000000000000000000000000000000000000000",
     "coinbase": "0x6e60F5243e1a3F0Be3F407b5AFE9e5395ee82aa2",
     "alloc": {
       "0x6e60F5243e1a3F0Be3F407b5AFE9e5395ee82aa2":{
       "balance": "6660010000000000000000000000"
          }
     }
}
注:genesis.json 应创建在/opt/docker/bsc-private
3.4 初始化geth
将上面修改好的geth.toml和genesis.json以及预生成的账户地址keystore文件放到规划好的位置,我们此时放在 /opt/docker/heco-private
- 初始化geth
cd /opt/docker/bsc-private

docker run --rm -v $(pwd):/data private_bsc:v1.1.2 init /data/genesis.json --datadir /data/bsc- 将预生成的账户地址keystore文件拷贝至初始数据文件中
cp UTC--2017-11-21T05-46-23.555205600Z--6e60f5243e1a3f0be3f407b5afe9e5395ee82aa2 bsc/keystore/或者可以将以上步骤编写为一个脚本,例如:
# vim /opt/docker/bsc-private/genesis.sh

#!/bin/bash

docker run --rm -v $(pwd):/data private_bsc:v1.1.2 init /data/genesis.json --datadir /data/bsc
cp UTC--* ./bsc/keystore/
3.5 启动bsc
- 启动bsc
docker run -itd --restart=unless-stopped -v /etc/localtime:/etc/localtime -v /etc/timezone:/etc/timezone --name private-bsc -v /opt/docker/bsc/bsc:/data -p 30311:30311 -p 8545:8545 -p 8546:8546 private_bsc:v1.1.2 --config config.toml --datadir /data/bsc --nodiscover --allow-insecure-unlock- 查看bsc启动日志
# tail -100 /opt/docker/bsc-private/bsc/bsc.log.2021-09-01_12

t=2021-09-01T12:58:10+0800 lvl=info msg="Writing clean trie cache to disk"       path=/data/bsc/geth/triecache threads=1
t=2021-09-01T12:58:10+0800 lvl=info msg="Persisted the clean trie cache"         path=/data/bsc/geth/triecache elapsed="893.611µs"
注意:此时heco私链并没有开启挖矿
3.6 启动挖矿
启动后,进入ipc,解锁我们预先生成的地址,作为此节点的coinbase
- 从另一个终端进入geth控制台
# docker exec -it private-bsc bash
root@602e93dadf6a:/data# geth attach /data/bsc/geth.ipc- 查看当前的的coinbase地址
> eth
{
  accounts: ["0x6e60f5243e1a3f0be3f407b5afe9e5395ee82aa2"],
  blockNumber: 0,
  coinbase: "0x6e60f5243e1a3f0be3f407b5afe9e5395ee82aa2",
accounts和coinbase都为以上步骤预先生成的地址
- 设置该地址为无限期解锁,因为后面需要使用该私钥进行出块签名。0为无限期
> personal.unlockAccount("0x6e60f5243e1a3f0be3f407b5afe9e5395ee82aa2","123456",0)
true- 启动挖矿
>  miner.start(1)
null
注:开启一个线程进行挖矿
- 此时查看容器日志
# tail -100 /opt/docker/bsc-private/bsc/bsc.log.2021-09-01_13
// 生成DAG数据
t=2021-09-01T13:34:51+0800 lvl=info msg="Generating DAG in progress" epoch=0 percentage=9 elapsed=7.342s
t=2021-09-01T13:34:52+0800 lvl=info msg="Generating DAG in progress" epoch=0 percentage=10 elapsed=8.072s
t=2021-09-01T13:34:52+0800 lvl=info msg="Generating DAG in progress" epoch=0 percentage=11 elapsed=8.816s
// 开始出块
t=2021-09-01T13:35:58+0800 lvl=info msg="Successfully sealed new block" number=1 sealhash=0x0f990fcb956860fc1f050205d1aee1aff052f75327a0f1fe82a29b886d259f3b hash=0x8b79131b55f3447c988ac7c361dc0b903666c4dfcbae86bd08aed3f08d453c44 elapsed=1m15.471s
t=2021-09-01T13:35:58+0800 lvl=info msg=" mined potential block" number=1 hash=0x8b79131b55f3447c988ac7c361dc0b903666c4dfcbae86bd08aed3f08d453c44
t=2021-09-01T13:35:58+0800 lvl=info msg="Commit new mining work" number=2 sealhash=0x42546fe2ddf49aacb6a5b87341035e41c55b74145a51fc0a60a364ae91228f15 uncles=0 txs=0 gas=0 elapsed="367.28µs"节点出块主要是以下日志
// 成功封存新的区块
t=2021-09-01T14:58:03+0800 lvl=info msg="Successfully sealed new block" number=1421 sealhash=0x96c582534f19f90bf0c0a7d035723cbe131968d68c250b3b561c39d4e163543f hash=0x7a983d8db1630bb5d30b906d020e578f82608408150d23e08d41182d6f62f5d5 elapsed=13.696s
// 区块进行上链
t=2021-09-01T14:58:03+0800 lvl=info msg=" block reached canonical chain" number=1410 hash=0x6cbcd8fa3606cb2d0a5395af3cd0c515eebb8b84ad864a1cf060eea5e852f107
// 挖掘可能的区块
t=2021-09-01T14:58:03+0800 lvl=info msg=" mined potential block" number=1421 hash=0x7a983d8db1630bb5d30b906d020e578f82608408150d23e08d41182d6f62f5d5
// 进行新的挖矿工作
t=2021-09-01T14:58:03+0800 lvl=info msg="Commit new mining work" number=1422 sealhash=0x51bcd69f824944147b113afc8da20a50f7af89e31793969be64c3e199bf9dd8b uncles=0 txs=0 gas=0 elapsed="268.173µs"四.ws协议验证
4.1 查看websocket协议端口是否启动
- 安装netstat工具
docker exec -it private-bsc bash  //进入容器
apt-get update                    //更新系统
apt-get install net-tools //安装网络工具- 查看容器内websocket协议端口8546是否启动
# netstat -lnptu
Active Internet connections (only servers)
Proto Recv-Q Send-Q Local Address           Foreign Address         State       PID/Program name
tcp6       0      0 :::8545                 :::*                    LISTEN      1/geth
tcp6       0      0 :::8546                 :::*                    LISTEN      1/geth
tcp6       0      0 :::30311                :::*                    LISTEN      1/geth
4.2 测试websocket协议是否可用
使用postman模拟发送一个websocket请求,查询区块高度,查看是否可正常返回
以上,就是今天分享的全部内容了。
希望大家通过以上方式可以解决自己的实际需求,解决自己目前所遇到的问题。
如果在部署过程中有任何疑问,可以扫描下面的二维码,添加我的个人微信,备注:地区-职业方向-昵称,欢迎来撩,加入区块链技术交流群,与更多的区块链技术大佬学习交流。
原创不易,码字不易。 觉得这篇文章对你有点用的话,麻烦你为本文点个赞,留言或转发一下,因为这将是我输出更多优质文章的动力,感谢!
本文参与登链社区写作激励计划 ,好文好收益,欢迎正在阅读的你也加入。
- 发表于 2021-09-02 10:11
- 阅读 ( 1244 )
- 学分 ( 26 )
- 分类:以太坊


评论