区块链中的数学 – Halo2 Circuit
本文介绍另一种基于plonk的proof system--halo2,目前看到基于plonk的工程实现有三种:bellman, dusk, halo2.
## 写在前面 上一篇介绍了[Baby Jubjub 曲线](https://learnblockchain.cn/article/2801),对椭圆曲线感兴趣的朋友可以看看,一种snark友好的曲线。 本文介绍另一种基于plonk的proof system--halo2,目前看到基于plonk的工程实现有三种:bellman, dusk, halo2. dusk实现接近于paper,其代码也导读过(最近几个月code有所change,可能会有变化),感兴趣可查阅过往[plonk视频](https://mp.weixin.qq.com/mp/appmsgalbum?action=getalbum&__biz=MzA5NzI4MzkyNA==&scene=1&album_id=1664071313331650562&count=3#wechat_redirect), bellman做了一定custom变化。halo2工程设计颇有特点! ## Halo2 Proof System Halo 2基于PLONK底层算法和电路构造模式,同时扩展自定义门(custom gate)和lookup(AKA UltraPLONK), halo2电路书写形式与其他不同(如bellman),采用table或matrix组织定义不同属性值。是根据值的矩形矩阵定义的。使用传统的含义来表示该矩阵的行、列和单元格。 电路包含一系列配置: 1. 有限域F,其中单元格(cell)值,是F的元素,使用Pasta曲线域。 2. 数据存放在table中,列有几种: * advice:就是我们常说的witness,电路中的秘密输入 * instance:作为public input, 简称PI,是P和V两方都知道(或者说共享)的值 * Fixed:作为常量(constant)使用,plonk paper中的$q_c$, 电路的一部分 * Selector: 确定gate是何种门等,在halo2中作为Fixed 列的一种特殊情况,只能取0或1 3. Copy constrain 作用到两个或以上不同的cell上 4. lookup&多项式约束: 约束可以是当前行的给定列中的单元格值,也可以是该行相对的另一行的给定列,即一个门中的多项式约束可以引用多行多列的值,提供了访问灵活性。 如何构造halo2中的table(or matrix),举例电路说明常见r1cs 或者其他plonk电路-->table演化 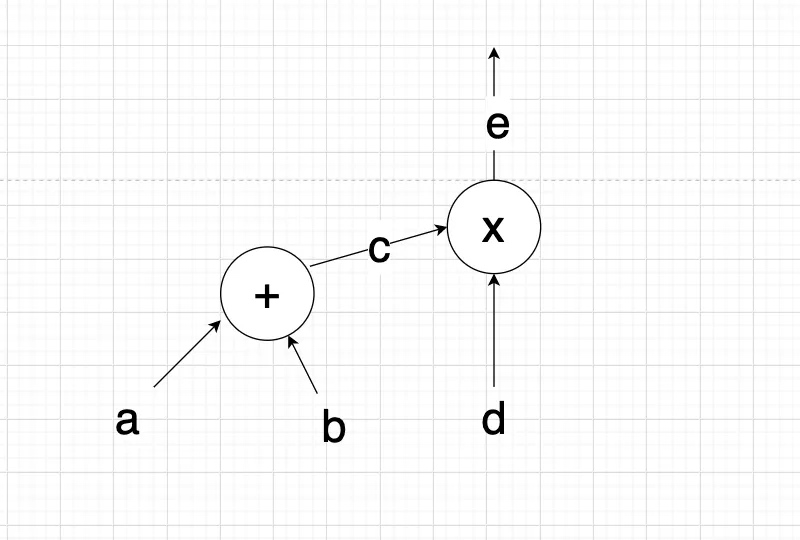 如图,构造一个简单电路描述,包含两个约束: a + b = c c * d = e 可以构造表如下: | advice | advice | advice | selector(add) | selector(mul) | | :-- | :-- | :-- | :-- | :-- | | a | b | c | 1 | | | c | d | e | 0 | 1 | 表中两行分别表示了上述两个约束方程,第一行满足 a + b - c = 0 , 第二行满足 c * d - e = 0 . 其中还隐含了一个复制约束,column[2][0] = column[0][1] ## 电路构造实例 halo2 文档中给了一个example, 验证 $a^2+b^2=c$ 其中c是public input ,即instance列值。 1. 第一步:定义instruction,就是定义需要实现的方法接口,由于计算涉及到乘法,需要mul方法,同时需要加载输入变量和公共输入。 ``` trait NumericInstructions<F: FieldExt>: Chip<F> { /// Variable representing a number. type Num; Loads a number into the circuit as a private input. fn load_private(&self, layouter: impl Layouter<F>, a: Option<F>) -> Result<Self::Num, Error>; /// Loads a number into the circuit as a fixed constant. fn load_constant(&self, layouter: impl Layouter<F>, constant: F) -> Result<Self::Num, Error>; /// Returns `c = a * b`. fn mul( &self, layouter: impl Layouter<F>, a: Self::Num, b: Self::Num, ) -> Result<Self::Num, Error>; /// Exposes a number as a public input to the circuit. fn expose_public( &self, layouter: impl Layouter<F>, num: Self::Num, row: usize, ) -> Result<(), Error>; }` ``` load_private就是加载witness, expose_public是设置instance列 2\. 第二步:定义config, 代码中chip指实现特定功能且可复用的模块,粒度可大可小,比如本例子中的chip就是非常小的。config中包含运算所需要的列。 ``` /// Chip state is stored in a config struct. This is generated by the chip /// during configuration, and then stored inside the chip. #[derive(Clone, Debug)] struct FieldConfig { /// For this chip, we will use two advice columns to implement our instructions. /// These are also the columns through which we communicate with other parts of /// the circuit. advice: [Column<Advice>; 2], /// This is the public input (instance) column. instance: Column<Instance>, // We need a selector to enable the multiplication gate, so that we aren't placing // any constraints on cells where `NumericInstructions::mul` is not being used. // This is important when building larger circuits, where columns are used by // multiple sets of instructions. s_mul: Selector, /// The fixed column used to load constants. constant: Column<Fixed>, } ``` 3\. 第三步:实现chip, 其中最重要的是 configur方法,用来构造table column和gate 约束。 ``` impl<F: FieldExt> FieldChip<F> { fn construct(config: <Self as Chip<F>>::Config) -> Self { Self { config, _marker: PhantomData, } } fn configure( meta: &mut ConstraintSystem<F>, advice: [Column<Advice>; 2], instance: Column<Instance>, constant: Column<Fixed>, ) -> <Self as Chip<F>>::Config { meta.enable_equality(instance.into()); meta.enable_constant(constant); for column in &advice { meta.enable_equality((*column).into()); } let s_mul = meta.selector(); // Define our multiplication gate! meta.create_gate("mul", |meta| { // To implement multiplication, we need three advice cells and a selector // cell. We arrange them like so: // // | a0 | a1 | s_mul | // |-----|-----|-------| // | lhs | rhs | s_mul | // | out | | | // // Gates may refer to any relative offsets we want, but each distinct // offset adds a cost to the proof. The most common offsets are 0 (the // current row), 1 (the next row), and -1 (the previous row), for which // `Rotation` has specific constructors. let lhs = meta.query_advice(advice[0], Rotation::cur()); let rhs = meta.query_advice(advice[1], Rotation::cur()); let out = meta.query_advice(advice[0], Rotation::next()); let s_mul = meta.query_selector(s_mul); // Finally, we return the polynomial expressions that constrain this gate. // For our multiplication gate, we only need a single polynomial constraint. // // The polynomial expressions returned from `create_gate` will be // constrained by the proving system to equal zero. Our expression // has the following properties: // - When s_mul = 0, any value is allowed in lhs, rhs, and out. // - When s_mul != 0, this constrains lhs * rhs = out. vec![s_mul * (lhs * rhs - out)] }); FieldConfig { advice, instance, s_mul, constant, } } } ``` 4\. 第四步:对chip实现第一步中定义的instruction接口 ``` /// A variable representing a number. #[derive(Clone)] struct Number<F: FieldExt> { cell: Cell, value: Option<F>, } impl<F: FieldExt> NumericInstructions<F> for FieldChip<F> { type Num = Number<F>; fn load_private( &self, mut layouter: impl Layouter<F>, value: Option<F>, ) -> Result<Self::Num, Error> { let config = self.config(); let mut num = None; layouter.assign_region( || "load private", |mut region| { let cell = region.assign_advice( || "private input", config.advice[0], 0, || value.ok_or(Error::SynthesisError), )?; num = Some(Number { cell, value }); Ok(()) }, )?; Ok(num.unwrap()) } fn load_constant( &self, mut layouter: impl Layouter<F>, constant: F, ) -> Result<Self::Num, Error> { let config = self.config(); let mut num = None; layouter.assign_region( || "load constant", |mut region| { let cell = region.assign_advice_from_constant( || "constant value", config.advice[0], 0, constant, )?; num = Some(Number { cell, value: Some(constant), }); Ok(()) }, )?; Ok(num.unwrap()) } fn mul( &self, mut layouter: impl Layouter<F>, a: Self::Num, b: Self::Num, ) -> Result<Self::Num, Error> { let config = self.config(); let mut out = None; layouter.assign_region( || "mul", |mut region: Region<'_, F>| { // We only want to use a single multiplication gate in this region, // so we enable it at region offset 0; this means it will constrain // cells at offsets 0 and 1. config.s_mul.enable(&mut region, 0)?; // The inputs we've been given could be located anywhere in the circuit, // but we can only rely on relative offsets inside this region. So we // assign new cells inside the region and constrain them to have the // same values as the inputs. let lhs = region.assign_advice( || "lhs", config.advice[0], 0, || a.value.ok_or(Error::SynthesisError), )?; let rhs = region.assign_advice( || "rhs", config.advice[1], 0, || b.value.ok_or(Error::SynthesisError), )?; region.constrain_equal(a.cell, lhs)?; region.constrain_equal(b.cell, rhs)?; // Now we can assign the multiplication result into the output position. let value = a.value.and_then(|a| b.value.map(|b| a * b)); let cell = region.assign_advice( || "lhs * rhs", config.advice[0], 1, || value.ok_or(Error::SynthesisError), )?; // Finally, we return a variable representing the output, // to be used in another part of the circuit. out = Some(Number { cell, value }); Ok(()) }, )?; Ok(out.unwrap()) } fn expose_public( &self, mut layouter: impl Layouter<F>, num: Self::Num, row: usize, ) -> Result<(), Error> { let config = self.config(); layouter.constrain_instance(num.cell, config.instance, row) } } ``` 5. 使用实现的chip构建电路 ``` /// The full circuit implementation. /// In this struct we store the private input variables. We use `Option<F>` because /// they won't have any value during key generation. During proving, if any of these /// were `None` we would get an error. #[derive(Default)] struct MyCircuit<F: FieldExt> { constant: F, a: Option<F>, b: Option<F>, } impl<F: FieldExt> Circuit<F> for MyCircuit<F> { // Since we are using a single chip for everything, we can just reuse its config. type Config = FieldConfig; type FloorPlanner = SimpleFloorPlanner; fn without_witnesses(&self) -> Self { Self::default() } fn configure(meta: &mut ConstraintSystem<F>) -> Self::Config { // We create the two advice columns that FieldChip uses for I/O. let advice = [meta.advice_column(), meta.advice_column()]; // We also need an instance column to store public inputs. let instance = meta.instance_column(); // Create a fixed column to load constants. let constant = meta.fixed_column(); FieldChip::configure(meta, advice, instance, constant) } fn synthesize( &self, config: Self::Config, mut layouter: impl Layouter<F>, ) -> Result<(), Error> { let field_chip = FieldChip::<F>::construct(config); // Load our private values into the circuit. let a = field_chip.load_private(layouter.namespace(|| "load a"), self.a)?; let b = field_chip.load_private(layouter.namespace(|| "load b"), self.b)?; // Load the constant factor into the circuit. let constant = field_chip.load_constant(layouter.namespace(|| "load constant"), self.constant)?; // We only have access to plain multiplication. // We could implement our circuit as: // asq = a*a // bsq = b*b // absq = asq*bsq // c = constant*asq*bsq // // but it's more efficient to implement it as: // ab = a*b // absq = ab^2 // c = constant*absq let ab = field_chip.mul(layouter.namespace(|| "a * b"), a, b)?; let absq = field_chip.mul(layouter.namespace(|| "ab * ab"), ab.clone(), ab)?; let c = field_chip.mul(layouter.namespace(|| "constant * absq"), constant, absq)?; // Expose the result as a public input to the circuit. field_chip.expose_public(layouter.namespace(|| "expose c"), c, 0) } } ``` 完整代码可从下方”本文参考“中找到! ## 小结 需要说明的一点,构造的table不一定需要所有单元格都填满数据,可能一些表格是空的(或者默认值),到这里可以总结下halo2与其他实现方案的不同点: 1. halo2 电路中每个门的约束范围不一定都是某一行的元素,也可以是不同行列的元素,通过offset/rotation指定不同cell,这一点与其他算术门工程实现由很大不同,也是其灵活度的表现 2. halo2中的每个门,多项式约束可以是多个,所以对门的概念理解有所不同,不能根据门的使用数量来作为衡量算法复杂度的唯一因素,还需要结合其他因素整合考虑(i.e. table宽度,degree等)。 3. 原生halo2实现并不使用Kate 承若方案,但是需要时候也可以改造支持,目前已经在进行中。 本文参考: the halo2 book: https://zcash.github.io/halo2/concepts/proofs.html halo2 repo: https://github.com/zcash/halo2 --- 原文链接:https://mp.weixin.qq.com/s/01H6X1iT0kATn8ev-0A7-A 欢迎关注公众号:blocksight --- ### 相关阅读: [区块链中的数学--PLookup](https://learnblockchain.cn/article/2732) PLookup [相关plonk系列视频](https://mp.weixin.qq.com/mp/appmsgalbum?action=getalbum&__biz=MzA5NzI4MzkyNA==&scene=1&album_id=1664071313331650562&count=3#wechat_redirect): [区块链中的数学 -- Accumulator(累加器)](https://learnblockchain.cn/article/2373) 累加器与RSA Accumulator [区块链中的数学 - Kate承诺batch opening](https://learnblockchain.cn/article/2252) Kate承诺批量证明 [区块链中的数学 - 多项式承诺](https://learnblockchain.cn/article/2165) 多项式知识和承诺 [区块链中的数学 - Pedersen密钥共享](https://learnblockchain.cn/article/2164) Pedersen 密钥分享 [区块链中的数学 - Pedersen承诺](https://learnblockchain.cn/article/2096) 密码学承诺--Pedersen承诺 [区块链中的数学 - 不经意传输](https://learnblockchain.cn/article/2022) 不经意传输协议 [区块链中的数学 - RSA算法加解密过程及原理](https://learnblockchain.cn/article/1548) RSA加解密算法 [区块链中的数学 - BLS门限签名](https://learnblockchain.cn/article/1962) BLS m of n门限签名 [Schorr 签名基础篇](https://learnblockchain.cn/article/2450) Schnorr签名与椭圆曲线 [区块链中的数学-Uniwap自动化做市商核心算法解析](https://learnblockchain.cn/article/1494) Uniwap核心算法解析(中)
写在前面
上一篇介绍了Baby Jubjub 曲线,对椭圆曲线感兴趣的朋友可以看看,一种snark友好的曲线。
本文介绍另一种基于plonk的proof system--halo2,目前看到基于plonk的工程实现有三种:bellman, dusk, halo2. dusk实现接近于paper,其代码也导读过(最近几个月code有所change,可能会有变化),感兴趣可查阅过往plonk视频, bellman做了一定custom变化。halo2工程设计颇有特点!
Halo2 Proof System
Halo 2基于PLONK底层算法和电路构造模式,同时扩展自定义门(custom gate)和lookup(AKA UltraPLONK),
halo2电路书写形式与其他不同(如bellman),采用table或matrix组织定义不同属性值。是根据值的矩形矩阵定义的。使用传统的含义来表示该矩阵的行、列和单元格。
电路包含一系列配置:
- 有限域F,其中单元格(cell)值,是F的元素,使用Pasta曲线域。
-
数据存放在table中,列有几种:
- advice:就是我们常说的witness,电路中的秘密输入
- instance:作为public input, 简称PI,是P和V两方都知道(或者说共享)的值
- Fixed:作为常量(constant)使用,plonk paper中的$q_c$, 电路的一部分
- Selector: 确定gate是何种门等,在halo2中作为Fixed 列的一种特殊情况,只能取0或1
- Copy constrain 作用到两个或以上不同的cell上
- lookup&多项式约束: 约束可以是当前行的给定列中的单元格值,也可以是该行相对的另一行的给定列,即一个门中的多项式约束可以引用多行多列的值,提供了访问灵活性。
如何构造halo2中的table(or matrix),举例电路说明常见r1cs 或者其他plonk电路-->table演化

如图,构造一个简单电路描述,包含两个约束: a + b = c c * d = e
可以构造表如下:
| advice | advice | advice | selector(add) | selector(mul) |
|---|---|---|---|---|
| a | b | c | 1 | |
| c | d | e | 0 | 1 |
表中两行分别表示了上述两个约束方程,第一行满足 a + b - c = 0 , 第二行满足 c * d - e = 0 . 其中还隐含了一个复制约束,column[2][0] = column[0][1]
电路构造实例
halo2 文档中给了一个example, 验证 $a^2+b^2=c$ 其中c是public input ,即instance列值。
- 第一步:定义instruction,就是定义需要实现的方法接口,由于计算涉及到乘法,需要mul方法,同时需要加载输入变量和公共输入。
trait NumericInstructions<F: FieldExt>: Chip<F> {
    /// Variable representing a number.
    type Num;
Loads a number into the circuit as a private input.
    fn load_private(&self, layouter: impl Layouter<F>, a: Option<F>) -> Result<Self::Num, Error>;
    /// Loads a number into the circuit as a fixed constant.
    fn load_constant(&self, layouter: impl Layouter<F>, constant: F) -> Result<Self::Num, Error>;
    /// Returns `c = a * b`.
    fn mul(
        &self,
        layouter: impl Layouter<F>,
        a: Self::Num,
        b: Self::Num,
    ) -> Result<Self::Num, Error>;

    /// Exposes a number as a public input to the circuit.
    fn expose_public(
        &self,
        layouter: impl Layouter<F>,
        num: Self::Num,
        row: usize,
    ) -> Result<(), Error>;
}`
load_private就是加载witness, expose_public是设置instance列
2. 第二步:定义config, 代码中chip指实现特定功能且可复用的模块,粒度可大可小,比如本例子中的chip就是非常小的。config中包含运算所需要的列。
/// Chip state is stored in a config struct. This is generated by the chip
/// during configuration, and then stored inside the chip.
#[derive(Clone, Debug)]
struct FieldConfig {
    /// For this chip, we will use two advice columns to implement our instructions.
    /// These are also the columns through which we communicate with other parts of
    /// the circuit.
    advice: [Column<Advice>; 2],

    /// This is the public input (instance) column.
    instance: Column<Instance>,

    // We need a selector to enable the multiplication gate, so that we aren't placing
    // any constraints on cells where `NumericInstructions::mul` is not being used.
    // This is important when building larger circuits, where columns are used by
    // multiple sets of instructions.
    s_mul: Selector,

    /// The fixed column used to load constants.
    constant: Column<Fixed>,
}
3. 第三步:实现chip, 其中最重要的是 configur方法,用来构造table column和gate 约束。
impl<F: FieldExt> FieldChip<F> {
    fn construct(config: <Self as Chip<F>>::Config) -> Self {
        Self {
            config,
            _marker: PhantomData,
        }
    }

    fn configure(
        meta: &mut ConstraintSystem<F>,
        advice: [Column<Advice>; 2],
        instance: Column<Instance>,
        constant: Column<Fixed>,
    ) -> <Self as Chip<F>>::Config {
        meta.enable_equality(instance.into());
        meta.enable_constant(constant);
        for column in &advice {
            meta.enable_equality((*column).into());
        }
        let s_mul = meta.selector();

        // Define our multiplication gate!
        meta.create_gate("mul", |meta| {
            // To implement multiplication, we need three advice cells and a selector
            // cell. We arrange them like so:
            //
            // | a0  | a1  | s_mul |
            // |-----|-----|-------|
            // | lhs | rhs | s_mul |
            // | out |     |       |
            //
            // Gates may refer to any relative offsets we want, but each distinct
            // offset adds a cost to the proof. The most common offsets are 0 (the
            // current row), 1 (the next row), and -1 (the previous row), for which
            // `Rotation` has specific constructors.
            let lhs = meta.query_advice(advice[0], Rotation::cur());
            let rhs = meta.query_advice(advice[1], Rotation::cur());
            let out = meta.query_advice(advice[0], Rotation::next());
            let s_mul = meta.query_selector(s_mul);

            // Finally, we return the polynomial expressions that constrain this gate.
            // For our multiplication gate, we only need a single polynomial constraint.
            //
            // The polynomial expressions returned from `create_gate` will be
            // constrained by the proving system to equal zero. Our expression
            // has the following properties:
            // - When s_mul = 0, any value is allowed in lhs, rhs, and out.
            // - When s_mul != 0, this constrains lhs * rhs = out.
            vec![s_mul * (lhs * rhs - out)]
        });

        FieldConfig {
            advice,
            instance,
            s_mul,
            constant,
        }
    }
}
4. 第四步:对chip实现第一步中定义的instruction接口
/// A variable representing a number.
#[derive(Clone)]
struct Number<F: FieldExt> {
    cell: Cell,
    value: Option<F>,
}

impl<F: FieldExt> NumericInstructions<F> for FieldChip<F> {
    type Num = Number<F>;

    fn load_private(
        &self,
        mut layouter: impl Layouter<F>,
        value: Option<F>,
    ) -> Result<Self::Num, Error> {
        let config = self.config();

        let mut num = None;
        layouter.assign_region(
            || "load private",
            |mut region| {
                let cell = region.assign_advice(
                    || "private input",
                    config.advice[0],
                    0,
                    || value.ok_or(Error::SynthesisError),
                )?;
                num = Some(Number { cell, value });
                Ok(())
            },
        )?;
        Ok(num.unwrap())
    }

    fn load_constant(
        &self,
        mut layouter: impl Layouter<F>,
        constant: F,
    ) -> Result<Self::Num, Error> {
        let config = self.config();

        let mut num = None;
        layouter.assign_region(
            || "load constant",
            |mut region| {
                let cell = region.assign_advice_from_constant(
                    || "constant value",
                    config.advice[0],
                    0,
                    constant,
                )?;
                num = Some(Number {
                    cell,
                    value: Some(constant),
                });
                Ok(())
            },
        )?;
        Ok(num.unwrap())
    }

    fn mul(
        &self,
        mut layouter: impl Layouter<F>,
        a: Self::Num,
        b: Self::Num,
    ) -> Result<Self::Num, Error> {
        let config = self.config();

        let mut out = None;
        layouter.assign_region(
            || "mul",
            |mut region: Region<'_, F>| {
                // We only want to use a single multiplication gate in this region,
                // so we enable it at region offset 0; this means it will constrain
                // cells at offsets 0 and 1.
                config.s_mul.enable(&mut region, 0)?;

                // The inputs we've been given could be located anywhere in the circuit,
                // but we can only rely on relative offsets inside this region. So we
                // assign new cells inside the region and constrain them to have the
                // same values as the inputs.
                let lhs = region.assign_advice(
                    || "lhs",
                    config.advice[0],
                    0,
                    || a.value.ok_or(Error::SynthesisError),
                )?;
                let rhs = region.assign_advice(
                    || "rhs",
                    config.advice[1],
                    0,
                    || b.value.ok_or(Error::SynthesisError),
                )?;
                region.constrain_equal(a.cell, lhs)?;
                region.constrain_equal(b.cell, rhs)?;

                // Now we can assign the multiplication result into the output position.
                let value = a.value.and_then(|a| b.value.map(|b| a * b));
                let cell = region.assign_advice(
                    || "lhs * rhs",
                    config.advice[0],
                    1,
                    || value.ok_or(Error::SynthesisError),
                )?;

                // Finally, we return a variable representing the output,
                // to be used in another part of the circuit.
                out = Some(Number { cell, value });
                Ok(())
            },
        )?;

        Ok(out.unwrap())
    }

    fn expose_public(
        &self,
        mut layouter: impl Layouter<F>,
        num: Self::Num,
        row: usize,
    ) -> Result<(), Error> {
        let config = self.config();

        layouter.constrain_instance(num.cell, config.instance, row)
    }
}- 使用实现的chip构建电路
/// The full circuit implementation.
/// In this struct we store the private input variables. We use `Option<F>` because
/// they won't have any value during key generation. During proving, if any of these
/// were `None` we would get an error.
#[derive(Default)]
struct MyCircuit<F: FieldExt> {
    constant: F,
    a: Option<F>,
    b: Option<F>,
}

impl<F: FieldExt> Circuit<F> for MyCircuit<F> {
    // Since we are using a single chip for everything, we can just reuse its config.
    type Config = FieldConfig;
    type FloorPlanner = SimpleFloorPlanner;

    fn without_witnesses(&self) -> Self {
        Self::default()
    }

    fn configure(meta: &mut ConstraintSystem<F>) -> Self::Config {
        // We create the two advice columns that FieldChip uses for I/O.
        let advice = [meta.advice_column(), meta.advice_column()];

        // We also need an instance column to store public inputs.
        let instance = meta.instance_column();

        // Create a fixed column to load constants.
        let constant = meta.fixed_column();

        FieldChip::configure(meta, advice, instance, constant)
    }

    fn synthesize(
        &self,
        config: Self::Config,
        mut layouter: impl Layouter<F>,
    ) -> Result<(), Error> {
        let field_chip = FieldChip::<F>::construct(config);

        // Load our private values into the circuit.
        let a = field_chip.load_private(layouter.namespace(|| "load a"), self.a)?;
        let b = field_chip.load_private(layouter.namespace(|| "load b"), self.b)?;

        // Load the constant factor into the circuit.
        let constant =
            field_chip.load_constant(layouter.namespace(|| "load constant"), self.constant)?;

        // We only have access to plain multiplication.
        // We could implement our circuit as:
        //     asq  = a*a
        //     bsq  = b*b
        //     absq = asq*bsq
        //     c    = constant*asq*bsq
        //
        // but it's more efficient to implement it as:
        //     ab   = a*b
        //     absq = ab^2
        //     c    = constant*absq
        let ab = field_chip.mul(layouter.namespace(|| "a * b"), a, b)?;
        let absq = field_chip.mul(layouter.namespace(|| "ab * ab"), ab.clone(), ab)?;
        let c = field_chip.mul(layouter.namespace(|| "constant * absq"), constant, absq)?;

        // Expose the result as a public input to the circuit.
        field_chip.expose_public(layouter.namespace(|| "expose c"), c, 0)
    }
}
完整代码可从下方”本文参考“中找到!
小结
需要说明的一点,构造的table不一定需要所有单元格都填满数据,可能一些表格是空的(或者默认值),到这里可以总结下halo2与其他实现方案的不同点:
- halo2 电路中每个门的约束范围不一定都是某一行的元素,也可以是不同行列的元素,通过offset/rotation指定不同cell,这一点与其他算术门工程实现由很大不同,也是其灵活度的表现
- halo2中的每个门,多项式约束可以是多个,所以对门的概念理解有所不同,不能根据门的使用数量来作为衡量算法复杂度的唯一因素,还需要结合其他因素整合考虑(i.e. table宽度,degree等)。
- 原生halo2实现并不使用Kate 承若方案,但是需要时候也可以改造支持,目前已经在进行中。
本文参考: the halo2 book: https://zcash.github.io/halo2/concepts/proofs.html
halo2 repo: https://github.com/zcash/halo2
原文链接:https://mp.weixin.qq.com/s/01H6X1iT0kATn8ev-0A7-A 欢迎关注公众号:blocksight
相关阅读:
区块链中的数学--PLookup PLookup
相关plonk系列视频:
区块链中的数学 -- Accumulator(累加器) 累加器与RSA Accumulator
区块链中的数学 - Kate承诺batch opening Kate承诺批量证明
区块链中的数学 - 多项式承诺 多项式知识和承诺
区块链中的数学 - Pedersen密钥共享 Pedersen 密钥分享
区块链中的数学 - Pedersen承诺 密码学承诺--Pedersen承诺
区块链中的数学 - 不经意传输 不经意传输协议
区块链中的数学 - RSA算法加解密过程及原理 RSA加解密算法
区块链中的数学 - BLS门限签名 BLS m of n门限签名
Schorr 签名基础篇 Schnorr签名与椭圆曲线
区块链中的数学-Uniwap自动化做市商核心算法解析 Uniwap核心算法解析(中)
本文参与登链社区写作激励计划 ,好文好收益,欢迎正在阅读的你也加入。
- 发表于 2021-09-06 10:10
- 阅读 ( 594 )
- 学分 ( 4 )
- 分类:入门/理论


缩略图")

评论